# BigID Developer Portal - Full Documentation
> This file contains the complete, concatenated markdown documentation for the BigID Developer Portal. It is specifically formatted for AI agents, LLMs, and RAG systems to easily ingest the entire context.
--------------------------------------------------------------------------------
# 404
import NotFoundSearch from '../../components/NotFoundSearch.tsx';
import NotFoundAnimation from '../../components/NotFoundAnimation.tsx';
--------------------------------------------------------------------------------
# BigID API Overview
import { Card, CardGrid, Aside } from '@astrojs/starlight/components';
BigID was designed as an open platform. Any action that can be performed
in our UI can also be done programmatically. This allows you to connect
anything and everything to the data discovery capabilities of your BigID
system. Whether you are automating a script, integrating a portal, or running a headless engine, the API is here and open for you to use.
## Authentication
Every API request to BigID must be authenticated. Learn how to securely manage sessions and tokens.
[Learn how to authenticate using a standard Username and Password.](/api/bigid-api-user-authentication/)
[Learn how to authenticate using long-lived API tokens.](/api/bigid-api-token-authentication/)
## Tutorials & Workflows
Learn how to use BigID programmatically through a series of step-by-step tutorials covering commonly automated tasks.
[Learn how to create and manage data sources automatically.](/api/bigid-api-add-data-source-tutorial/)
[Configure and execute system scans via API.](/api/scan-profiles-api-tutorial/)
[Trigger and retrieve Data Subject Access Requests.](/api/bigid-api-dsar-tutorial/)
[Export classification and object metadata to external tools.](/api/bigid-api-metadata-export-tutorial/)
[Analyze streaming data from tools like Kafka and Kinesis.](/api/bigid-api-scan-data-in-motion-tutorial/)
[Identify and eliminate redundant files across your ecosystem.](/api/bigid-api-duplicate-data-tutorial/)
--------------------------------------------------------------------------------
# Add Data Source Tutorial
import { TabItem, Tabs, Aside } from '@astrojs/starlight/components';
import ApiExplorer from '../../../components/ApiExplorer.astro';
In this tutorial, we'll use SAMPLE as our session token. This is unique
to the training sandbox and will not work in other environments. See
BigID API/Tutorial for information on
authenticating with BigID.
## Discovering Data Sources
You can see what data source connectors are installed in your
environment through the BigID UI, but since we're focused on the API
(and because all actions in the UI can be performed in the API), we are
going to use the API to retrieve them.
Press Send on the request below to get a listing of the data
source connectors installed on our test BigID system.
You'll see our test system has around 70 different data source
connectors installed. If you don't see a data source you want to use,
you can develop your own or it
might already exist, just not on our system. [See the BigID docs for an
exhaustive list.](https://docs.bigid.com)
## Getting Data Source Parameters
Each type of data source has different parameters needed to connect to
it. These parameters can be as simple as a username and password or as
complex as rate limiting information. BigID uses templates to display
these fields to the user in the UI. We can use those same templates to
determine what we need to supply when adding a data source via the API.
We're going to add a MySQL database. **Use the below request to get the
template for an rdb-mysql data source.**
As you can see in the request above, there's a ton of different options
to customize how we connect to a MySQL database. For our purposes, we're
going to go with just the most basic options as seen below.
```json
{
"name": "rdb-mysql",
...
"fields": [
{
"type": "string",
"name": "name",
"apiName": "name",
"displayName": "Data Source Name",
"placeholder": "Type data source name",
"mandatory": true,
"mandatoryForTest": true,
"validation": [
{
"regex": "^[\\w\\-\\s\\(\\):]+$",
"errorText": "Invalid value. Please use alphanumeric characters, spaces, underscore, dash and parentheses."
}
],
"section": "connection",
"order": 0,
"enabled": true
},
{
"type": "stringSelect",
"name": "enabled",
"apiName": "enabled",
"displayName": "Status",
"defaultValue": "yes",
"options": [
{
"value": "yes",
"label": "Enabled"
},
{
"value": "no",
"label": "Disabled"
}
],
"section": "connection",
"order": 1,
"enabled": true
},
{
"type": "string",
"name": "dbUrl",
"apiName": "rdb_url",
"displayName": "DB URL",
"placeholder": ":",
"tooltipText": "Enter a connection string to the data source.",
"section": "connection",
"mandatoryForTest": true,
"order": 0,
"enabled": true
},
{
"type": "string",
"name": "dBSchemaName",
"apiName": "rdb_name",
"displayName": "DB/Schema Name",
"placeholder": ".",
"tooltipText": "Enter database or schema name. Note: this field may be case sensitive depending on the specific data source.",
"isSeparatorAfter": true,
"mandatoryForTest": false,
"section": "connection",
"order": 1,
"enabled": true
},
{
"type": "string",
"name": "userName",
"apiName": "username",
"displayName": "User Name",
"visibleIf": [
{
"field": "useCredentialOrNamePass",
"value": false
}
],
"enabledIf": [
{
"field": "useCredentialOrNamePass",
"value": false
}
],
"mandatoryForTest": true,
"section": "connection",
"order": 6,
"enabled": true
},
{
"type": "password",
"name": "password",
"displayName": "Password",
"apiName": "password",
"visibleIf": [
{
"field": "useCredentialOrNamePass",
"value": false
}
],
"enabledIf": [
{
"field": "useCredentialOrNamePass",
"value": false
}
],
"mandatoryForTest": true,
"isSeparatorAfter": true,
"nullifyIfNotChanged": true,
"section": "connection",
"order": 7,
"enabled": true
},
{
"type": "string",
"name": "type",
"apiName": "type",
"mandatory": true,
"hidden": true,
"defaultValue": "rdb-mysql",
"section": "connection",
"order": 9,
"enabled": true
}
...
]
}
```
## Testing a data source
In any organization, getting the correct information to access a data
source can be an arduous process. Especially after data source
credentials have gone through multiple levels of your organization to
make it to you. Because of this, we recommend testing any data source
credentials before you enter them into BigID. This will also ensure
BigID has proper network connectivity to the data source. You can do
this with the /ds-connection-test endpoint.
Just be sure you include 'isNewPassword' to the request, otherwise BigID
will attempt to test the existing data source in your system.
## Adding a data source
Now that we know what parameters to pass, let's create our data source.
We just need to send a POST to the /ds_conenctions endpoint with our
parameters. Let's connect to the BigID test data set:
- Type: rdb-mysql
- URL: sql.mybigid.com
- Username: bigid
- Password: bigid111
- rdb_name: rockstream
Every data source in BigID also needs a unique name. For your data
source, you should use the name RANDOMHERE so you don't
conflict with other users.
If we retrieve our data sources, now we should see a new data source
with the information we supplied above. Use CTRL+F (or CMD+F) in your
browser to find the data source you created in the request below.
## Code Samples
```python
# Add Data Source Tutorial
import requests
import json
# Base URL of the BigID API (training sandbox)
base_url = "https://developer.bigid.com/api/v1"
# Session token (replace SAMPLE with actual session token)
headers = {
"Authorization": "Bearer SAMPLE",
"Content-Type": "application/json"
}
# 1. Get list of available data source connectors
url = f"{base_url}/ds-templates"
response = requests.get(url, headers=headers)
print(response.json())
# 2. Get the rdb-mysql template to find required fields
url = f"{base_url}/ds-templates/rdb-mysql"
response = requests.get(url, headers=headers)
print(response.json())
# 3. Test the connection to the example MySQL data source
url = f"{base_url}/ds-connection-test"
payload = {
"ds_connection": {
"username": "bigid",
"password": "bigid111",
"rdb_url": "sql.mybigid.com",
"type": "rdb-mysql",
"enabled": "yes",
"rdb_name": "rockstream"
},
"isNewPassword": True
}
response = requests.post(url, headers=headers, json=payload)
print(response.json())
# 4. Add the example MySQL data source
url = f"{base_url}/ds_connections"
payload = {
"ds_connection": {
"name": "645", # Name for every data source should be unique
"type": "rdb-mysql",
"rdb_url": "sql.mybigid.com",
"username": "bigid",
"password": "bigid111",
"rdb_name": "rockstream"
}
}
response = requests.post(url, headers=headers, json=payload)
print(response.json())
```
```javascript
// Add Data Source tutorial
const BASE_URL = "https://developer.bigid.com/api/v1";
const HEADERS = {
"Authorization": "Bearer SAMPLE", // Replace SAMPLE with a actual session token
"Content-Type": "application/json"
};
// 1. Get list of available data source connectors
async function getDataSourceConnectors() {
const res = await fetch(`${BASE_URL}/ds-templates`, {
method: "GET",
headers: HEADERS
});
const data = await res.json();
console.log("Available connectors:", JSON.stringify(data, null, 2));
}
// 2. Get the rdb-mysql template
async function getMySQLTemplate() {
const res = await fetch(`${BASE_URL}/ds-templates/rdb-mysql`, {
method: "GET",
headers: HEADERS
});
const data = await res.json();
console.log("MySQL template:", JSON.stringify(data, null, 2));
}
// 3. Test the connection
async function testConnection() {
const body = {
ds_connection: {
username: "bigid",
password: "bigid111",
rdb_url: "sql.mybigid.com",
type: "rdb-mysql",
enabled: "yes",
rdb_name: "rockstream"
},
isNewPassword: true
};
const res = await fetch(`${BASE_URL}/ds-connection-test`, {
method: "POST",
headers: HEADERS,
body: JSON.stringify(body)
});
const data = await res.json();
console.log("Connection test result:", JSON.stringify(data, null, 2));
}
// 4. Add the data source
async function addMySQLDataSource() {
const body = {
ds_connection: {
name: "645",
type: "rdb-mysql",
rdb_url: "sql.mybigid.com",
username: "bigid",
password: "bigid111",
rdb_name: "rockstream"
}
};
const res = await fetch(`${BASE_URL}/ds_connections`, {
method: "POST",
headers: HEADERS,
body: JSON.stringify(body)
});
const data = await res.json();
console.log("Add data source response:", JSON.stringify(data, null, 2));
}
async function main() {
await getTemplates();
await getMySQLTemplate();
await testConnection();
await addDataSource();
}
main().catch(err => {
console.error("Error in tutorial flow:", err);
});
```
--------------------------------------------------------------------------------
# API Best Practices
The BigID API has hundreds of endpoints and even more data points. To
best utilize the API, keep the following best practices in mind:
## Start with the data you need
When developing an integration, first write down what data you need.
There's a lot of data inside of our API and it's easiest to search for
something when you know what you're looking for. Once you have your list
of what you need for your integration, search the [BigID
Docs](https://docs.bigid.com) for an API that provides that data.
## Every API has a reference example, the UI
The API powers our UI as well as your integrations. That means anything
you can see within the UI is accessible to you programmatically. If
you're struggling to find a piece of information in the API
documentation, find it in the user interface. The network activity of
that page will give you the API endpoint you're looking for. See how to
examine network activity
[here](https://developer.chrome.com/docs/devtools/network/).
## Copy, don't modify
If your integration is going to modify data it didn't create, copy
records instead of modifying them. Modifying data sources and other
sensitive objects could cause important processes like Subject Access
Requests to return the wrong data. Copy these resources then apply your
modifications to the copy. That way you aren't causing ripple effects in
the system.
## Ask before performing intensive operations
Some operations like scans are intensive. You should ask the user before
performing these tasks because they may cause significant database load
on an organization's operational systems. Ideally, confirm with the user
prior to performing any task that puts load on an external data source
(scans, SARs, previews).
--------------------------------------------------------------------------------
# Execute DSARs Tutorial
import { TabItem, Tabs, Aside } from '@astrojs/starlight/components';
import ApiExplorer from '../../../components/ApiExplorer.astro';
In this tutorial, we'll use SAMPLE as our session token. This is unique
to the training sandbox and will not work in other environments. See
BigID API/Tutorial for information on
authenticating with BigID.
## Getting DSAR Profiles
BigID uses DSAR profiles to specify what data sources we should use to
look for user data. You can create these using the APIs, but creating
them via the UI is preferred since the UI will provide suggestions as
you work. In our case, we already have a few profiles within our system
so we can use an already created profile.
From this API call we can see a list of DSAR profiles. This also gives
us insight into why organizations use DASR profiles. Different groups of
systems can have users with the same unique ID (employee number 1 and
customer number 1 are probably different people). Profiles allow us to
segment those user groups. Below we see a different profile for US
customers to illustrate that.
```json
{
"profiles": [
{
"_id": "5d93e8431810782ce9173ae0",
"name": "Default Profile",
"allEnabledEs": true,
"allEnabledDs": true,
"scopes": [
"root"
],
"isCustom": false
},
{
"_id": "614d7794dfa3fdf8bd71cacb",
"allEnabledDs": true,
"allEnabledEs": false,
"name": "ALL PI for US Customer",
"scopes": [
"root"
],
"shouldAttributesEnrichment": true,
"isCustom": true
}
]
}
```
In our case, we know a user with the email alex.bulis@gmail.com is
present in the default profile. However, we need to figure out what
attributes we can use to execute a DSAR with this profile so we get the
names correct.
We can see that there's an idsor_attribute named Email that has an
identifiability of 1. This means that 100% of the sampled users have a
different Email which is perfect for our DSAR. Let's initiate a DSAR on
this user using that Email attribute.
## Initiating a DSAR
Because the amount of data scanned as part of a DSAR can be well into
the petabytes, the DSAR API is asynchronous. The below request will
start a DSAR and return immediately with an ID you can use to track its
progress. Execute the below request to start your DSAR.
## Checking DSAR Status
Let's check the status of your DSAR. Replace REQUESTID in the URL of the
below request with the requestId you received above when you initiated
the DSAR.
When checking the status, we can see the state of our DSAR overall as
well as each individual data source. The sample below has 17/18 data
sources in the scan completed so the overall state is still "Started".
**Rerun the above request until you have a state of "Complete".**
```json
{
"status": "success",
"statusCode": 200,
"data": {
"requestId": "61784c9b1a1d3e0ea3b21a53",
"userId": "DSAR",
"state": "Started",
"statuses": {
"Completed": 17,
"Queued": 1,
"InProgress": 1
}
...
},
"message": null
}
```
## Retrieving DSAR Results
After your DSAR has completed, there's a variety of ways we can get and
display the results. For a full view of the options, visit [the BigID
Docs](https://www.docs.bigid.com/bigid/reference/reports-2#get_api-v1-sar-reports-requestid).
Some common reports are:
- Full report - Includes internal information like what data source
information was found in and column names. Can be JSON or CSV.
- Short Report - Includes attribute names and values. Respects profile
settings for hiding columns. Useful for returning to consumers. Can be
in JSON, CSV, or a PDF.
- Personal Info report - PDF report with information, consent records,
purposes of processing, and data source information. Formatted as a
PDF. Useful as a pretty report for consumers and is an expanded
version of the short report.
Since we want to automate what we would return to consumers, we're going
to retrieve the short report in JSON. You can also replace json in the
URL with csv to change the format. **Replace REQUESTID with the
requestId of your DSAR that can be found above.**
Now that we know the required APIs to perform a DSAR we can add this
into our account portal and give users self service access to their
data.
## Code Samples
```python
# DSAR Tutorial
import requests
import json
# Base URL of the BigID API
base_url = "https://developer.bigid.com/api/v1"
# Session token (replace SAMPLE with actual session token)
headers = {
"Authorization": "Bearer SAMPLE",
"Content-Type": "application/json"
}
# 1. Getting DSAR Profiles
url = f"{base_url}/sar/profiles"
response = requests.get(url, headers=headers)
profiles = response.json()
print(json.dumps(profiles, indent=2))
# Get available attributes for the selected profile, assuming we are using the Default Profile
default_profile_id = profiles['profiles'][0]['_id']
url = f"{base_url}/sar/attributes?profileId={default_profile_id}"
response = requests.get(url, headers=headers)
attributes = response.json()
print(json.dumps(attributes, indent=2))
# 2. Initiating a DSAR
url = f"{base_url}/sar/reports"
payload = {
"userDetails": {
"attributes": {
"Email": "alex.bulis@gmail.com"
},
"userId": "DSAR",
"displayName": "DSAR"
},
"profileId": default_profile_id
}
response = requests.post(url, headers=headers, json=payload)
init_result = response.json()
print(json.dumps(init_result, indent=2))
# Get request_id which will be used to check DSAR status
request_id = init_result.get("requestId") or init_result.get("data", {}).get("requestId")
# 3. Checking DSAR Status
url = f"{base_url}/sar/reports/{request_id}/status"
response = requests.get(url, headers=headers)
status_result = response.json()
print(json.dumps(status_result, indent=2))
# 4. Retrieving DSAR Results
url = f"{base_url}/sar/reports/{request_id}/short-report?format=json" # Retrieving a short report. See docs for other report options
response = requests.get(url, headers=headers)
report = response.json()
print(json.dumps(report, indent=2))
```
```javascript
// DSAR Tutorial
const baseUrl = "https://developer.bigid.com/api/v1"; // Base URL of the BigID API
const headers = {
"Authorization": "Bearer SAMPLE", // Replace SAMPLE with a actual session token
"Content-Type": "application/json"
};
// 1. Get DSAR Profiles
async function getDsarProfiles() {
const response = await fetch(`${baseUrl}/sar/profiles`, {
method: "GET",
headers
});
const data = await response.json();
console.log("Available DSAR Profiles:", JSON.stringify(data, null, 2));
return data;
}
// Get available attributes for the selected profile, assuming we are using the Default Profile
async function getDefaultProfileId(profiles) {
for (const profile of profiles.profiles || []) {
if (profile.name === "Default Profile") {
return profile._id;
}
}
throw new Error("Default Profile not found");
}
async function getDsarAttributes(profileId) {
console.log("Getting DSAR Attributes for the profile...");
const res = await fetch(`${baseUrl}/sar/attributes?profileId=${profileId}`, { headers });
const attributes = await res.json();
console.log(JSON.stringify(attributes, null, 2));
return attributes;
}
// 2. Initiate a DSAR
async function initiateDsar(profileId) {
const payload = {
userDetails: {
attributes: {
Email: "alex.bulis@gmail.com"
},
userId: "DSAR",
displayName: "DSAR"
},
profileId
};
const response = await fetch(`${baseUrl}/sar/reports`, {
method: "POST",
headers,
body: JSON.stringify(payload)
});
const data = await response.json();
console.log("DSAR Initiated:", JSON.stringify(data, null, 2));
return data.data.requestId;
}
// 3. Checking DSAR Status
async function checkDsarStatus(requestId) {
const response = await fetch(`${baseUrl}/sar/reports/${requestId}/status`, {
method: "GET",
headers
});
const data = await response.json();
console.log("DSAR Status:", JSON.stringify(data, null, 2));
return data;
}
// 4. Retrieving DSAR Results
async function getDsarShortReport(requestId) {
const response = await fetch(`${baseUrl}/sar/reports/${requestId}/short-report?format=json`, {
method: "GET",
headers
});
const data = await response.json();
console.log("DSAR Short Report:", JSON.stringify(data, null, 2));
return data;
}
```
--------------------------------------------------------------------------------
# Find Duplicate Data Tutorial
import { TabItem, Tabs, Aside } from '@astrojs/starlight/components';
import ApiExplorer from '../../../components/ApiExplorer.astro';
This means that both structured and unstructured data sources can have
multiple objects within them. In a production BigID system there can be
millions of objects so we need to filter.
## Using Duplicate Filters
Let's use the has_duplicates filter to request objects that contain
duplicate files. Because any number of objects in your estate could carry
duplicates, this sweep runs against the streaming endpoint.
The stream returns a flat JSON array rather than a `results` wrapper, and it
returns far fewer objects than an unfiltered sweep of the catalog. But what are
the duplicates? Each duplicate object has a duplicate_id that represents a
hash of the file. We can filter objects by this ID to find all the
duplicates. Since one hash only ever matches a small number of files, that
lookup is bounded, so the paginated `/data-catalog` endpoint is a good fit.
**Replace DUPLICATEID in the URL of the request below with
the duplicate_id of the first object above to find its duplicates.**
Now you have a list of the files that are duplicated, you can delete
some of your unneeded copies to save on data storage costs.
## Code Samples
```python
# Duplicate Data Tutorial
import requests
import json
base_url = "https://developer.bigid.com/api/v1"
headers = {
"Authorization": "Bearer SAMPLE",
"Content-Type": "application/json"
}
# The cursor is derived from the sort field, so it must not change between pages.
CATALOG_SORT = '[{"field":"fullyQualifiedName","order":"asc"}]'
def stream_catalog_objects(page_size=1000, filter_expr=None):
"""Yield catalog objects via the streaming endpoint, following the cursor."""
url = f"{base_url}/data-catalog/objects/stream"
params = {
"limit": page_size,
"sort": CATALOG_SORT,
"offsetKey": "", # empty string starts at the beginning
}
if filter_expr:
params["filter"] = filter_expr
while True:
res = requests.get(url, headers=headers, params=params, timeout=300)
res.raise_for_status()
page = res.json() # a flat JSON array, not an object
if not page:
return
yield from page
if len(page) < page_size:
return # short page means we reached the end
# The cursor for the next page lives on the last object returned.
next_offset_key = page[-1].get("nextOffsetKey")
if not next_offset_key:
return
params["offsetKey"] = next_offset_key
# 1. Walk every catalog object
total = sum(1 for _ in stream_catalog_objects())
print("Total objects in catalog:", total)
# 2. Stream only the objects that have duplicates
duplicates = list(stream_catalog_objects(filter_expr='has_duplicates="true"'))
print("Objects with duplicates:", len(duplicates))
# Get the duplicate_id of the first object (for example)
duplicate_id = duplicates[0].get("duplicate_id")
# 3. Get all objects that share the same duplicate_id.
# This is a small, bounded lookup, so the paginated endpoint is a good fit.
response = requests.get(
f"{base_url}/data-catalog",
headers=headers,
params={"filter": f'duplicate_id="{duplicate_id}"'}
)
data = response.json()
print("Objects with same duplicate_id:", json.dumps(data, indent=2))
```
```javascript
// Duplicate Data Tutorial
const baseUrl = "https://developer.bigid.com/api/v1";
const headers = {
"Authorization": "Bearer SAMPLE",
"Content-Type": "application/json"
};
// The cursor is derived from the sort field, so it must not change between pages.
const CATALOG_SORT = '[{"field":"fullyQualifiedName","order":"asc"}]';
// Yield catalog objects via the streaming endpoint, following the cursor.
async function* streamCatalogObjects({ pageSize = 1000, filter } = {}) {
let offsetKey = ""; // empty string starts at the beginning
while (true) {
const params = new URLSearchParams({
limit: String(pageSize),
sort: CATALOG_SORT,
offsetKey,
});
if (filter) params.set("filter", filter);
const res = await fetch(`${baseUrl}/data-catalog/objects/stream?${params}`, { headers });
if (!res.ok) throw new Error(`Catalog stream failed: ${res.status} ${res.statusText}`);
const page = await res.json(); // a flat JSON array, not an object
if (page.length === 0) return;
yield* page;
if (page.length < pageSize) return; // short page means we reached the end
// The cursor for the next page lives on the last object returned.
const { nextOffsetKey } = page[page.length - 1];
if (!nextOffsetKey) return;
offsetKey = nextOffsetKey;
}
}
// 1. Walk every catalog object
async function countAllCatalogObjects() {
let total = 0;
for await (const _ of streamCatalogObjects()) total++;
console.log("Total objects in catalog:", total);
return total;
}
// 2. Stream only the objects that have duplicates
async function getObjectsWithDuplicates() {
const duplicates = [];
for await (const obj of streamCatalogObjects({ filter: 'has_duplicates="true"' })) {
duplicates.push(obj);
}
console.log("Objects with duplicates:", duplicates.length);
return duplicates;
}
// 3. Get all objects that share the same duplicate_id.
// This is a small, bounded lookup, so the paginated endpoint is a good fit.
async function getObjectsByDuplicateId(duplicateId) { // Use duplicate id of desired object obtained above in step 2
console.log(`Fetching objects for duplicate_id: ${duplicateId}`);
const params = new URLSearchParams({ filter: `duplicate_id="${duplicateId}"` });
const res = await fetch(`${baseUrl}/data-catalog?${params}`, { headers });
const data = await res.json();
console.log("Objects with same duplicate_id:", JSON.stringify(data, null, 2));
return data;
}
// Run all 3 steps
(async () => {
await countAllCatalogObjects();
const duplicates = await getObjectsWithDuplicates();
if (duplicates.length > 0) {
await getObjectsByDuplicateId(duplicates[0].duplicate_id);
}
})();
```
--------------------------------------------------------------------------------
# Export Metadata Tutorial
import { TabItem, Tabs, Aside } from '@astrojs/starlight/components';
import ApiExplorer from '../../../components/ApiExplorer.astro';
## Listing Every Object in the Catalog
Because you are synchronizing the *whole* catalog, start with
`/data-catalog/objects/stream`. This endpoint streams a flat JSON array of
catalog objects and pages with a cursor, so it can walk a catalog of any size.
To page through the stream:
1. Send the first request with `offsetKey=` (an empty string) to start at the beginning.
2. Read `nextOffsetKey` from the **last object** in the returned array.
3. Pass that value as `offsetKey` on the next request.
4. Stop when the array is empty or holds fewer objects than your `limit`.
The `sort` field must be identical on every request, because the cursor is
derived from that field's value.
## Drilling Into a Single Object
For unstructured data, we discover information directly about and inside
the files. For example, we can see that there are phone numbers within a
file, or that a file matches a machine learning model for an invoice.
For structured data we discover data about the data inside of the
columns as well as the columns themselves. For example we would know
that a database *Users* has a column named State and that column
contains values of the type US State Abbreviation. This means that if we
want information about specific columns we will need to perform an extra
API request. The below API request shows how to retrieve the information
about a specific table. The column parameter follows the format of Data
Source Name.schema name.table name.
For unstructured data sources, you can use the information returned from
the catalog stream or use the attributes call to get more
detailed information like below:
By using these three API calls you can find out information about any
element being scanned by your BigID system.
## Code Samples
```python
# Metadata Export Tutorial
import requests
import json
base_url = "https://developer.bigid.com/api/v1"
headers = {
"Authorization": "Bearer SAMPLE",
"Content-Type": "application/json"
}
# The cursor is derived from the sort field, so it must not change between pages.
CATALOG_SORT = '[{"field":"fullyQualifiedName","order":"asc"}]'
# 1. Stream every object in the catalog, one page at a time
def stream_catalog_objects(page_size=1000, filter_expr=None):
"""Yield every catalog object using cursor-based pagination."""
url = f"{base_url}/data-catalog/objects/stream"
params = {
"limit": page_size,
"sort": CATALOG_SORT,
"offsetKey": "", # empty string starts at the beginning
}
if filter_expr:
params["filter"] = filter_expr
while True:
res = requests.get(url, headers=headers, params=params, timeout=300)
res.raise_for_status()
page = res.json() # a flat JSON array, not an object
if not page:
return
yield from page
if len(page) < page_size:
return # short page means we reached the end
# The cursor for the next page lives on the last object returned.
next_offset_key = page[-1].get("nextOffsetKey")
if not next_offset_key:
return
params["offsetKey"] = next_offset_key
count = 0
for obj in stream_catalog_objects():
count += 1
print(obj["fullyQualifiedName"])
print(f"Exported {count} catalog objects")
# 2. Retrieve information about a specific table
url = f"{base_url}/data-catalog/object-details/columns?object_name=DataSourceName.schemaName.tableName" # Replace "DataSourceName.schemaName.tableName with desired table information"
res = requests.get(url, headers=headers)
data = res.json()
print(json.dumps(data, indent=2))
# 3. Retrieve information about unstructured data source
url = f"{base_url}/data-catalog/object-details/attributes?object_name=Sales%20Drive.devops%40bigiddemo.com%2FEducation%2FProspects4-Restricted.docx" # Example using attribute object_name to fetch detailed information
res = requests.get(url, headers=headers)
data = res.json()
print(json.dumps(data, indent=2))
```
```javascript
// Metadata Export Tutorial
const baseUrl = "https://developer.bigid.com/api/v1";
const headers = {
"Authorization": "Bearer SAMPLE", // Replace with your token
"Content-Type": "application/json"
};
// The cursor is derived from the sort field, so it must not change between pages.
const CATALOG_SORT = '[{"field":"fullyQualifiedName","order":"asc"}]';
// 1. Stream every object in the catalog, one page at a time
async function* streamCatalogObjects({ pageSize = 1000, filter } = {}) {
let offsetKey = ""; // empty string starts at the beginning
while (true) {
const params = new URLSearchParams({
limit: String(pageSize),
sort: CATALOG_SORT,
offsetKey,
});
if (filter) params.set("filter", filter);
const res = await fetch(`${baseUrl}/data-catalog/objects/stream?${params}`, { headers });
if (!res.ok) throw new Error(`Catalog stream failed: ${res.status} ${res.statusText}`);
const page = await res.json(); // a flat JSON array, not an object
if (page.length === 0) return;
yield* page;
if (page.length < pageSize) return; // short page means we reached the end
// The cursor for the next page lives on the last object returned.
const { nextOffsetKey } = page[page.length - 1];
if (!nextOffsetKey) return;
offsetKey = nextOffsetKey;
}
}
async function exportAllCatalogObjects() {
let count = 0;
for await (const obj of streamCatalogObjects()) {
count++;
console.log(obj.fullyQualifiedName);
}
console.log(`Exported ${count} catalog objects`);
return count;
}
// 2. Retrieve information about a specific structured table
async function getTableMetadata() {
const tableFQN = "DataSourceName.schemaName.tableName"; // Replace this with your actual table name
const url = `${baseUrl}/data-catalog/object-details/columns?object_name=${encodeURIComponent(tableFQN)}`;
console.log(`Fetching metadata for table: ${tableFQN}`);
const res = await fetch(url, { headers });
const data = await res.json();
console.log("Structured Table Metadata:\n", JSON.stringify(data, null, 2));
return data;
}
// 3. Retrieve info about an unstructured object
async function getUnstructuredAttributes() {
const objectFQN = "Sales Drive.devops@bigiddemo.com/Education/Prospects4-Restricted.docx"; // Replace as needed
const url = `${baseUrl}/data-catalog/object-details/attributes?object_name=${encodeURIComponent(objectFQN)}`;
console.log(`Fetching metadata for unstructured object: ${objectFQN}`);
const res = await fetch(url, { headers });
const data = await res.json();
console.log("Unstructured Object Metadata:\n", JSON.stringify(data, null, 2));
return data;
}
// Run all 3 steps
(async () => {
await exportAllCatalogObjects();
await getTableMetadata();
await getUnstructuredAttributes();
})();
```
--------------------------------------------------------------------------------
# Scan Data in Motion Tutorial
import { Aside, Tabs, TabItem } from '@astrojs/starlight/components';
import ApiExplorer from '../../../components/ApiExplorer.astro';
Many organizations are receiving and processing data in real time. Where
there's data, there's bound to be personal information. In this
tutorial, we'll add an AWS Kinesis data source that BigID will scan in
real time.
Unlike traditional BigID scans that run weekly, monthly or quarterly,
data in motion scans run continuously. This means that under scan
details you'll see your data in motion scan at 0% with a status of "in
progress" while you're monitoring a data in motion data source.
First, we should check if data in motion is enabled in your environment.
## Discovering Data Source Options
You can see what data source connectors are installed in your
environment through the BigID UI, but since we're focused on the API
(and because all actions in the UI can be performed in the API), we are
going to use the API to retrieve them.
Press Send on the request below to get a listing of the data
source connectors installed on our test BigID system.
You'll see our test system has around 70 different data source
connectors installed. Use CTRL+F (CMD+F on Mac OS) to search for the
Kinesis connector.
import SandboxAction from "../../../components/SandboxAction";
## Adding the Data in Motion data source
Now that we know the Kinesis data source connector is enabled, lets add
our data source. Remember the three steps of adding a datasource:
- Populate the data source parameters.
- Test the data source connection.
- Save the data source.
### Populating Data Source Parameters
Kinesis data sources look like the following JSON object:
{
` "owners": [`
` ""`
` ],`
` "differential": false,`
` "rdb_is_sample_data": false,`
` "aws_key_id": "",`
` "aws_key_secret": "",`
` "isIamRoleAuth": true,`
` "region": "us-east-1",`
` "stream_name": "STREAMNAME",`
` "name": "Kinesis",`
` "type": "kinesis",`
` "security_tier": "1",`
` "ocr_languages": "eng",`
` "scanner_strategy": "SCAN_ALL",`
` "enabled": "yes",`
` "keyDeserializer": "String",`
` "valueDeserializer": "String"`
}
Notice how you have the option to either use an IAM role or an access
key and secret to connect to the data source. In our case we'll use an
IAM Role already applied to the sandbox that gives us access to a
Kinesis stream called "StockTradeStream".
Our parameters should look like the following:
` "owners": [`
` ""`
` ],`
` "differential": false,`
` "rdb_is_sample_data": false,`
` "aws_key_id": "",`
` "aws_key_secret": "",`
` "isIamRoleAuth": true,`
` "region": "us-east-1",`
` "stream_name": "StockTradeStream",`
` "name": "Kinesis",`
` "type": "kinesis",`
` "security_tier": "1",`
` "ocr_languages": "eng",`
` "scanner_strategy": "SCAN_ALL",`
` "enabled": "yes",`
` "keyDeserializer": "String",`
` "valueDeserializer": "String"`
}
### Test the data source connection
Let's make sure our BigID installation has the proper permissions and
network capabilities to access our data source by performing a test
connection. We can do this by sending our parameters to the
/ds-connection-test endpoint.
### Save the data source connection
Now that we know what parameters to pass, let's create our data source.
We just need to send a POST to the /ds_conenctions endpoint with our
parameters.
Every data source in BigID also needs a unique name. For your data
source, use RANDOMHERE as the name so you don't conflict
with other users.
If we retrieve our data sources, now we should see a new data source
with the information we supplied above. Use CTRL+F (or CMD+F) in your
browser to find the data source you created.
## Scanning a Data in Motion Data Source
### Creating a Scan Profile
Scans within BigID rely on scan profiles to know what data sources to
scan, when to scan them, and what classifiers to apply. To scan our new
data source we need to add a scan profile that targets it. The object
for a scan profile looks like the following:
```json
{
"scanType": "dataInMotion",
"allEnabledIdSor": true,
"allEnabledDs": false,
"skipIdScan": true,
"isClassificationsAsPiiFindings": false,
"labelFramework": {
"id": "mip",
"name": "Labels"
},
"dataSourceList": [
"DSNAME"
],
"name": "PROFILENAME",
"owners": [],
"isCustomScanProfile": true
}
```
Let's create one below. Be sure to use RANDOMHERE as your
profile and data source name.
### Starting a Scan
Now that we have our profile, we need to start our scan. Remember that
this scan will not complete. Data in motion scans run continuously to
scan data as it comes in. The request to start a scan won't have a
request body, but if we request a list of our scans we can see it.
## Code Sample
```python
import requests
BASE_URL = "https://sandbox.bigid.tools/api/v1"
TOKEN = "YOUR_SESSION_TOKEN"
headers = {"Authorization": TOKEN}
response = requests.get(f"{BASE_URL}/ds-connections-types", headers=headers)
connectors = response.json()["data"]["ds_connections_types"]
kinesis_available = any(c["type"] == "kinesis" for c in connectors)
if not kinesis_available:
print("Kinesis connector not enabled. Enable DIM_ENABLED flag first.")
exit(1)
test_payload = {
"ds_connection": {
"isIamRoleAuth": True,
"region": "us-east-1",
"stream_name": "StockTradeStream",
"type": "kinesis",
"scanner_strategy": "SCAN_ALL",
"keyDeserializer": "String",
"valueDeserializer": "String"
},
"isNewPassword": True
}
response = requests.post(
f"{BASE_URL}/ds-connection-test",
headers=headers,
json=test_payload
)
if response.status_code != 200:
print(f"Connection test failed: {response.text}")
exit(1)
print("Connection test successful!")
ds_name = "MyKinesisDataSource"
ds_payload = {
"ds_connection": {
"name": ds_name,
"isIamRoleAuth": True,
"region": "us-east-1",
"stream_name": "StockTradeStream",
"type": "kinesis",
"scanner_strategy": "SCAN_ALL",
"keyDeserializer": "String",
"valueDeserializer": "String"
}
}
response = requests.post(
f"{BASE_URL}/ds_connections",
headers=headers,
json=ds_payload
)
ds_id = response.json()["data"]["ds_connection"]["_id"]
print(f"Created data source with ID: {ds_id}")
profile_name = "MyKinesisScanProfile"
scan_profile_payload = {
"scanType": "dataInMotion",
"allEnabledIdSor": True,
"allEnabledDs": False,
"skipIdScan": True,
"isClassificationsAsPiiFindings": False,
"labelFramework": {"id": "mip", "name": "Labels"},
"dataSourceList": [ds_name],
"name": profile_name,
"owners": [],
"isCustomScanProfile": True
}
response = requests.post(
f"{BASE_URL}/scanProfiles",
headers=headers,
json=scan_profile_payload
)
print(f"Created scan profile: {profile_name}")
scan_payload = {
"scanType": "dataInMotion",
"scanProfileName": profile_name,
"scanOrigin": "Invoked manually via API"
}
response = requests.post(
f"{BASE_URL}/scans",
headers=headers,
json=scan_payload
)
print("Scan started! Data in motion scans run continuously.")
```
```js
const BASE_URL = "https://sandbox.bigid.tools/api/v1";
const TOKEN = "YOUR_SESSION_TOKEN";
const connectorsResponse = await fetch(`${BASE_URL}/ds-connections-types`, {
headers: { Authorization: TOKEN }
});
const connectorsData = await connectorsResponse.json();
const kinesisAvailable = connectorsData.data.ds_connections_types.some(
c => c.type === "kinesis"
);
if (!kinesisAvailable) {
console.log("Kinesis connector not enabled. Enable DIM_ENABLED flag first.");
process.exit(1);
}
const testPayload = {
ds_connection: {
isIamRoleAuth: true,
region: "us-east-1",
stream_name: "StockTradeStream",
type: "kinesis",
scanner_strategy: "SCAN_ALL",
keyDeserializer: "String",
valueDeserializer: "String"
},
isNewPassword: true
};
const testResponse = await fetch(`${BASE_URL}/ds-connection-test`, {
method: "POST",
headers: { Authorization: TOKEN, "Content-Type": "application/json" },
body: JSON.stringify(testPayload)
});
if (!testResponse.ok) {
console.log("Connection test failed");
process.exit(1);
}
console.log("Connection test successful!");
const dsName = "MyKinesisDataSource";
const dsPayload = {
ds_connection: {
name: dsName,
isIamRoleAuth: true,
region: "us-east-1",
stream_name: "StockTradeStream",
type: "kinesis",
scanner_strategy: "SCAN_ALL",
keyDeserializer: "String",
valueDeserializer: "String"
}
};
const dsResponse = await fetch(`${BASE_URL}/ds_connections`, {
method: "POST",
headers: { Authorization: TOKEN, "Content-Type": "application/json" },
body: JSON.stringify(dsPayload)
});
const dsData = await dsResponse.json();
console.log(`Created data source with ID: ${dsData.data.ds_connection._id}`);
const profileName = "MyKinesisScanProfile";
const scanProfilePayload = {
scanType: "dataInMotion",
allEnabledIdSor: true,
allEnabledDs: false,
skipIdScan: true,
isClassificationsAsPiiFindings: false,
labelFramework: { id: "mip", name: "Labels" },
dataSourceList: [dsName],
name: profileName,
owners: [],
isCustomScanProfile: true
};
await fetch(`${BASE_URL}/scanProfiles`, {
method: "POST",
headers: { Authorization: TOKEN, "Content-Type": "application/json" },
body: JSON.stringify(scanProfilePayload)
});
console.log(`Created scan profile: ${profileName}`);
const scanPayload = {
scanType: "dataInMotion",
scanProfileName: profileName,
scanOrigin: "Invoked manually via API"
};
await fetch(`${BASE_URL}/scans`, {
method: "POST",
headers: { Authorization: TOKEN, "Content-Type": "application/json" },
body: JSON.stringify(scanPayload)
});
console.log("Scan started! Data in motion scans run continuously.");
```
--------------------------------------------------------------------------------
# Token Authentication
import { Aside } from '@astrojs/starlight/components';
import ApiExplorer from '../../../components/ApiExplorer.astro';
In this tutorial we're going to authenticate with BigID using a user
token to retrieve a list of data sources.
First we'll need to create a user token for us to use through the BigID
UI.
### Generate a Token
To do this we need to navigate to the Access Management screen under
Administration -\> Access Management. On the Access Management screen,
select the user you want to create a token for from the System Users
List. Then press the Generate button to start the token
creation process.
Tokens can only be valid for up to 999 days. Since we're just using this
token for testing, let's set it to 30 days and then click
Generate like in the screenshot below.
On the next screen you'll see a name for the token as well as the token
value. Copy the token value by clicking the icon to the right of it then
close the dialog. You can't see the token value again so be sure you
have saved it someplace safe.
Finally, save the user so the token can take effect.
import SandboxAction from "../../../components/SandboxAction";
### Exchange a token for an session token
Now that we have a user token, we need to exchange it for a system token
that we can use to access API endpoints. This uses the
/api/v1/refresh-access-token endpoint like below. Replace the TOKEN HERE
in the request headers with your previously obtained user token and
click Send to get a session token.
In response to this request you'll get the following:
```json
{
"success": true,
"systemToken": "eyJhbGciOi..."
}
```
This session token can then get used on any BigID API.
### Calling an API
Now that you have a session token we can directly call BigID APIs.
Documentation for these APIs is available at
[https://www.docs.bigid.com/bigid/reference/api-getting-started](https://www.docs.bigid.com/bigid/reference/api-getting-started) . Since
we're just trying to perform a simple task, we don't need the docs here,
just to know that GET /ds-connections is the endpoint to retrieve a list
of data source connections.
Add a new header named "Authorization" and paste the session token you
got in the previous request to authenticate yourself.
In that API call, we can see a list of data sources and all the
information for each data source.
```json
{
"status": "success",
"statusCode": 200,
"data": {
"ds_connections": [
""
]
}
}
```
--------------------------------------------------------------------------------
# User Authentication
import { TabItem, Tabs } from '@astrojs/starlight/components';
import ApiExplorer from '../../../components/ApiExplorer.astro';
In this tutorial, we're going to authenticate with BigID using
Username/Password auth and retrieve a list of data sources.
### Getting a session token
Below you'll see the POST request we'll use to authenticate. The body of
the request contains our username and password and we're directing the
request to the sessions endpoint in our BigID Sandbox system. Press
Send to get a session token.
In the response, there's a bunch of information about the logged in
user. For our purposes, we just care about line 4, the auth_token. This
token is what we'll use the authenticate with the other BigID APIs.
We've placed a sample below with the auth token highlighted. **Copy the
auth token from the request you placed above. We'll need it in just a
second.**
```json
{
"success": true,
"message": "Enjoy your token!",
"auth_token": "eyJhbGciOiJ...",
"username": "bigid",
"firstName": "BigID Admin",
"permissions": [
"admin",
"permission.tasks.edit",
"permission.tasks.read_task_list",
...
```
### Calling an API
Now that you have a session token we can directly call BigID APIs.
Documentation for these APIs is available at
[https://www.docs.bigid.com/bigid/reference/api-getting-started](https://www.docs.bigid.com/bigid/reference/api-getting-started) . Since
we're just trying to perform a simple task, we don't need the docs here,
just to know that GET /ds-connections is the endpoint to retrieve a list
of data source connections.
Add a new header named "Authorization" and paste the session token you
got in the previous request to authenticate yourself.
In that API call, we can see a list of data sources and all the
information for each data source.
```json
{
"status": "success",
"statusCode": 200,
"data": {
"ds_connections": [
""
]
}
}
```
We now know the API calls we need and can use our programming language of choice to prepare our report. Below are some samples.
```python
import requests
credentials = {'username': 'bigid', 'password': 'learner'}
env = 'https://sandbox.bigid.tools/'
def getDataSources(credentials, env):
sessionRequest = requests.post(env + 'api/v1/sessions', json=credentials)
sessionData = sessionRequest.json()
dsRequest = requests.get(env + 'api/v1/ds-connections', headers={'Authorization': sessionData.get('auth_token')})
return dsRequest.json()
```
```javascript
const credentials = { username: "bigid", password: "learner" };
const env = "https://sandbox.bigid.tools/";
async function getDataSources(credentials, env) {
// Request API Key using user/pass authentication
const sessionResponse = await fetch(env + 'api/v1/sessions', {
method: 'POST',
body: JSON.stringify(credentials),
headers: { 'Content-Type': 'application/json' }
});
const sessionData = await sessionResponse.json();
const dsResponse = await fetch(env + 'api/v1/ds-connections', {
method: 'GET',
headers: {
'Content-Type': 'application/json',
'Authorization': sessionData.auth_token
}
});
return await dsResponse.json();
}
```
--------------------------------------------------------------------------------
# Cluster Analysis Tutorial
import { TabItem, Tabs, Aside } from '@astrojs/starlight/components';
import ApiExplorer from '../../../components/ApiExplorer.astro';
In this tutorial, we'll use SAMPLE as our session token. This is unique
to the training sandbox and will not work in other environments. See
BigID API/Tutorial for information on
authenticating with BigID.
To view the **complete code** for all steps, see the section labelled
Code Samples.''
For more information on the API capabilities used in this tutorial,
check out the [**Data Catalog API
Docs**](https://api.bigid.com/doc/data-catalog/).
## 1. Authenticate Using Your API Key
All API requests require authentication using a valid API key. Refer to
[**BigID
Documentation**](https://developer.bigid.com/wiki/BigID_API/API_Tutorial)
to obtain your token. Then, define the Authorization header using the
format \`Authorization: Bearer YOUR_API_KEY\`. This header must be
included in every request to ensure proper authentication and access to
BigID’s API endpoints. Throughout the tutorial, we will be using SAMPLE
as our token.
## 2. Obtain Cluster ID
The easiest way to obtain the Cluster ID for the cluster you are
interested in is through the BigID UI. On the Cluster Analysis page, you
can find detailed information on all existing clusters for your
organization’s data.
However, if you prefer to handle everything programmatically, you can
use the GET /api/v1/clusters endpoint to retrieve the list of clusters
via API. You can filter the results to find exactly what you’re looking
for.
For example, the following request retrieves all clusters where the size
equals 20:
Your response will contain a variety of information for each cluster.
Once you have located the cluster you are interested in, you will need
the ID in order to proceed.
## 3. Get All Columns
Once you have the id of the cluster you are interested in, you can
review its columns using the GET
/api/v1/data-catalog/column/cluster/similar endpoint. This endpoint
returns a detailed list of every column that has been grouped into the
specified cluster by BigID’s similarity engine. These columns may come
from different tables, sources, or systems, but they share common
structural, content-based, or metadata characteristics that indicate a
high degree of similarity.
You can use this response to:
- Audit similar columns across your data environment
- Apply or verify tags (like sensitivity or classification labels)
- Identify redundant or duplicate data
- Export the columns for further analysis or reporting
### Query Parameters
Depending on your needs, you can customize your request using optional
query parameters to paginate results, apply filters, or limit the data
returned. The specific query options for this endpoint are outlined
below:
| **Parameter** | **Type** | **Description** | **Default** |
|----|----|----|----|
| **clusterId** | string | **Required.** The ID of the cluster to retrieve columns for. | N/A |
| **limit** | number | Maximum number of results to return. | 10000 |
| **skip** | number | Number of results to skip (used for pagination). | 0 |
| **filter** | string | Filter results based on column metadata. | "" (empty) |
| **searchText** | string | Search across column names and attributes. | "" (empty) |
| **sort** | string | Field to sort the results by. | _id |
| **offsetKey** | string | Used for advanced pagination. | "" |
| **ignoreLimit** | boolean | If true, ignores the limit parameter. | false |
| **sample** | number | Number of columns to randomly sample from the cluster. | null |
All of the above options can be used to control the API response;
however, they are all optional **except** for the *clusterId*. In the
below request, only the clusterId is provided. To test the endpoint,
replace the fake clusterId below with a real id.
A successful request will return a 200 OK response with a JSON payload
containing metadata for all columns in the specified cluster. For
example:
```json
{
"results": [
{
"fullyQualifiedName": "x.y.z",
"columnName": "abc",
"businessAttribute": "friendly name",
"tableName": "my-table",
"source": "my-sql-tables",
"isPrimary": true,
"dataType": "integer",
"attributes": [
{
"attribute_original_name": "SSN",
"attribute_name": "SSN",
"rank": "High",
"calc_confidence_level": 0.695781717492013,
"attribute_type": "IDSoR Attribute",
"attribute_id": "74b78d7040e97f1ab9ba3b69c8e372e3"
}
],
"tags": [
{
"tagId": "ba7a5426-64d6-47eb-995b-8fd8e1224de0",
"valueId": "ba7a5426-64d6-47eb-995b-8fd8e1224de1",
"isMutuallyExclusive": "true",
"properties": {
"hidden": false,
"applicationType": "sensitivityClassification"
},
"tagName": "sensitivity",
"tagValue": "high"
}
]
}
],
"totalCount": 5
}
```
## 4. Troubleshooting
If your request fails, here’s what the server might tell you, and how to
fix it:
| **Status Code** | **Example Response** | **What It Means** | **How to Fix It** |
|----|----|----|----|
| **200** | Successful response with scan data | Everything’s looking good! | Keep cruising. |
| **400** | `{ "error": "Scan ID is invalid" }` | Bad or malformed scan ID provided | Double-check the scan ID you’re using. |
| **404** | `{ "error": "Scan 1234 was not found" }` | Scan ID doesn’t exist | Make sure the ID is valid and fetched from the parent scans endpoint. |
| **401** | Unauthorized | API key missing or invalid | Verify your API key and authorization header. |
| **500** | `{ "status": "error", "message": "Server error", "errors": [{}] }` | BigID server hit a snag (internal error) | Wait a moment and retry. If it persists, reach out to support. |
## Code Samples
```python
# Cluster Analysis API Tutorial
import requests
import json
# --- 1. Setup and Authentication ---
# Base URL of the BigID API (training sandbox)
base_url = "https://developer.bigid.com/api/v1"
# Session token (replace SAMPLE with actual session token)
AUTH_TOKEN = "SAMPLE"
headers = {
"Authorization": f"Bearer {AUTH_TOKEN}",
"Content-Type": "application/json"
}
try:
# 2. Provide the Cluster ID once obtained
target_cluster_id = "cluster_id_here"
# 3. Get All Columns for the provided cluster
columns_url = f"{base_url}/data-catalog/column/cluster/similar"
# The clusterId is a required parameter for this endpoint.
# You can also add other optional parameters like 'limit'.
params = {
'clusterId': target_cluster_id,
'limit': 20 # Limit the results for this example
}
response_cols = requests.get(columns_url, headers=headers, params=params)
response_cols.raise_for_status()
columns_data = response_cols.json()
print("Successfully retrieved columns for the cluster.")
print(f"Total columns in cluster: {columns_data.get('totalCount')}")
print("Sample of retrieved columns:")
print(json.dumps(columns_data.get('results', []), indent=2))
except requests.exceptions.HTTPError as http_err:
print(f"HTTP error occurred: {http_err}")
if http_err.response:
print(f"Response content: {http_err.response.text}")
except Exception as err:
print(f"An other error occurred: {err}")
```
```javascript
// Cluster Analysis API Tutorial
// --- 1. Setup and Authentication ---
// Base URL of the BigID API (training sandbox)
const base_url = "https://developer.bigid.com/api/v1";
// Session token (replace SAMPLE with actual session token)
const AUTH_TOKEN = "SAMPLE";
const headers = {
"Authorization": `Bearer ${AUTH_TOKEN}`,
"Content-Type": "application/json"
};
async function runDataCatalogWorkflow() {
try {
// 2. Provide the Cluster ID from the BigID UI
const targetClusterId = "cluster_id_here";
// 3. Get All Columns for the provided cluster
const params = new URLSearchParams({
clusterId: targetClusterId,
limit: 20 // Limit the results for this example
});
const columnsUrl = `${base_url}/data-catalog/column/cluster/similar?${params}`;
const colsResponse = await fetch(columnsUrl, { headers });
if (!colsResponse.ok) {
throw new Error(`HTTP error fetching columns! Status: ${colsResponse.status}`);
}
const columnsData = await colsResponse.json();
console.log("Successfully retrieved columns for the cluster.");
console.log(`Total columns in cluster: ${columnsData.totalCount}`);
console.log("Sample of retrieved columns:");
console.log(JSON.stringify(columnsData.results || [], null, 2));
} catch (error) {
console.error("An error occurred during the workflow:", error.message);
}
}
// Run the entire workflow
runDataCatalogWorkflow();
```
## Summary
Congratulations! In this tutorial, you have learned how to authenticate
with BigID, get a cluster ID, and retrieve all columns in that cluster
using the API. Now you can easily review and manage similar columns
across your data environment.
--------------------------------------------------------------------------------
# Data Posture API Tutorial
import { TabItem, Tabs, Aside } from '@astrojs/starlight/components';
import ApiExplorer from '../../../components/ApiExplorer.astro';
In this tutorial, we'll use SAMPLE as our session token. This is unique
to the training sandbox and will not work in other environments. See
BigID API/Tutorial for information on
authenticating with BigID.
To view the **complete code** for all steps, see the section labelled
Code Samples.
For more information on the API capabilities used in this tutorial,
check out the [**Data Posture API
Docs**](https://api.bigid.com/doc/dspm/).
## 1. Authenticate Using Your API Key
All API requests require authentication using a valid API key. Refer to
[**BigID
Documentation**](https://developer.bigid.com/wiki/BigID_API/API_Tutorial)
to obtain your token. Then, define the Authorization header using the
format Authorization: Bearer YOUR_API_KEY. This header must be included
in every request to ensure proper authentication and access to BigID’s
API endpoints. Throughout the tutorial, we will be using SAMPLE as our
token.
## 2. Retrieve Security Issues
There are multiple endpoints available for fetching security cases, but
because our goal is to export these issues to a third party system, we
want to use the **GET** /api/v1/actionable-insights/all-cases. This will
allow us to fetch all existing security issues, as well as limit the
selection based on various parameters if necessary.
In the case that you do not want to fetch all cases, you can filter the
response based on several parameters, all of which are outlined in the
following table:
| **Parameter** | **Type** | **Description** |
|----|----|----|
| **skip** | integer | Number of records to skip (for pagination) |
| **limit** | integer | Number of records to return |
| **filter** | string | BigID Query Language filter to narrow results |
| **fields** | string | Comma-separated list of fields to return |
| **sort** | string | Field to sort by, plus optional ASC/DESC |
| **requireTotalCount** | boolean | Whether to include totalCount in response |
Once you have fetched the details for all of the security cases you are
interested in, you can proceed to the next step.
## 3. Export Issues to Your Third-Party System
Once you retrieve the list of open security issues, the next step is to
export them to your third-party system for remediation. This could be a
ticketing platform like Jira, ServiceNow, or a SOAR tool for automated
workflows.
For each issue, map the relevant fields to your third-party system’s
API. Common mappings might include:
| **BigID Field** | **Third-Party Field** |
|--------------------|-----------------------|
| **caseLabel** | Ticket title |
| **policyName** | Category or label |
| **severityLevel** | Priority |
| **assignee** | Assigned owner |
| **dataSourceName** | Affected resource |
## 4. Mark Issues as Resolved
After successfully exporting the issues, you’ll want to mark them as
resolved in BigID to avoid duplicate work and keep the backlog clean.
You have **two options** for marking issues as resolved using the API.
First, you can do so in bulk using the **PATCH**
/api/v1/actionable-insights/cases:{actionType} endpoint. In order to use
this endpoint, you should:
1. In the request, tell BigID which field to update (in this case,
caseStatus) and what the new value should be (set it to resolved).
2. Add filters to select the cases you want to update, like policyName
or caseStatus:open.
3. Run the request. BigID will return the list of case IDs that were
successfully updated.
For example, your request may be structured like the following:
```json
{
"type": "CasesDB",
"subType": "updateCases",
"additionalProperties": {
"field": "assignee",
"newValue": "qaext@bigid.com",
"casesFilters": [
{
"filterField": "policyName",
"filterValues": [
"policy1234"
]
},
{
"filterField": "caseStatus",
"filterValues": [
"remediated"
]
}
]
}
}
```
The following request uses the example request body above. To actually
test this endpoint, replace the fields with real values based on the
previous steps.
If you only need to update the status of specific cases, this can be
done using the **PATCH**
/api/v1/actionable-insights/case-status/{caseId} endpoint. To do so:
1. Replace {caseId} with the actual ID of the case you want to update.
2. In the request body, set caseStatus to resolved.
3. Add an auditReason so your team knows why the change was made (for
example, “Exported to Jira on July 14th”).
For example, your request may be structured like the following:
```json
{
"caseStatus": "resolved",
"auditReason": "Exported to Jira on July 14th"
}
```
In the request below, the *{caseId}* is currently represented by a fake
ID, 123abc. In order to test the endpoint, replace it with a case ID you
have addressed in the previous steps.
## 5. Troubleshooting
If your request fails, here’s what the server might tell you, and how to
fix it:
| **Status Code** | **Example Response** | **What It Means** | **How to Fix It** |
|----|----|----|----|
| **200** | Successful response with scan data | Everything’s looking good! | Keep cruising. |
| **400** | `{ "error": "Scan ID is invalid" }` | Bad or malformed scan ID provided | Double-check the scan ID you’re using. |
| **404** | `{ "error": "Scan 1234 was not found" }` | Scan ID doesn’t exist | Make sure the ID is valid and fetched from the parent scans endpoint. |
| **401** | Unauthorized | API key missing or invalid | Verify your API key and authorization header. |
| **500** | `{ "status": "error", "message": "Server error", "errors": [{}] }` | BigID server hit a snag (internal error) | Wait a moment and retry. If it persists, reach out to support. |
## Code Samples
```python
# Data Posture API Tutorial
import requests
import json
# --- 1. Setup and Authentication ---
# Base URL of the BigID API (training sandbox)
base_url = "https://developer.bigid.com/api/v1"
# Session token (replace SAMPLE with actual session token)
AUTH_TOKEN = "SAMPLE"
headers = {
"Authorization": f"Bearer {AUTH_TOKEN}",
"Content-Type": "application/json"
}
def get_issues(filters=None):
"""
Fetches security cases from the actionable-insights endpoint.
Args:
filters (dict): A dictionary of query parameters like {'limit': 10, 'filter': '...'}.
Returns:
list: A list of case objects, or an empty list if none are found.
"""
cases_url = f"{base_url}/actionable-insights/all-cases"
try:
response = requests.get(cases_url, headers=headers, params=filters)
response.raise_for_status()
issues = response.json()
print(f" -> Found {len(issues)} issues.")
return issues
except requests.exceptions.HTTPError as http_err:
print(f"HTTP error occurred while fetching issues: {http_err}")
return []
def move_issues_to_system(issues):
"""
A placeholder function to simulate exporting issues to a third-party system.
Args:
issues (list): A list of case objects.
Returns:
list: A list of case IDs that were "exported".
"""
exported_ids = []
for issue in issues:
case_id = issue.get("caseId")
# Example mapping
ticket_data = {
"title": issue.get("caseLabel"),
"priority": issue.get("severityLevel"),
"description": f"Policy: {issue.get('policyName')}, Source: {issue.get('dataSourceName')}",
"assignee": issue.get("assignee")
}
print(f" -> Creating ticket for Case ID {case_id}: {ticket_data['title']}")
exported_ids.append(case_id)
print(" -> Simulation complete.")
return exported_ids
def resolve_single_issue(case_id):
"""
Marks a single case as resolved.
"""
resolve_url = f"{base_url}/actionable-insights/case-status/{case_id}"
payload = {
"caseStatus": "resolved",
"auditReason": f"Remediated and moved on {json.dumps(requests.get('http://worldtimeapi.org/api/ip').json()['datetime'])}"
}
try:
response = requests.patch(resolve_url, headers=headers, json=payload)
response.raise_for_status()
print(f" -> Successfully marked case {case_id} as resolved.")
return True
except requests.exceptions.HTTPError as http_err:
print(f"HTTP error occurred while resolving case {case_id}: {http_err}")
return False
def resolve_issues_in_bulk(policy_name):
"""
Marks all open cases for a given policy name as resolved.
"""
bulk_resolve_url = f"{base_url}/actionable-insights/cases:update" # Assuming 'update' is the actionType
payload = {
"type": "CasesDB",
"subType": "updateCases",
"additionalProperties": {
"field": "caseStatus", # Field to update
"newValue": "resolved", # New value
"casesFilters": [
{
"filterField": "policyName",
"filterValues": [ policy_name ]
},
{
"filterField": "caseStatus",
"filterValues": [ "open" ] # Only target open cases
}
]
}
}
try:
response = requests.patch(bulk_resolve_url, headers=headers, json=payload)
response.raise_for_status()
updated_cases = response.json()
print(f" -> Successfully resolved {len(updated_cases.get('caseIds', []))} cases in bulk.")
return updated_cases
except requests.exceptions.HTTPError as http_err:
print(f"HTTP error occurred during bulk resolve: {http_err}")
return None
# --- Main Workflow ---
if __name__ == "__main__":
# 2. Retrieve the first 5 open issues for demonstration
open_issues = get_issues(filters={'limit': 5, 'filter': '{"caseStatus": "open"}'})
if open_issues:
# 3. Simulate exporting these issues
exported_case_ids = export_issues_to_system(open_issues)
# 4. Mark issues as resolved
if exported_case_ids:
# Option A: Resolve the first exported issue individually
resolve_single_issue(exported_case_ids[0])
# Option B: Resolve all issues for a specific policy in bulk
# We'll use the policy from the second issue as an example
if len(open_issues) > 1:
example_policy = open_issues[1].get("policyName")
if example_policy:
resolve_issues_in_bulk(example_policy)
```
```javascript
// Data Posture API Tutorial
// --- 1. Setup and Authentication ---
// Base URL of the BigID API (training sandbox)
const base_url = "https://developer.bigid.com/api/v1";
// Session token (replace SAMPLE with actual session token)
const AUTH_TOKEN = "SAMPLE";
const headers = {
"Authorization": `Bearer ${AUTH_TOKEN}`,
"Content-Type": "application/json"
};
/**
* Fetches security cases from the actionable-insights endpoint.
* @param {URLSearchParams} params - Query parameters for the request.
* @returns {Promise} A list of case objects, or an empty list if none are found.
*/
async function get_issues(params) {
const cases_url = `${base_url}/actionable-insights/all-cases?${params}`;
try {
const response = await fetch(cases_url, { headers });
if (!response.ok) throw new Error(`HTTP error! Status: ${response.status}`);
const issues = await response.json();
console.log(` -> Found ${issues.length} issues.`);
return issues;
} catch (error) {
console.error("HTTP error occurred while fetching issues:", error.message);
return [];
}
}
/**
* A placeholder function to simulate exporting issues to a third-party system.
* @param {Array} issues - A list of case objects.
* @returns {Array} A list of case IDs that were "exported".
*/
function move_issues_to_system(issues) {
const exported_ids = issues.map(issue => {
const case_id = issue.caseId;
// Example mapping
const ticket_data = {
title: issue.caseLabel,
priority: issue.severityLevel,
description: `Policy: ${issue.policyName}, Source: ${issue.dataSourceName}`,
assignee: issue.assignee
};
console.log(` -> Creating ticket for Case ID ${case_id}: ${ticket_data.title}`);
return case_id;
});
console.log(" -> Simulation complete.");
return exported_ids;
}
/**
* Marks a single case as resolved.
* @param {string} case_id - The ID of the case to resolve.
*/
async function resolve_single_issue(case_id) {
const resolve_url = `${base_url}/actionable-insights/case-status/${case_id}`;
const timeResponse = await fetch('http://worldtimeapi.org/api/ip');
const timeData = await timeResponse.json();
const payload = {
caseStatus: "resolved",
auditReason: `Remediated and moved on ${timeData.datetime}`
};
try {
const response = await fetch(resolve_url, { method: 'PATCH', headers, body: JSON.stringify(payload) });
if (!response.ok) throw new Error(`HTTP error! Status: ${response.status}`);
console.log(` -> Successfully marked case ${case_id} as resolved.`);
return true;
} catch (error) {
console.error(`HTTP error occurred while resolving case ${case_id}:`, error.message);
return false;
}
}
/**
* Marks all open cases for a given policy name as resolved.
* @param {string} policy_name - The name of the policy to filter by.
*/
async function resolve_issues_in_bulk(policy_name) {
const bulk_resolve_url = `${base_url}/actionable-insights/cases:update`; // Assuming 'update' is the actionType
const payload = {
"type": "CasesDB",
"subType": "updateCases",
"additionalProperties": {
"field": "caseStatus", // Field to update
"newValue": "resolved", // New value
"casesFilters": [
{ "filterField": "policyName", "filterValues": [policy_name] },
{ "filterField": "caseStatus", "filterValues": ["open"] } // Only target open cases
]
}
};
try {
const response = await fetch(bulk_resolve_url, { method: 'PATCH', headers, body: JSON.stringify(payload) });
if (!response.ok) throw new Error(`HTTP error! Status: ${response.status}`);
const updated_cases = await response.json();
console.log(` -> Successfully resolved ${updated_cases.caseIds?.length || 0} cases in bulk.`);
return updated_cases;
} catch (error) {
console.error("HTTP error occurred during bulk resolve:", error.message);
return null;
}
}
// --- Main Workflow ---
async function runWorkflow() {
// 2. Retrieve the first 5 open issues for demonstration
const params = new URLSearchParams({
limit: 5,
filter: JSON.stringify({ "caseStatus": "open" })
});
const open_issues = await get_issues(params);
if (open_issues.length > 0) {
// 3. Simulate exporting these issues
const exported_case_ids = move_issues_to_system(open_issues);
// 4. Mark issues as resolved
if (exported_case_ids.length > 0) {
// Option A: Resolve the first exported issue individually
await resolve_single_issue(exported_case_ids[0]);
// Option B: Resolve all issues for a specific policy in bulk
// We'll use the policy from the second issue as an example
const example_policy = open_issues[1]?.policyName;
if (example_policy) {
await resolve_issues_in_bulk(example_policy);
}
}
}
}
runWorkflow();
```
## Summary
Congratulations! In this tutorial, you have learned how to retrieve open
security issues from BigID, export those issues to a third-party system
for remediation, and mark the issues as resolved in BigID to keep your
backlog clean and accurate. By following these steps, you can streamline
your remediation process, reduce manual effort, and maintain a clear,
up-to-date view of your organization’s security posture.
--------------------------------------------------------------------------------
# Manage Data Sources
import { TabItem, Tabs, Aside } from '@astrojs/starlight/components';
import ApiExplorer from '../../../components/ApiExplorer.astro';
BigID system.
- How to import those data sources into the new BigID system using the
API.
- How to verify that all data sources were transferred successfully
In this tutorial, we'll use SAMPLE as our session token. This is unique
to the training sandbox and will not work in other environments. See
BigID API/Tutorial for information on
authenticating with BigID.
To view the **complete code** for all steps, see the section labelled
Code Samples.''
For more information on the API capabilities used in this tutorial,
check out the [**Data Source Connections API
Docs**](https://api.bigid.com/doc/data-sources/).
## 1. Authenticate Using Your API Key
All API requests require authentication using a valid API key. Refer to
[**BigID
Documentation**](https://developer.bigid.com/wiki/BigID_API/API_Tutorial)
to obtain your token. Then, define the Authorization header using the
format \`Authorization: Bearer YOUR_API_KEY\`. This header must be
included in every request to ensure proper authentication and access to
BigID’s API endpoints. Throughout the tutorial, we will be using SAMPLE
as our token.
## 2. Export All Existing Data Sources
Use the GET /ds-connections/file-download/export endpoint to export your
configured data sources into a JSON file. There is an optional ids
parameter that can be used to fetch specific data sources only, but
because we are transferring all the data, we do not need to include it.
The file returned will contain all the necessary configuration metadata
for each data source, including connection type, credentials (if
stored), scan options, and more.
## 3. Import Data Sources into the New BigID System
Now that you've exported your data sources as a JSON file in Step 2,
it's time to import them into the new BigID environment. BigID does not
support bulk importing via file upload, so each data source must be
created individually using the POST /ds_connections endpoint.
This endpoint accepts a ds_connection object with the configuration
values for the new data source. These should match the fields exported
from your old system, and they must include any required values as
defined in the data source’s template.
## 4. Verify Data Source are Properly Transferred
Once all data sources have been created in the new BigID environment,
it’s important to verify that the transfer was successful.
You can confirm this by using the GET /ds-connections endpoint on the
new system to retrieve the list of all configured data sources. Compare
this list to your original export to ensure that each data source has
been recreated accurately.
## 5. Troubleshooting
| **Status Code** | **Example Response** | **What It Means** | **How to Fix It** |
|----|----|----|----|
| **200** | Successful response with scan data | Everything’s looking good! | Keep cruising. |
| **400** | `{ "error": "Scan ID is invalid" }` | Bad or malformed scan ID provided | Double-check the scan ID you’re using. |
| **404** | `{ "error": "Scan 1234 was not found" }` | Scan ID doesn’t exist | Make sure the ID is valid and fetched from the parent scans endpoint. |
| **401** | Unauthorized | API key missing or invalid | Verify your API key and authorization header. |
| **500** | `{ "status": "error", "message": "Server error", "errors": [{}] }` | BigID server hit a snag (internal error) | Wait a moment and retry. If it persists, reach out to support. |
## Code Samples
```python
# Scan Insights API Tutorial
import requests
import json
API_TOKEN = "SAMPLE"
HEADERS = {
"Authorization": f"Bearer {API_TOKEN}",
"Content-Type": "application/json"
}
# 1. Export all data sources and return the contents of the response file
def export_data_sources():
url = "https://bigid-ui:9090/api/v1/ds-connections/file-download/export"
response = requests.get(url, headers=HEADERS)
if response.status_code == 200:
with open("exported_datasources.json", "w") as f:
f.write(response.text)
print("Data sources exported.")
return json.loads(response.text)
else:
print("Failed to export data sources.")
print(response.text)
return []
# 2. Import data sources by cycling through the provided list
def import_data_sources(data_sources):
url = "https://bigid-ui:9090/api/v1/ds_connections"
for ds in data_sources:
body = { "ds_connection": ds }
response = requests.post(url, headers=HEADERS, json=body)
if response.status_code == 200:
print(f"Imported: {ds.get('name')}")
else:
print(f"Failed to import: {ds.get('name')}")
print(response.text)
# 3. Verify successful migration
def verify_imported_sources():
url = "https://bigid-ui:9090/api/v1/ds-connections"
response = requests.get(url, headers=HEADERS)
if response.status_code == 200:
data = response.json()
print(f"Total data sources in new environment: {len(data.get('data', []))}")
else:
print("Failed to verify data sources.")
print(response.text)
# Run through the full process
data = export_data_sources()
if data:
import_data_sources(data)
verify_imported_sources()
```
```javascript
// Scan Insights API Tutorial
const API_TOKEN = 'SAMPLE';
const BASE_URL = 'https://bigid-ui:9090/api/v1';
const headers = {
'Authorization': `Bearer ${API_TOKEN}`,
'Content-Type': 'application/json'
};
// Step 1: Export all data sources and return the contents of the response file
async function exportDataSources() {
try {
const response = await fetch(`${BASE_URL}/ds-connections/file-download/export`, {
method: 'GET',
headers
});
if (!response.ok) throw new Error('Export failed.');
const blob = await response.blob();
const text = await blob.text();
const data = JSON.parse(text);
console.log('Exported data sources:', data);
return data;
} catch (err) {
console.error('Error exporting:', err.message);
}
}
// Step 2: Import data sources by cycling through the provided list
async function importDataSources(dataSources) {
for (const ds of dataSources) {
try {
const res = await fetch(`${BASE_URL}/ds_connections`, {
method: 'POST',
headers,
body: JSON.stringify({ ds_connection: ds })
});
if (!res.ok) {
const errText = await res.text();
console.error(`Failed to import ${ds.name}:`, errText);
} else {
const result = await res.json();
console.log(`Imported: ${result.name}`);
}
} catch (err) {
console.error(`Import error for ${ds.name}:`, err.message);
}
}
}
// Step 3: Verify successful transfer
async function verifyTransfer() {
try {
const response = await fetch(`${BASE_URL}/ds-connections`, {
method: 'GET',
headers
});
if (!response.ok) throw new Error('Verification failed.');
const data = await response.json();
console.log(`Verified ${data.data.length} data sources in the new system.`);
} catch (err) {
console.error('Error verifying transfer:', err.message);
}
}
// Function to run all steps in order
async function migrateDataSources() {
const exported = await exportDataSources();
if (exported && exported.length > 0) {
await importDataSources(exported);
await verifyTransfer();
}
}
migrateDataSources();
```
## Summary
Congratulations! In this tutorial, you have learned how to efficiently
export existing data sources from one BigID environment and import them
into another using the BigID API.
--------------------------------------------------------------------------------
# Scan Insights API Tutorial
import { TabItem, Tabs, Aside } from '@astrojs/starlight/components';
import ApiExplorer from '../../../components/ApiExplorer.astro';
In this tutorial, we'll use SAMPLE as our session token. This is unique
to the training sandbox and will not work in other environments. See
BigID API/Tutorial for information on
authenticating with BigID.
To view the **complete code** for all steps, see the section labelled
Code Samples.''
For more information on the API capabilities used in this tutorial,
check out the [**Scan Insights API
Docs**](https://api.bigid.com/doc/scan-insights/).
## 1. Authenticate Using Your API Key
All API requests require authentication using a valid API key. Refer to
[**BigID
Documentation**](https://developer.bigid.com/wiki/BigID_API/API_Tutorial)
to obtain your token. Then, define the Authorization header using the
format \`Authorization: Bearer YOUR_API_KEY\`. This header must be
included in every request to ensure proper authentication and access to
BigID’s API endpoints. Throughout the tutorial, we will be using SAMPLE
as our token.
## 2. Obtain the scan ID(s)
Depending on the information you're interested in, you can retrieve scan
IDs from one of two endpoints. Since our goal is to check the status of
this week’s scheduled scan, we’ll focus on the **Parent Scan endpoint**
(*/scans/parent-scans*), which provides a high-level overview of each
full scan execution.
### Querying
When making a GET request to this endpoint, you can customize the
response using query parameters like **sort** and **limit**. By default,
results are sorted in descending order based on **updated_at**, meaning
the most recent scans appear first. Since we're only interested in the
most recent scan (this week’s scan) we’ll set limit=1 to return just the
latest result. The final request will look like this:
Upon receiving a successful response, we can view various details about
each scan. However, our primary focus is on obtaining the **id**
attribute, which should be clearly labeled in the response data.
Focus on the \`_id\` attribute inside each object in the
\`scanChildren\` array. This \`_id\` uniquely identifies the scan and
is what you’ll use in the next steps.
```json
{
"status": "string",
"statusCode": 42.0,
"message": "string",
"data": {
"totalCount": 42.0,
"scanChildren": [
{
"_id": "string",
"name": "string"
// ... additional fields omitted for brevity
}
]
}
}
```
## 3. Check Scan Status
Once you have the scan ID for a particular scan, you can check its
current **status** to determine whether it's still running or has
completed. To do this, send a **GET** request to the
*/scans/{scan_id}/status* endpoint. In the below request, replace
**SAMPLE_SCAN_ID** with the ID you previously retrieved.
### Parse and Interpret Response
Upon receiving a successful (200) response, the **status** field will
indicate the scan’s current state.
- A value of **true** means the scan is currently active.
- A value of **false** means the scan has stopped, which likely means it
has completed (though you’ll want to confirm completion by checking
additional scan metadata if needed).
If you do not receive a successful response, check the
Troubleshooting section for common errors.
## 4. Troubleshooting
If your request fails, here’s what the server might tell you, and how to
fix it:
| **Status Code** | **Example Response** | **What It Means** | **How to Fix It** |
|----|----|----|----|
| **200** | Successful response with scan data | Everything’s looking good! | Keep cruising. |
| **400** | `{ "error": "Scan ID is invalid" }` | Bad or malformed scan ID provided | Double-check the scan ID you’re using. |
| **404** | `{ "error": "Scan 1234 was not found" }` | Scan ID doesn’t exist | Make sure the ID is valid and fetched from the parent scans endpoint. |
| **401** | Unauthorized | API key missing or invalid | Verify your API key and authorization header. |
| **500** | `{ "status": "error", "message": "Server error", "errors": [{}] }` | BigID server hit a snag (internal error) | Wait a moment and retry. If it persists, reach out to support. |
## Code Samples
```python
# Scan Insights API Tutorial
import requests
import json
# Base URL of the BigID API
base_url = "https://developer.bigid.com/api/v1"
# Session token (replace SAMPLE with actual session token)
headers = {
"Authorization": "Bearer SAMPLE",
"Content-Type": "application/json"
}
# Obtain the scan ID
url_scans = f"{base_url}/scans/parent-scans"
params = {"limit": 1}
response = requests.get(url_scans, headers=headers, params=params)
if response.status_code != 200:
print(f"Failed to get parent scans: {response.status_code} - {response.text}")
exit(1)
data = response.json()
scans = data.get("data", [])
if not scans:
print("No parent scans found.")
exit(1)
scan_id = scans[0]["id"]
print(f"Latest parent scan ID: {scan_id}")
# Check scan status using the scan ID
url_status = f"{base_url}/scans/{scan_id}/status"
response = requests.get(url_status, headers=headers)
if response.status_code != 200:
print(f"Failed to get scan status: {response.status_code} - {response.text}")
exit(1)
status_data = response.json()
status = status_data.get("status")
if status is True:
print("Scan is currently ACTIVE.")
elif status is False:
print("Scan has STOPPED (likely completed).")
else:
print("Scan status unknown or missing.")
```
```javascript
// Scan Insights API Tutorial
const baseUrl = "https://developer.bigid.com/api/v1"; // Base URL of the BigID API
const headers = {
"Authorization": "Bearer SAMPLE", // Replace SAMPLE with a actual session token
"Content-Type": "application/json"
};
// Obtain the scan ID
async function getLatestParentScanId() {
const url = `${baseUrl}/scans/parent-scans?limit=1`;
const response = await fetch(url, { headers });
if (!response.ok) {
throw new Error(`Failed to get parent scans: ${response.status} ${response.statusText}`);
}
const data = await response.json();
if (!data.data || data.data.length === 0) {
throw new Error("No parent scans found.");
}
return data.data[0].id;
}
// Check Scan Status
async function getScanStatus(scanId) {
const url = `${baseUrl}/scans/${scanId}/status`;
const response = await fetch(url, { headers });
if (!response.ok) {
throw new Error(`Failed to get scan status: ${response.status} ${response.statusText}`);
}
const data = await response.json();
return data.status;
}
async function main() {
try {
console.log("Fetching latest parent scan ID...");
const scanId = await getLatestParentScanId();
console.log(`Latest parent scan ID: ${scanId}`);
console.log("Checking scan status...");
const status = await getScanStatus(scanId);
if (status === true) {
console.log("Scan is currently ACTIVE.");
} else if (status === false) {
console.log("Scan has STOPPED (likely completed).");
} else {
console.log("Scan status unknown or missing.");
}
} catch (error) {
console.error("Oops! Something went wrong:", error.message);
}
}
main();
```
## Summary
Congratulations, you can now confidently explore and evaluate the status
of scans using the Scan Insights API! With these skills, you’re equipped
to monitor your organization’s data scans effectively, ensuring timely
detection and management of sensitive information.
--------------------------------------------------------------------------------
# Manage Scan Profiles
import { TabItem, Tabs, Aside } from '@astrojs/starlight/components';
import ApiExplorer from '../../../components/ApiExplorer.astro';
In this tutorial, we'll use SAMPLE as our session token. This is unique
to the training sandbox and will not work in other environments. See
BigID API/Tutorial for information on
authenticating with BigID.
To view the **complete code** for all steps, see the section labelled
Code Samples.''
For more information on the API capabilities used in this tutorial,
check out the [**Scan Profiles API
Docs**](https://api.bigid.com/doc/scan-profiles/) or the [**Data Sources
API Docs**](https://api.bigid.com/doc/data-sources/).
## 1. Authenticate Using Your API Key
All API requests require authentication using a valid API key. Refer to
[**BigID
Documentation**](https://developer.bigid.com/wiki/BigID_API/API_Tutorial)
to obtain your token. Then, define the Authorization header using the
format \`Authorization: Bearer YOUR_API_KEY\`. This header must be
included in every request to ensure proper authentication and access to
BigID’s API endpoints. Throughout the tutorial, we will be using SAMPLE
as our token.
## 2. Gather Data Source IDs
Before creating your scan profile, you need to gather the unique IDs of
the data sources you want to include in your scan. If you have not
obtained them already, whether by browsing the BigID UI or using the
API, this step ensures you have the correct identifiers to specify
exactly which sources to scan.
You can retrieve this information using the **GET**
*/api/v1/ds-connections* endpoint. This API returns the details of one
or more data sources in your BigID environment.
Depending on which data sources you're interested in, this endpoint
supports several optional query parameters to help you narrow down and
customize the results:
- **skip (integer)**: Number of data sources to skip for pagination.
- **limit (integer)**: Maximum number of data sources to return.
- **requireTotalCount (boolean)**: If true, returns the total count of
matching data sources.
- **sort (string)**: Sort results by a specified field and order.
- **filter (string)**: Filter results based on field values.
The response provides common fields for each data source. From this, you
can compile the _id values for all the data sources you want to include
in your scan profile. These IDs will be used in the dataSourceList field
when creating the scan profile in the next step.
## 3. Create a Scan Profile
Once you have a list of all the data sources you’d like to include in
the scan, you can proceed to create a new scan profile using the **Scan
Profiles API**. This profile defines what you want to scan, when you
want to scan it, and how it should behave.
Use the **POST** */api/v1/scanProfiles* endpoint to define the profile
details, including:
- A name and optional description
- A list of dataSourceList IDs (targeted sources only)
- A valid scanTemplateId
- A schedule for recurring scans or isSingleRunScan: true for a one-time
run
For example, to establish a scan profile named "Targeted Marketing Data
Scan" that runs a one-time scan on two specific data sources (e.g.,
marketing-related databases), you would make the request using the
following details:
```json
{
"name": "Targeted Marketing Data Scan",
"description": "Scans only marketing-related sources for compliance",
"dataSourceList": [
"64f7df00cc834f0001a44e85",
"64f7df00cc834f0001a44e86"
],
"scanTemplateId": "standard-privacy-template-001",
"isSingleRunScan": true
}
```
Once submitted, BigID will create the scan profile and queue the scan
based on the schedule you've defined (or start it right away for a
one-time scan). Upon success, the API response will return the newly
created scan profile, including its unique ID. Be sure to save this ID,
as you’ll need it in the next step to verify and manage the scan
profile.
## 4. Verify Scan Profile Creation
After creating your scan profile, you’ll want to double-check that BigID
received and saved it correctly. Using the id returned in the previous
step, you can retrieve the scan profile directly to confirm its details
and status.
Use the **GET** */api/v1/scanProfiles/{id}* endpoint, replacing *{id}*
with your unique scan profile *id* returned from the creation step, to
retrieve and verify the details of your scan profile.
At this step, you’re primarily confirming a successful API response and
that the scan profile exists with the expected ID. If the request
returns a valid profile object (status code 200), you know your scan
profile was created correctly and is ready to rock!
## 5. Troubleshooting
If your request fails, here’s what the server might tell you, and how to
fix it:
| **Status Code** | **Example Response** | **What It Means** | **How to Fix It** |
|----|----|----|----|
| **200** | Successful response with scan data | Everything’s looking good! | Keep cruising. |
| **400** | `{ "error": "Scan ID is invalid" }` | Bad or malformed scan ID provided | Double-check the scan ID you’re using. |
| **404** | `{ "error": "Scan 1234 was not found" }` | Scan ID doesn’t exist | Make sure the ID is valid and fetched from the parent scans endpoint. |
| **401** | Unauthorized | API key missing or invalid | Verify your API key and authorization header. |
| **500** | `{ "status": "error", "message": "Server error", "errors": [{}] }` | BigID server hit a snag (internal error) | Wait a moment and retry. If it persists, reach out to support. |
## Code Samples
```python
# Scan Profiles API Tutorial
import requests
import json
# --- 1. Setup and Authentication ---
# Base URL of the BigID API (training sandbox)
base_url = "https://developer.bigid.com/api/v1"
# Replace SAMPLE with your actual API key
AUTH_TOKEN = "SAMPLE"
headers = {
"Authorization": f"Bearer {AUTH_TOKEN}",
"Content-Type": "application/json"
}
# --- 2. Gather Data Source IDs ---
ds_connections_url = f"{base_url}/ds-connections"
try:
# We'll add a limit to get a small number of data sources for this example.
response = requests.get(f"{ds_connections_url}?limit=5", headers=headers)
response.raise_for_status() # Raise an error for bad status codes (4xx or 5xx)
data_sources = response.json()
# We will look for data sources of these types.
target_types = {'snowflake', 's3'}
target_data_source_ids = []
# Access the list via the 'data' object
connections_list = data_sources_response.get('data', {}).get('ds_connections', [])
for ds in connections_list:
if ds.get('type') in target_types:
print(f" -> Found matching source: {ds.get('name')} (ID: {ds.get('_id')})")
target_data_source_ids.append(ds.get('_id'))
if not target_data_source_ids:
print("Could not find any data sources with the specified types. Exiting.")
exit()
# --- 3. Create a Scan Profile ---
scan_profiles_url = f"{base_url}/scanProfiles"
# The payload defines the new scan profile.
new_profile_data = {
"name": "Dynamic Marketing Data Scan",
"description": "Scans all Snowflake and S3 marketing sources",
"dataSourceList": target_data_source_ids,
"scanTemplateId": "standard-privacy-template-001",
"isSingleRunScan": True
}
response_create = requests.post(scan_profiles_url, headers=headers, json=new_profile_data)
response_create.raise_for_status()
created_profile = response_create.json()
new_profile_id = created_profile.get("_id")
if not new_profile_id:
raise ValueError("Failed to get ID from the created profile response.")
# --- 4. Verify Scan Profile Creation ---
verify_url = f"{scan_profiles_url}/{new_profile_id}"
response_verify = requests.get(verify_url, headers=headers)
response_verify.raise_for_status()
verified_profile = response_verify.json()
print("Verification successful! The profile was created correctly.")
except requests.exceptions.HTTPError as http_err:
print(f"HTTP error occurred: {http_err}")
print(f"Response content: {http_err.response.text}")
except Exception as err:
print(f"An other error occurred: {err}")
```
```javascript
// Scan Profiles API Tutorial in progress
// --- 1. Setup and Authentication ---
// Base URL of the BigID API (training sandbox)
const base_url = "https://developer.bigid.com/api/v1";
const AUTH_TOKEN = "SAMPLE";
const headers = {
"Authorization": `Bearer ${AUTH_TOKEN}`,
"Content-Type": "application/json"
};
async function runBigIDWorkflow() {
try {
// --- 2. Gather and Parse Data Source IDs ---
const dsConnectionsUrl = `${base_url}/ds-connections`;
const dsResponse = await fetch(dsConnectionsUrl, { headers });
if (!dsResponse.ok) throw new Error(`HTTP error! Status: ${dsResponse.status}`);
const dataSourcesResponse = await dsResponse.json();
const targetTypes = ['snowflake', 's3'];
// Access the list via the 'data' object.
const connectionsList = (dataSourcesResponse.data && dataSourcesResponse.data.ds_connections) || [];
const targetDataSourceIds = connectionsList
.filter(ds => targetTypes.includes(ds.type))
.map(ds => {
console.log(` -> Found matching source: ${ds.name} (ID: ${ds._id})`);
return ds._id;
});
if (targetDataSourceIds.length === 0) {
console.log("Could not find any data sources with the specified types. Exiting.");
return;
}
// --- 3. Create a Scan Profile Using Dynamic IDs ---
const scanProfilesUrl = `${base_url}/scanProfiles`;
const newProfileData = {
"name": "Dynamic Marketing Data Scan",
"description": "Scans all Snowflake and S3 marketing sources",
"dataSourceList": targetDataSourceIds,
"scanTemplateId": "standard-privacy-template-001",
"isSingleRunScan": true
};
const createResponse = await fetch(scanProfilesUrl, {
method: 'POST',
headers: headers,
body: JSON.stringify(newProfileData)
});
if (!createResponse.ok) throw new Error(`HTTP error! Status: ${createResponse.status}`);
const createdProfile = await createResponse.json();
const newProfileId = createdProfile._id;
if (!newProfileId) throw new Error("Failed to get ID from created profile.");
// --- 4. Verify Scan Profile Creation ---
const verifyUrl = `${scanProfilesUrl}/${newProfileId}`;
const verifyResponse = await fetch(verifyUrl, { headers });
if (!verifyResponse.ok) throw new Error(`HTTP error! Status: ${verifyResponse.status}`);
const verifiedProfile = await verifyResponse.json();
console.log("Verification successful! The profile was created correctly.");
console.log(JSON.stringify(verifiedProfile, null, 2));
} catch (error) {
console.error("An error occurred during the workflow:", error);
}
}
runBigIDWorkflow();
```
## Summary
Congratulations! In this tutorial, you have learned how to create a
targeted scan profile in BigID by specifying the exact data sources you
want to include. You’ve mastered how to submit a scan profile via the
API, retrieve its unique ID, and verify that the profile was
successfully created and saved.
Now that you’ve set up and verified your scan profile, you can take it
further by monitoring or managing scan execution using the [**Scan
Insights
API**](https://developer.bigid.com/wiki/Scan_Insights_API_Tutorial).
--------------------------------------------------------------------------------
# App Development Best Practices
> Guidelines and best practices for building robust, scalable BigID Applications.
When developing custom BigID Applications, following best practices ensures that your app is secure, scalable, and behaves correctly across both BigID Cloud (multi-tenant) and On-Premise environments.
## Avoid Duplicating Settings
If a configuration setting or preference already exists within the core BigID platform, **do not** recreate a redundant option within your custom application's UI.
Instead, your application should utilize the [BigID API](/api/bigid-api/) to seamlessly retrieve the existing configuration. This guarantees a single source of truth for administrators and prevents conflicting states between the platform and your app.
## Utilize Native TPA Storage
**Do not** stand up your own database or establish direct external database connections for your application state unless absolutely necessary.
BigID provides native **TPA (Third Party App) Storage** specifically designed for custom applications. Relying on TPA storage ensures that:
- Your application natively inherits BigID's secure, multi-tenant isolation out of the box.
- Your application will function identically whether deployed in a BigID Cloud environment or within an On-Premise customer installation.
- You avoid the overhead of managing, scaling, and securing an external database connection.
You can interact with TPA storage directly through the BigID API using your App's token credentials.
## Secure Endpoint Validation
Because your custom application is an independent web service receiving POST requests from the BigID core, it is critical that your application validates that these requests are legitimately originating from BigID.
- **Always** parse and validate the `X-Signed-Token` header sent with action executions.
- **Always** fetch the public key from the BigID `api/v1/tpa/public-key` endpoint to cryptographically verify the signature payload.
- Ensure the `exp` (expiration) field within the signature payload is checked to prevent replay attacks using expired tokens.
## Build for Asynchronous Execution
When designing your app's actions, assume that tasks might take a significant amount of time to process, especially when dealing with large datasets or complex remediation workflows.
- Design actions to run asynchronously whenever possible. Avoid blocking the initial HTTP request with long-running operations.
- Instead, your `/execute` endpoint should immediately acknowledge the request and return an `IN_PROGRESS` status response.
- Once your application completes the background processing, utilize the `updateResultCallback` URL provided in the initial execution payload to send the final `SUCCESS` or `ERROR` status back to BigID.
## Stateless Design
Your BigID Application should be designed as a stateless microservice.
- Avoid storing session state or long-running execution context directly in memory on your application server.
- If your app crashes or scales horizontally across multiple instances, it should be able to pick up work or serve UI components without relying on local server state.
- Rely on the payload parameters sent by BigID on each request, and use TPA Storage for any necessary persistent configuration.
--------------------------------------------------------------------------------
# Role of BigID Apps
## The BigID Platform
BigID is implemented as a platform. This means the BigID core provides
four services: Correlation, Classification, Clustering, and Catalog. All
other capabilities are implemented as apps using the data from these
four services.
### Correlation
Correlation is the process of determining who a piece of information
belongs to. For example, in our DSAR application we use correlation to
report all of the information belonging to an individual. In our breach
response application, we can use a sample of breached data to discover
the individuals that need to be notified.
### Classification
Classification is the process of determining the type of a piece of
information. For example, classification can tell us that the string "+1
(917) 555-5555" is a phone number. It also can tell us that an image
looks like a receipt. BigID uses regular expressions, NLP, and NER
classifiers to determine the types of data and files. You can read more
about our classification methodology here:
[https://bigid.com/blog/what-is-data-classification/](https://bigid.com/blog/what-is-data-classification/)
### Clustering
Clustering is a commonly used machine learning technique. Google has a
good article about clustering in general at
[https://developers.google.com/machine-learning/clustering/overview](https://developers.google.com/machine-learning/clustering/overview).
For BigID, clustering is the process of combining like files together to
generalize about the group. For example, if you have hundreds of files
that look similar (similar types of data, layouts, text patterns, etc)
BigID can determine that files it encounters in the future are going to
have the same data elements.
### Catalog
The BigID Catalog takes the results of the previous 3 services and
allows them to be accessed and searched in one place. Along with that,
the catalog also indexes metadata about the objects being scanned like
access permissions and modification dates.
## Where does my app come in?
All apps have the same access to the four core services above. This
means your app can perform any use case that requires knowing the type,
metadata or owner of a piece of data.
--------------------------------------------------------------------------------
# Building a BigID App
import { Aside } from '@astrojs/starlight/components';
import { Vimeo } from '@astro-community/astro-embed-vimeo';
import ExerciseIframe from '@/components/ExerciseIframe.astro';
import Scenario from '@/components/Scenario.astro';
import ApiExplorer from '../../../components/ApiExplorer.astro';
# What is a BigID App
BigID Applications allow you to add your own business logic and UI to a
BigID system. This means that you can add dashboards, synchronize BigID
with an external system, or even add entire data governance
applications.
BigID applications are written as web applications. This means you can
use any programming language and development environment you want. We've
created samples in Typescript, Java, and Python to get you started. You
also can use our partner [Retool](https://retool.com) to create low-code
BigID apps.
## Common Use Cases
There are a variety of uses for BigID apps, but the most common are:
- Sending BigID's classification results to external systems (Alation
App, Informatica App, Wiz App)
- Adding intelligence from an external system into the BigID Data
Catalog (Okera App)
- Using third-party password stores inside of BigID (AWS Secrets Manager
App)
- Generating proprietary reports with BigID data (Sanctions.io)
- Configuring BigID with information from other systems (AWS
AutoDiscovery)
## How are BigID Apps implemented?
BigID apps are web applications. In their simplest form can be
implemented with 3 HTTP endpoints. More advanced applications provide
their own user interface which is also written as a web page.
This means you can use your programming environment of choice to make a
BigID app. As long as your programming language of choice can send and
receive HTTP requests it can be used to make a BigID app.
## The Simplest BigID App
BigID apps range from a few hundred lines to entire data governance
suites. Below is a sample of an minimal BigID app. It consists of the
manifest and an action. The specifics of manifests and actions are
covered more below, but this code is a good launching point.
```js
const app = express();
app.use(express.json());
app.get('/manifest', (req, res) => {
let manifest = {
app_name: "Training App",
description: "Test App",
vendor: "BigID",
category: "utility",
license_type: "FREE",
actions: [
{
description: "test",
params: [],
is_sync: true,
action_id: "Sync"
}
],
global_params: []
};
res.json(manifest)
});
app.post('/execute', (req, res) => {
let response = {
"statusEnum": "ERROR",
"executionId": req.body.executionId,
"progress": 0,
"message": ""
};
if (req.body.actionName !== "Sync") {
return res.json(response);
}
// Do something here
// Update status to success if we had a success
response.statusEnum = "SUCCESS";
response.progress = 1;
return res.json(response);
})
app.listen(3000);
```
## Knowledge Check
import Quiz from "../../../components/Quiz";
# Defining Your Application
The name, description, and capabilities of your application are defined
in a JSON file called the App Manifest. The App Manifest tells us two
types of information:
- Who your application is (metadata)
- What your application can do (actions)
A sample manifest is below:
```json
{
"app_name": "Training App",
"description": "This application is a training sample",
"category": "privacy",
"license_verification_key": "",
"license_type":"FREE",
"vendor": "BigID",
"is_interactive": true,
"actions": [],
"global_params": []
}
```
- app_name - The name that will appear within the apps page for your
application
- description - The description that will appear within the apps page
for your application
- category - The section of the apps page your app will be placed in
once installed. Options are "privacy", "protection", "perspective",
and "utility"
- license_verification_key - A key you receive from the after your app
has been reviewed and submitted. Without a key, a warning will be
presented to users when installing your application.
- license_type - Whether a paid license is required for your
application. Options are "paid" or "free"
- vendor - The name of the application author
- is_interactive - Boolean representing whether this application has a
custom UI component. True if a custom ui component exists.
- actions - One or more App Actions that your application can perform
- global_params - global settings for your application that are sent
with all action requests
## Exercise: Create an App Manifest
You want to create an application for your org to be able to synchronize
BigID with a home grown inventory system. The first step is creating
your application manifest. **Create an application manifest for an app
named Training App**
## Exposing Logs to BigID
Apps are most commonly installed within Kubernetes clusters. This makes
it difficult for users other than system administrators to know what's
going on in your application. To make this process easier you can
publish logs to the /logs endpoint as text. The contents of this
endpoint will then be accessible to users by navigating to the App
Activity Log within the BigID UI.
## Customizing Icons
Apps have two endpoints where they can customize icons displayed within
the UI, /assets/icon sets the icon shown within the app drawer.
/assets/sideBarIcon sets the icon shown within the sidebar while the app
is active or pinned to the sidebar. You can return jpg, png, and svg
icons at that endpoint, but we suggest svg to allow the icon to scale
with your user's screens.
## Defining App Actions
Actions are schedulable pieces of business logic that your application
allows BigID to access. They can synchronize between BigID and other
systems, modify BigID contents and more. They are defined in your
manifest under actions with the following format:
```json
{
"action_id": "dsConnections",
"description": "The action updates the data source connections in our training app",
"is_sync": true,
"action_params": [
{
"param_name": "save",
"param_type": "boolean",
"is_cleartext": true,
"param_description": "Should we save data source connections?",
"default_value": "true",
"param_priority": "primary",
"is_mandatory": true
}
]
}
```
This action will look like the following inside BigID:
Actions can have multiple configurations and schedules. For instance,
someone can run your action once a week with settings to modify all data
sources and once a day to modify a specific data source.
## Exercise: Defining App Actions
Your application needs an action to send data between your internal
system and BigID. **Add an action to your app manifest without
parameters called "Sync".**
## Implementing App Actions
All app actions will result in a POST request to your app's /execute
endpoint. This post request will have the following body:
```json
{
"actionName": "dsConnections",
"executionId": "5f0bd3bad10a2604246ad846",
"globalParams": [],
"actionParams": [
{
"paramName": "save",
"paramValue": "true"
}
],
"bigidToken": "eyJhbGciOiJIUzI1NiIsInR5cCI6IkpXVCJ9.eyJ1c2VyX25hbWUiOiJiaWdpZC13ZWIiLCJpc0FkbWluIjp0cnVlLCJyb2xlSWRzIjpbInN5c3RlbSJdLCJ0eXBlIjoiYWNjZXNzLXRva2VuIiwiaWF0IjoxNTk0NjEwNjE4LCJleHAiOjE1OTUyMTU0MTh9.0isHh5qJ1pa8rwJVLQD-wjf5Vik5-dwNtwBGM0EFQCw",
"updateResultCallback": "https://bigid.mybigid.com:443/api/v1/tpa/executions/5f0bd3bad10a2604246ad846",
"bigidBaseUrl": "https://bigid.mybigid.com:443/api/v1/",
"tpaId": "5f04b073292cf28c3bb756fb"
}
```
- actionName - the name of the action that you defined in your manifest
that is currently being executed
- executionId - the ID of this particular call to the action. Used in
BigID for auditing and tracking if an action was completed
successfully.
- globalParams/actionParams - parameters defined in the the manifest and
the values set for these parameters in the BigID UI.
- bigidToken - the API token that lets you query BigID APIs. You need
this to get data from BigID
- updateResultCallback - URL is where you can send status information
about long running tasks so BigID knows they are complete
- bigidBaseUrl - the URL of the BigID API so you know where to send API
calls
- tpaId - unique ID for our application from BigID
The bigidToken is a system token that can be used to access any of the
[BigID API endpoints](https://developer.bigid.com/wiki/BigID_API).
Your /execute endpoint should return its status with the following JSON:
```json
{
"statusEnum": "COMPLETED/ERROR/IN_PROGRESS",
"executionId": executionId,
"progress": 1,
"message": "Successfully imported data sources"
}
```
This status will be displayed within the application's activity page in
the BigID UI. Your app may have long running actions and need to
incrementally update the user with its status. You can do that using the
updateResultCallback provided in the initial request to your action.
```http
PUT https://bigidBaseUrl/api/v1/tpa/executions/executionId HTTP/1.1
Authorization: bigidToken
{
"statusEnum": "IN_PROGRESS",
"progress": 0.5,
"message": "Almost there!"
}
```
## Exercise: Implementing App Actions
Write the /execute endpoint for your action. Make sure if there's
invalid data being sent you return a status of ERROR. Call
inventory.update() to update your homegrown inventory. **Implement the
"Sync" action for the /execute endpoint.**
Now that you've created an basic action, you can use API token supplied
by BigID to your action to call any of the [BigID API
Endpoints](https://developer.bigid.com/wiki/BigID_API) to modify and
retrieve data in BigID.
# Creating an App Frontend
Apps can also have a user interface that's displayed within the BigID
UI. This UI takes the form of a website. The app framework provides an
[SDK for both Typescript and
Javascript](https://www.npmjs.com/package/@bigid/app-fw-ui-sdk) that
allows you to communicate with BigID from your app.
In your manifest, set the is_interactive property to true.
```json
{
"is_interactive": true,
}
```
When you install an app with this flag set equal to true, users will be
prompted for a UI URL during installation as can be seen in the below
app install walkthrough. By default this will be set to ``/ui,
so we suggest you use that endpoint to make installation easier for end
users.
This UI can either be served directly to your users or BigID can
function as a proxy to request the contents of the UI from a private IP
address only accessible to BigID.
## Exercise: Adding a UI
You've decided that instead of using actions you want your application
to take the form of a web app. **Implement a /ui endpoint that returns
the text "Hello World" and modify the manifest so BigID knows this is an
interactive application.**
## Framework Features
### Creating Remediation Actions
The app framework allows developers to create remediation actions that
integrate directly into BigID policies and the Security Posture console.
Once created, these actions are available for users to manage security
violations and enforce data policies.
#### How to Create a Remediation Action
To turn an application action into a BigID remediation action, you must:
1. Add the field **\`command_type\`** to the action definition in your
**app manifest**.
2. Ensure the action contains the **mandatory parameter** for its
\`command_type\`.
3. (Optional) Define additional parameters your action requires.
##### \`command_type\` Values
| Command Type | Mandatory Parameter | Type | Description |
|----|----|----|----|
| **objects** | \`objectList\` | \`string\[\]\` | A list of object identifiers (e.g., files). |
| **container** | \`containerName\` | \`string\` | A single container identifier. |
| **column** | \`columnList\` | \`string\[\]\` | A list of column identifiers. |
Remediation Action Types
##### Example: Remediation Action Manifest
Below is an example manifest snippet for an action configured as a
remediation action using the **\`objects\`** \`command_type\`:
```json
{
"ds_supported_types": [
"googledrive",
"gdrive-v2",
"sharepoint-online",
"sharepoint-online-v2",
"o365-onedrive",
"onedrive-v2",
"smb_v2"
],
"action_id": "revoke",
"command_type": "objects",
"description": "Revokes permission from file",
"is_sync": false,
"action_params": [
{
"param_name": "objectList",
"param_type": "Array",
"is_cleartext": true,
"param_description": "The list of file names",
"default_value": ["file1", "file2"],
"param_priority": "primary",
"is_mandatory": true
},
{
"param_name": "coaLabel",
"param_type": "String",
"is_cleartext": true,
"param_description": "The access label to revoke",
"default_value": "coaLabel",
"param_priority": "primary",
"is_mandatory": true,
"fetch_items": {
"api": "api/v1/aci/coa",
"pathToArray": "data",
"pathToValue": "label_name"
}
},
{
"param_name": "dataSource",
"param_type": "String",
"is_cleartext": true,
"param_description": "The data source name",
"default_value": "dataSource",
"param_priority": "primary",
"is_mandatory": true
}
]
}
```
#### Availability in BigID
1. **Policies**: Remediation actions automatically appear in the
**Available Remediation Actions** section of the policy
configuration page.
2. **Case Creation**: When a policy violation creates a **case** in the
Security Posture console, the remediation action will appear in the
**All Actions** dropdown list if the case is on a supported data
source.
3. **Execution**: The user can execute the action at the **case level**
(for all violations) or **object level** (for specific violations).
#### Developer Checklist
- Added \`command_type\` in the manifest.
- Verified inclusion of the correct **mandatory parameter**.
- Declared **supported data sources** (\`ds_supported_types\`).
- Tested execution at both case and object level in the Security Posture
console.
## Asymmetric Signing Without Using SDK
When Asymmetric Signing is enabled, all requests to Third Party
Applications will include a special header called X-Signed-Token. This
token is a base64 encoded JSON object that contains a signature created
using the RSA-SHA256 algorithm.
Example of X-Signed-Token
```json
{
"signaturePayload": {
"exp": 1672508987,
"kid": "key123"
},
"signature": "Base64 or Hex Encoded Signature"
}
```
Components
signaturePayload: Contains the following fields:
- exp: The expiration time of the token in UNIX timestamp format.
- kid: The key ID used for the signature.
signature: The actual signature, encoded in Base64 or Hex.
Steps to Validate the Signature
1. Fetch the Public Keys
To validate the signature, you will need to fetch the public keys from
our platform. These keys are available at:
GET BASE_PLATFORM_URL/api/v1/tpa/public-key
This endpoint returns two keys in JSON format:
```json
{
"keys": [
{
"kid": "keyId1",
"publicKey": ""
},
{
"kid": "keyId2",
"publicKey": ""
}
]
}
```
Decode the X-Signed-Token
Extract the X-Signed-Token from the request header and decode the Base64
encoded JSON object.
Validate the Signature
To validate the signature, you need to:
- Retrieve the kid from the signaturePayload.
- Find the corresponding public key from the fetched keys using the kid.
- Verify the signature using the public key and the RSA-SHA256
algorithm.
- Ensure the exp field in the signaturePayload is still valid (not
expired).
Notes
- Signature Algorithm: Ensure you use the RSA-SHA256 algorithm
for validation.
- Expiration Time
Always check the exp field to avoid accepting expired tokens.
## Storing Application Data
BigID applications should be multitenant. This allows your application
to be used by many BigID installations. To make this possible, you need
someplace to store configuration and application data that is unique to
each environment. BigID allows your application to store information
through a series of API calls named TPA Storage.
To store a value into TPA storage you can post the information to the
[TPA storage
endpoint](https://api.bigid.com/index-custom-dev.html#put-/-tpaId-/storage):
Then to retrieve the values you've stored, you can retrieve them with a
GET request like below:
If you want to retrieve just a single key like the test key we set
earlier you can use the /key endpoint like below:
Both actions and the BigID UI SDK provide you the context of the
environment you're in. To make your application properly store data
across environments, use the bigidBaseUrl provided by an action or the
getBffUrl() function in the UI SDK to determine the base url to send
requests to.
## Retrieve Data Source Credentials
If enabled in the application settings, your application can retrieve
data source credentials from BigID to act upon data sources without
prompting the user to enter credentials again.
To enable this feature, your app needs to do the following:
- Set the APPLICATION_CREDENTIALS_KEY environment variable in your BigID
installation to a SHA256 key.
- Enable "Allow Application to retrieve BigID data sources credentials"
within your application settings
- Retrieve encrypted data source credentials from
[tpa/{tpaid}/credentials/{datasource}](https://api.bigid.com/index-custom-dev.html#get-/tpa/-tpaId-/credentials/-dsName-)
- Decrypt Credentials
## Supply Data Source Credentials
Your application can supply credentials to BigID. This allows BigID to
interface with custom credentials stores like Amazon Secrets Manager,
Azure Credentials Manager, or a homegrown solution. To do this you need
to create an action in your application to receive credential requests.
When the scanner needs to contact a data source that your application is
providing credentials for it will execute the action. This action will
be look the same as other action executions, but will have an additional
parameter **credentialProviderCustomQuery** that is set by the user to
indicate which credential they want your app to provide. The scanner
request will look like the following:
```json
{
"actionName": "your-action",
"executionId": "executionid",
"globalParams": [],
"actionParams": [
{
"paramName": "credentialProviderCustomQuery",
"paramValue": "user set credential locator"
}
],
"bigidToken": "bigidjwt",
"updateResultCallback": "https://bigid.mybigid.com:443/api/v1/tpa/executions/executionid",
"bigidBaseUrl": "https://bigid.mybigid.com:443/api/v1/",
"tpaId": "appid"
}
```
In response to this your application should look up the credential and
supply the username and password in the additionalData field of the
response like below:
```json
{
"executionId": "executionid",
"statusEnum": "COMPLETED",
"progress": 1,
"message": "User found and deserialized",
"additionalData": {
"username": "admin",
"password": "password"
}
}
```
The scanner will then use that username and password to contact the data
source.
A sample password vault implementation is available at
[https://source.bigid.tools/training/credentials-vault](https://source.bigid.tools/training/credentials-vault)
### Credential Types
The above sample shows basic authentication, but there's several other
types of credentials that are available.
#### Basic Credential Type
This credential type supplies a username and password.
```json
{
"executionId": "executionid",
"statusEnum": "COMPLETED",
"progress": 1,
"message": "User found and deserialized",
"additionalData": {
"username": "admin",
"password": "password"
}
}
```
#### JSON Credential Type
This credential type supplies a JSON object.
```json
{
"executionId": "executionid",
"statusEnum": "COMPLETED",
"progress": 1,
"message": "User found and deserialized",
"additionalData": {
"content_enc": "{}"
}
}
```
#### Personal Access Token Credential Type
This credential type supplies an access token for a user.
```json
{
"executionId": "executionid",
"statusEnum": "COMPLETED",
"progress": 1,
"message": "User found and deserialized",
"additionalData": {
"personalAccessToken": "token"
}
}
```
#### Kerberos Principal Credential Type
This credential type supplies a Kerberos Principal username and
password.
```json
{
"executionId": "executionid",
"statusEnum": "COMPLETED",
"progress": 1,
"message": "User found and deserialized",
"additionalData": {
"principal": "principal",
"username": "user",
"password": "pass"
}
}
```
#### Key Credential Type
This credential type supplies a secret key.
```json
{
"executionId": "executionid",
"statusEnum": "COMPLETED",
"progress": 1,
"message": "User found and deserialized",
"additionalData": {
"authentication_key_enc": "secret"
}
}
```
#### Account Authentication Credential Type
This credential type supplies a user account and a secret key.
```json
{
"executionId": "executionid",
"statusEnum": "COMPLETED",
"progress": 1,
"message": "User found and deserialized",
"additionalData": {
"authentication_key_enc": "secret",
"accountName": "user"
}
}
```
#### OAuth2 Credential Type
This credential type supplies an OAuth2 client id, client secret and
token url. It is used for data sources that use the OAuth2 Client
Credentials flow.
```json
{
"executionId": "executionid",
"statusEnum": "COMPLETED",
"progress": 1,
"message": "User found and deserialized",
"additionalData": {
"url": "tokenurl.com/oauth2/token",
"clientId": "clientid",
"client_secret_enc": "secret"
}
}
```
#### Role Credential Type
This credential type supplies a role name and session name.
```json
{
"executionId": "executionid",
"statusEnum": "COMPLETED",
"progress": 1,
"message": "User found and deserialized",
"additionalData": {
"roleSessionName": "session",
"roleResourceName": "resource"
}
}
```
#### AAD Service Principal Credential Type
This credential type supplies a principal id and secret used for Azure
Active Directory.
```json
{
"executionId": "executionid",
"statusEnum": "COMPLETED",
"progress": 1,
"message": "User found and deserialized",
"additionalData": {
"principalId": "principal",
"principal_secret_enc": "secret"
}
}
```
#### Credential Credential Type
This credential type supplies an access key and secret.
```json
{
"executionId": "executionid",
"statusEnum": "COMPLETED",
"progress": 1,
"message": "User found and deserialized",
"additionalData": {
"accessKey": "key",
"secret_key_enc": "secret"
}
}
```
#### STS Credential Type
This credential type supplies an access key, secret, and session token
for use with AWS STS.
```json
{
"executionId": "executionid",
"statusEnum": "COMPLETED",
"progress": 1,
"message": "User found and deserialized",
"additionalData": {
"accessKey": "key",
"secret_key_enc": "secret",
"session_token_enc": "000000"
}
}
```
## Custom Permissions and Roles
Permissions in BigID allow you to control which users have access to
which parts of your system. You can create custom permissions to control
how users access your app. For example you could create a custom
permission to make your application read only for your report writers,
but give full access to admins.
Roles in BigID allow you to give a set of permissions to users. For
instance you might want all report writers to be able to do the same
thing. You also might want all users of your app to be able to do
certain things. That's where custom roles come in.
Both custom roles and custom permissions are defined in the manifest.
A custom permission has the following format:
```json
{
"action": "permission.action",
"label": "Label Displayed in UI",
"description": "Description about what this permissions allows the user to do"
}
```
A role is a collection of permissions and has the following format:
```json
{
"name": "test",
"permissions": ["permission.action1","permission.action2"],
}
```
So if we wanted to add a custom permission named app.deleteData and a
custom role named App Admin, our manifest would look like below:
```json
{
"app_name": "Training App",
"description": "This application is a training sample",
"category": "privacy",
"license_verification_key": "",
"license_type":"FREE",
"vendor": "BigID",
"is_interactive": true,
"actions": [],
"global_params": []
"permissions": [
{
"action": "app.DeleteData",
"label": "Allow this user to delete data",
"description": "This allows a user to delete data in sample app"
}
],
"custom_roles": [
{
"name": "App Admin",
"permissions": ["app.DeleteData"]
}
]
}
```
Your application can then retrieve the permissions assigned to a user by
doing a GET request to the /api/v1/roles/rbac/user-permissions endpoint
using the user's token like below:
Custom permissions will be name-spaced with the
permission.applications.{App Name} prefix
--------------------------------------------------------------------------------
# Writing a Java Connector
## SDK Structure and Data Model
In this module, we'll explore the core components of the BigID Connector
SDK and delve into the data model that underpins connector development.
Understanding these elements is crucial for building effective and
interoperable connectors.
### Deep Dive into SDK Modules
The BigID Connector SDK is comprised of three modules, each serving a
distinct purpose:
- **sdk-api** This module houses the interfaces that define the core
functionalities of a connector. These interfaces act as contracts,
specifying the methods that your connector must implement to interact
with BigID and the data source.
- **sdk-data:** This module provides the data model, which includes
classes and objects that represent data source entities in a
standardized format. This standardized representation ensures seamless
communication between your connector and the BigID platform.
- **sdk-utils:** This module offers a collection of utility classes
designed to simplify common development tasks. These utilities can
help with data object conversion, iterator management, and other
functionalities, streamlining your development process.
### Exploring the Data Object Hierarchy
The SDK's data model employs a hierarchical structure to represent data
source entities. This hierarchy consists of three main levels:
- A **Container** Represents the highest-level entry point in a data
source. Examples include a database, a cloud storage bucket, a root
folder, or a user account.
- A **Subcontainer** Represents a secondary entry point within a
container. Examples include a schema within a database, a folder
within a bucket, or a workspace within a user account.
- A **Leaf Object** Represents the lowest level in the hierarchy,
containing the actual data. Examples include tables in a database,
files in a folder, emails in a mailbox, or tickets in a system.
Understanding this hierarchy is crucial for effectively modeling data
source entities and ensuring that your connector can accurately
represent the structure of the data source to BigID.
```mermaid
graph TD
Container --> Subcontainer
Subcontainer --> LeafObject
```
This diagram visually represents the relationship between the three
levels of the data object hierarchy. The *Container* is the root, with
*Subcontainers* nested within it, and *LeafObjects* at the bottom,
containing the actual data.
### Understanding Data Object Types
The SDK supports four types of data sources:
- **Structured** Represents data objects with a defined schema, such as
tables in relational databases or collections in NoSQL databases.
- **Unstructured** Represents data objects without a predefined schema,
such as files in a file system or documents in cloud storage.
- **App** Represents data objects specific to applications, such as
emails, messages, or tickets. These objects often contain a
combination of structured and unstructured data.
Determining the appropriate data source type allows you to know what
interfaces you need to implement.
### Importance of Excluding Sensitive Data
It's crucial to remember that \`DataSourceObjects\` and \`DataLink\`
objects should only contain metadata or indexing information. \*\*Never
include sensitive data, such as passwords, personally identifiable
information (PII), or other confidential details, in these objects.\*\*
BigID provides mechanisms for handling sensitive data during the
scanning process, and including it in the metadata objects can pose
security risks.
This concludes the module on SDK Structure and Data Model. You now have
a deeper understanding of the SDK structure and the data model that
forms the foundation of connector development. In the upcoming modules,
we'll explore the various interfaces that enable your connector to
interact with BigID and data sources.
--------------------------------------------------------------------------------
# Installing a Connector
import { Aside } from '@astrojs/starlight/components';
First, you'll need to install your connector onto a server. Many people
have a dedicated server for Apps and Connectors, other people just
install them directly onto the BigID App server. Where you install the
connectors depends on the resources of your BigID App server. **Wherever
they are installed, BigID connectors must be network accessible from
your scanners.**
Since BigID connectors can be created in any language and with any
deployment methodology, installing the connector may differ. What won't
differ is where you find out how to install a connector. Connectors
obtained from the marketplace will have a Setup and Support guide that
details the steps to install them. Connectors obtained from the BigID
community will have a README.md file detailing this information.
Once you have your connector installed on a server, we can install it
within BigID.
1. Once logged into BigID, navigate to Administration \> Data Source
2. Select + New Data Source
3. If your connector is for an unstructured data source, select "GRA
Unstructured". Otherwise select, "Generic REST API"
4. Enter the server URL of your REST connector into the "Generic server
URL" field
5. Fill out any other parameters as described in your connector's
README.
6. Test your connection and save
--------------------------------------------------------------------------------
# What is a BigID Connector?
import { Aside } from '@astrojs/starlight/components';
## What is a BigID Connector
BigID Connectors allow your BigID system to provide insights about new
types of data. Whether that's a known data type like CSV from a new type
of data source or something completely new to the BigID ecosystem, a
connector will allow you to bring BigID's data discovery capabilities to
that system.
### Why do we need connectors?
Every data source has its own way of communicating with third parties.
Some data sources return information nicely organized, others return it
as a jumbled mess. In order for BigID to give you the insights you
expect, data needs to be fed to BigID in a consistent way. Connectors
work as translators between the multitude of formats that data sources
have adapted to the standard format BigID expects. Note that even if the
data format is the same (REST JSON, REST XML, GraphQL, etc) small
differences make it difficult to reuse connectors. Think of a connector
as a way to interface with a single system.
### How are connectors implemented?
Connectors can either be implemented as a REST API or as a Java JAR
file. REST connectors are bound by the limitations of HTTP connections
including timeouts, size limitations and more. Java connectors are well
suited for complex use cases especially those involving data sources
that stream data.
### BigID Scanning Process
While BigID has different scanning methods (snapshots, metadata scans,
Hyperscan), they all depend on scanners. Scanners allow BigID to contact
data sources and create the search maps that are used to power the BigID
system. Depending on your deployment model you may have scanners located
in the BigID cloud, on-premise, or in your organization's cloud provider
accounts. Scanners take the form of a Docker container and require only
outbound network access.
In a scan, the scanner will do the following:
- If correlation is enabled, load all correlation records in order to
find them within data sources.
- Scan table and file metadata to determine access permissions and
ownership
- Classify data streams
After a user starts a scan, the scanner will use the data in the scan
request to determine what type of connection to make. In the case of
REST API scans, the connector will reach out to your connector. This
means your REST connector must allow inbound network access from your
scanner, and your data source must allow inbound access from the
connector. For Java connectors, the scanner will directly communicate
with the data source.
### Connector Types
There are two different types of connectors supported within BigID.
Which type of connector you want to use to connect to your data source
will have broad implications on setup, network security settings, and
connector installation.
#### Internal (Java-based Connectors)
Most of the connectors you are familiar with are Java-based connectors.
These connectors are written in the Java programming language and
distributed as JAR files. To install a new Java-based connector, an
administrator must manually load the connector JAR file into the scanner
using the command-line. Thankfully, the 50+ BigID written internal
connectors are bundled in the scanner by default. The scanner directly
uses these connectors’ code to connect to your data sources.
These connectors allow large amounts of customization in the scanning
process and the connection to your data source. Due to the customization
options, they are more complicated to create and are not the recommended
connector development method for BigID customers.
#### External (Generic REST API Connectors)
External connectors allow you to create a connector in your favorite
programming language. The scanner will communicate with your connector
over HTTPS so as long as your programming language of choice can respond
to web requests, it can be used to create an external connector.
External connectors can be hosted on any server that has a network
connection to both your scanner and your data source.
There are two different types of external connectors that you can
create: unstructured and structured.
##### Unstructured External Connector
Unstructured connectors allow BigID to scan files from a given data
source. An example of an unstructured data source is Google Drive.
##### Structured External Connector
Structured connectors allow BigID to scan databases. An example of a
structured connector would be our MySQL connector.
### The Simplest BigID Connector
Below is sample code for the simplest REST connector you can make.
```js
const express = require('express')
const app = express()
const port = 3000;
// This is our fake data for the connector
const FAKE_DATA = {
Customers: [
{ Id: 1, Name: "Michael", Address: "100 Osceola Parkway, Kissimmee FL" },
{ Id: 2, Name: "Bob", Address: "1 Sand Lake Rd, Orlando FL" },
{ Id: 3, Name: "Stewart", Address: "1 Sand Lake Rde, Orlando FL" }
],
Orders: [
{ Id: 1, Item: "banana", customerId: 2, Price: 1 }
]
};
/**
* Describes all objects inside a data source
*
* @async
* @param {{ domain: string; user: string; pass: string; header: string; }} login login information from BigID
* @param {string} object name of object
*/
async function describeObjects(login) {
const objects = [];
// Create a new object for each table
for (let table in FAKE_DATA) {
let thisObject = { objectName: table, fields: [] };
// Get field definitions for the object using the first item in each object
for (let field in FAKE_DATA[table][0]) {
thisObject.fields.push({ fieldName: field, fieldType: typeof FAKE_DATA[table][0][field] });
}
objects.push(thisObject);
}
return {
status: 'success',
objects: objects
};
}
/**
* Describes a specific object in the data source.
*
* @async
* @param {{ domain: string; user: string; pass: string; header: string; }} login login information from BigID
* @param {string} object name of object
*/
async function describeObject(login, object) {
const objectFields = [];
// Get field definitions for the object using the first item in the object
for (let field in FAKE_DATA[object][0]) {
thisObject.fields.push({ fieldName: field, fieldType: typeof FAKE_DATA[table][0][field] });
}
objectFields.push(thisObject);
return {
status: "success",
objectName: object,
fields: objectFields
}
}
/**
* Get records from data source for a specific object
*
* @async
* @param {{ domain: string; user: string; pass: string; header: string; }} login login information from BigID
* @param {string} object
* @param {number} offset
* @returns {unknown}
*/
async function getRecords(login, object, offset, count) {
let records = [];
// an offset defines where we should start. Use that as the starting point
// TODO splice only elements needed
const recordWindow = FAKE_DATA[object];
for(let record of FAKE_DATA['object']) {
let thisResult = {
id: record.Id, // All records *must* have a unique ID for BigID to identify them
data: []
};
for(let field in record){
thisResult.data.push({fieldName: field, fieldType: typeof record[field], fieldValue: record[field]});
}
records.push(thisResult);
}
return {
status: "success",
records: records,
offset: records.length
}
}
/**
* Get a count of the number of records of a given object type
*
* @async
* @param {{ domain: string; user: string; pass: string; header: string; }} login login information from BigID
* @param {string} object object name
* @returns {unknown}
*/
async function countRecords(login, object) {
return {
status: "success",
count: FAKE_DATA[object].length
};
}
/**
* Search through objects
*
* @param {{ domain: string; user: string; pass: string; header: string; }} login
* @param {*} object
* @param {*} search
*/
function search(login, object, search) {
//TODO
}
/**
* Returns BASIC formatted auth data from the authorization header
*
* @param {*} req
* @returns {{ user: string; pass: string; header: string; }}
*/
function getAuthData(req) {
if (req.headers.authorization === undefined) {
console.log("No Login information supplied");
res.status(401).json({
status: 'error'
})
return null;
}
const b64auth = (req.headers.authorization || '').split(' ')[1] || ''
const [login, password] = Buffer.from(b64auth, 'base64').toString().split(':');
return {
header: 'Basic ' + Buffer.from(login + ':' + password).toString('base64')
}
}
app.get('/objects/', async (req, res) => {
console.log(`LISTOBJS()`);
const login = getAuthData(req);
if (login === null) { return; }
const obj = await describeObjects(login);
if (obj.status === "success") {
return res.json(obj)
}
return res.status(401).json(obj);
});
app.get('/objects/:object/describe', async (req, res) => {
console.log(`DESCRIBEOBJS(object=${req.params.object})`);
const login = getAuthData(req);
if (login === null) { return; }
let result = await describeObject(login, req.params.object);
if (result.status === "success") {
return res.json(result);
}
return res.status(401).json(result);
});
app.get('/objects/:object/records', async (req, res) => {
console.log(`GETRECORDS(offset=${offset},count=${count},object=${req.params.object})`);
const login = getAuthData(req);
if (login === null) { return; }
let offset = req.query.Offset || 0;
let count = req.query.Count || 25;
if (count > 200) { count = 200 }
return res.json(await getRecords(login, req.params.object, offset, count));
});
app.get('/objects/:object/count', async (req, res) => {
console.log(`COUNTRECORDS(object=${req.params.object})`);
const login = getAuthData(req);
if (login === null) { return; }
return res.json(await countRecords(login, req.params.object));
});
app.listen(port, () => {
console.log(`Sample Connector listening on port ${port}`)
});
```
### Knowledge Check
import Quiz from "../../../components/Quiz";
--------------------------------------------------------------------------------
# Writing a REST Connector
import { Aside } from '@astrojs/starlight/components';
import ExerciseIframe from '@/components/ExerciseIframe.astro';
import Scenario from '@/components/Scenario.astro';
## Connectors Overview
BigID Connectors act as translators between your custom data sources and the standardized format BigID expects. While BigID supports native Java-based internal connectors, **External REST Connectors** allow you to write integrations in any programming language. As long as your service can respond to HTTP requests in the format BigID expects, the BigID scanner will be able to map, catalog, and classify your custom data.
If you need a refresher on the types of connectors and how BigID scanning works, please read [What is a BigID Connector?](/connectors/what-is-a-bigid-connector/) before proceeding.
---
# Writing a Structured Connector
While your data source may store its data differently, you will need to
reorganize it into this structure for BigID to scan the data. Remember
that connectors are translators. **Improper translation from your data
source's format to BigID's is the largest issue when testing and
developing custom connectors.** See the below example of a JSON file for
a single user converted into this format:
```json
{
"user":"user@bigid.com",
"phone": "(321) 555-5555",
"information": [
{"key": "name", "value": "user"},
{"key": "favcolor", "value": "green"}
]
}
```
translates to
```json
{
"objectName": "User",
"fields": [
{
"fieldName": "Name",
"fieldType": "string"
},
{
"fieldName": "FavColor",
"fieldType": "string"
},
{
"fieldName": "Phone",
"fieldType": "string"
}
]
}
```
```json
{
"id": "user@bigid.com",
"fields": [
{
"fieldName": "phone",
"fieldValue": "(321) 555-5555"
},
{
"fieldName": "name",
"fieldValue": "user"
},
{
"fieldName": "favcolor",
"fieldValue": "green"
}
]
}
```
## Connector Endpoints
BigID will request and view your connector’s hierarchy through six
endpoints:
- List what **fields** an **object** has (GET
/objects/``/describe)
- List what **objects** exist (/objects)
- List what **records** are inside an **object** (GET
/objects/``/records)
- Count the number of **records** inside an **object** (GET
/objects/``/count)
- Return the **fields and values** for a given record ID (GET
/objects/``/``)
- Search for **records** in an **object** (POST
/objects/``/sar)
You are not required to implement every endpoint outlined here. If you
want a connector that only does DSAR requests you only need to implement
the following endpoints:
- List what **objects** exist (/objects)
- List what **fields** an **object** has (GET
/objects/``/describe)
- Search for **records** in an **object** (POST
/objects/``/sar)
### List what **fields** an **object** has
Since all records within an object must contain the same fields, BigID
uses an object's fields to tell users what type of information is inside
your data source. BigID expects the following response by your connector
to see what fields an item has:
```http
GET /objects/User/describe HTTP/1.1
```
```json
{
"status": "success",
"objectName": "User",
"fields": [
{
"fieldName": "Name",
"fieldType": "string"
},
{
"fieldName": "FavColor",
"fieldType": "string"
},
{
"fieldName": "Phone",
"fieldType": "string"
}
]
}
```
#### Exercise: List what **fields** an **object** has
You want to create a connector for your org to be able to scan for
sensitive data within an ecommerce system, ShopDB. **Create an endpoint
for your connector that allows BigID to list an object's fields**
### List what **objects** exist
Now that we have an object class created, we need to let BigID all of
the objects our connector has access to. Our object listing endpoint
needs to display the fields within an object that we implemented in the
previous exercise. As we implement these endpoints, many of them rely on
one another.
```http
GET /objects/ HTTP/1.1
```
```json
{
"status": "success",
"objects": [
{
"objectName": "User",
"fields": [
{
"fieldName": "Name",
"fieldType": "string"
},
{
"fieldName": "FavColor",
"fieldType": "string"
},
{
"fieldName": "Phone",
"fieldType": "string"
}
]
}
]
}
```
#### Exercise: List what **objects** exist
For your ShopDB connector to work, you need to tell BigID what objects
are inside the database. The code for this endpoint is similar to your
previous endpoint. **Create an endpoint for your connector that allows
BigID to list out all objects.**
### List what **records** are inside an object
Now that BigID knows what objects we have and what type of information
it can find inside those objects, we need to return the actual data
BigID will scan.
```http
GET /objects/User/records?Count=&Offset= HTTP/1.1
```
```json
{
"status": "success",
"records": [
{
"id": 1,
"data": [
{
"fieldName": "Name",
"fieldValue": "Michael",
"fieldType": "string"
},
{
"fieldName": "Phone",
"fieldValue": "3215555555",
"fieldType": "string"
}
]
}
],
"offset": 1
}
```
#### Exercise: List what **records** are inside an object
BigID has the structure of your connector, but scans are still failing
with 0 records found. **Create an endpoint for your connector that
allows BigID to list out records.**
### **Count** the number of records inside an object
In order for BigID to properly paginate through your data sources, we
need to know how many total records to expect.
```http
GET /objects/User/count HTTP/1.1
```
```json
{
"status": "success",
"count": 1
}
```
### Record Pagination
In a previous exercise, you returned all records inside of an object in
a single call. It's extremely common for providers not to allow all
records to be returned in a single call either do to performance, or
cost reasons. This is where the offset and count parameter come in.
Data providers typically meter their APIs in one of the following ways:
- Limit the number of requests per second/hour/day
- Limit the number of records returned in a single request
- Limit the amount of data in GB processed in a given time period
To handle these use cases, BigID has two properties on the records
endpoint: Count and Offset.
Count dictates the batch size. This is how many records your connector
should return in a single call. This allows BigID users to throttle your
connector based on how many records it returns per page.
Offset allows BigID to paginate requests.
A sample scan using the records endpoint looks like the following:
` sequenceDiagram`
` participant BigID`
` participant Connector`
` BigID->>Connector: Call /count`
` Connector-->>BigID: Total records = 40`
` BigID->>Connector: Call /records with offset = 0 and count = 20`
` Connector-->>BigID: 20 Records retrieved, offset = 20`
` BigID->>Connector: Call /records with offset = 21 and count = 20`
` Connector-->>BigID: 20 Records retrieved, offset = 40`
` BigID->>BigID: Stop as offset >= total (40 >= 40)`
` `
#### Exercise: Pagination
Your connector is constantly scanning and scans are not completing.
**Implement pagination so BigID knows when you are done scanning.**
### Return the fields and values for a given **record ID**
There are cases when we only want to look into an individual record.
This is especially true in cases where we already know the unique ID
like a DSAR or a record investigation.
```http
GET /objects/User/records/1 HTTP/1.1
```
```json
{
"status": "success",
"records": [
{
"id": 1,
"data": [
{
"fieldName": "Name",
"fieldValue": "Michael",
"fieldType": "string"
},
{
"fieldName": "Phone",
"fieldValue": "3215555555",
"fieldType": "string"
}
]
}
],
"offset": 1
}
```
#### Exercise: Return the fields and values for a given **record ID**
Your team has been trying to investigate sensitive data in your data
source using the "Investigate" button in the data inventory, but they
aren't getting results. **Create an endpoint for your connector that
allows BigID to lookup an individual record**
### **Search** for records in an object
Our final service that our connector needs to offer is the ability to
search for records. This is what allows our connector to do DSARs.
Depending on your data source, you may need to implement searching on
your own.
```http
POST /objects/User/records/sar HTTP/1.1
Content-Type: application/json
[{"fieldName": "Name", "fieldValue": "Michael", "isFullMatch": "false"}]
```
```json
{
"status": "success",
"records": [
{
"id": 1,
"data": [
{
"fieldName": "Name",
"fieldValue": "Michael",
"fieldType": "string"
},
{
"fieldName": "Phone",
"fieldValue": "3215555555",
"fieldType": "string"
}
]
}
],
"offset": 1
}
```
#### Exercise: **Search** for records in an object
Your team is using BigID to comply with GDPR DSAR requests. ShopDB
doesn't have any search functionality so you'll have to implement it
yourself. **Implement the SAR endpoint so BigID can properly query your
data source.**
### Authentication
The connector you've written is allowing anyone on the internet to see
the information inside of your data source which is no good. This
connector's database also has no username and password which is
extremely rare. Typically the data sources your connectors will access
will also require authentication of some type.
BigID has the ability to store and manage these credentials for you
inside of the BigID system or use credentials from external password
vaults. When a scan is started, BigID will send the credentials to your
connector.
Credentials sent to your connector will always take the form of a [Basic
authentication
header](https://en.wikipedia.org/wiki/Basic_access_authentication). This
header is not encrypted. For this reason, you must never install a BigID
connector without HTTPS.
While Basic auth credentials always take the form of a username and
password, not all systems use that mechanism for login. Below are some
examples of how you can format a username and password into the
credentials your application is expecting:
- OAuth Client Credentials - Username:
[https://tenanturl.com/,CLIENT_ID](https://tenanturl.com/,CLIENT_ID) Password: CLIENT_SECRET
- Multi Tenant SaaS application with API key - Username: tenantID
Password: API_KEY
- SaaS application with just an API key - Username: `` Password:
API_KEY
#### Exercise: Authentication
Your organization is writing a connector and wants to be sure the data
is only viewable to BigID. You've set up the appropriate firewalls, but
also want your connector to be protected by a username and password.
**Protect your records endpoint with username password auth**
# Writing an Unstructured Connector
## Connector Endpoints
BigID will request and view your connector’s hierarchy through six
endpoints:
- List what **Containers** exist (/objects)
- List what **Objects** exist (/objects/``?Offset=)
- Return the **Metadata** for a given object (GET
/objects/``/``/describe)
- Return the **InputStream** for a given object (GET
/objects/``/``/content-stream)
- **Search** for specific data inside objects (POST
/objects/``/``/sar?Offset=)
Just like for structured connectors, you are not required to implement
every endpoint outlined here. If you want a connector that only does
DSAR requests you only need to implement the following endpoints:
- List what **Containers** exist (/objects)
- List what **Objects** exist (/objects/``?Offset=)
- **Search** for specific data inside objects (POST
/objects/``/``/sar?Offset=)
### List what **containers** exist
The first step in BigID's scan of unstructured data sources will always
be to list out the containers that exist within a data source. This
allows BigID to know where to start the discovery process. Compared to
structured connectors, this endpoint is extremely simple. That's because
containers or folders don't really specify anything about the
information that can be inside them, just that they are a storage
location.
```http
GET /objects HTTP/1.1
```
```json
{
"status": "success",
"containers": [
{
"containerName": "Folder"
},
{
"containerName": "Folder2"
}
]
}
```
#### Exercise: List what **containers** exist
Your team has a set of CSV files they are looking to scan on a file
server. **Implement the containers endpoint to let BigID know what
containers are present on the file server**
### List what **objects** exist inside a container
Now that BigID knows what containers our connector has access to, we can
give it insights into the objects inside those containers. This endpoint
will also provide BigID with the metadata about the objects so we can do
things like HyperScan and enforce permissions policies.
You'll notice that certain fields are set directly on the object,
whereas others are set inside of custom fields. The field set in the
object are predetermined by the BigID connector specification and cannot
change. The custom fields object allows you to add your own!
```http
GET /objects/Folder?Offset= HTTP/1.1
```
```json
{
"status": "success",
"objects": [
{
"containerName": "Folder",
"objectName": "1.pdf",
"dateCreated": "26/02/2020 19:00:34",
"lastModified": "26/02/2020 19:00:34",
"owner": 501,
"sizeInBytes": 177924,
"schemaFields": "NULL",
"sarCapable": false,
"customFields": [
{
"fieldName": "file_type",
"fieldValue": "pdf"
}
]
}
],
"offset": 1
}
```
#### Exercise: List what **objects** exist inside a container
List the objects inside of the container and their metadata so BigID can
scan populate the catalog. **Implement the objects endpoint to let BigID
know what objects are present on the file server**
### Return the **metadata** for a given object
Just like we listed out the metadata for all objects, we need to be able
to list out the metadata for a single object so BigID can inspect single
objects without needing to go through potentially thousands of listings
in our container.
```http
GET /objects/Folder/File/describe HTTP/1.1
```
```json
{
"status": "success",
"containerName": "Folder",
"objectName": "1.pdf",
"dateCreated": "26/02/2020 19:00:34",
"lastModified": "26/02/2020 19:00:34",
"owner": 501,
"sizeInBytes": 177924,
"schemaFields": "NULL",
"sarCapable": false,
"customFields": [
{
"fieldName": "file_type",
"fieldValue": "pdf"
}
]
}
```
#### Exercise: Return the **metadata** for a given object
We need our users to be able to know the metadata of a single file. The
format is exactly the same as the container listing endpoint so feel
free to reuse your code. **Implement the object endpoint to let BigID
know a single object's metadata**
### Return the **inputStream** for a given object
In order for BigID to do classification on the contents of the file it
needs access to them. The inputStream endpoint is unique in that it just
returns the raw data from the file. There's no formatting required here,
just return the raw data.
```http
GET /objects/Folder/File/content-stream HTTP/1.1
utf-8 data here
```
#### Exercise: Return the **inputStream** for a given object
### **Search** for specific data inside objects
```http
POST /objects/Folder/File/sar?Offset= HTTP/1.1
Content-Type: application/json
[{"fieldName": "Name", "fieldValue": "Michael", "isFullMatch": "false"}]
```
```json
{
"status": "success",
"records": [
{
"id": "container/object",
"data": [
{
"searchedFieldName": "fieldName",
"searchedFieldValue": "fieldValue",
"fullObjectName": "container/object",
"offset": "12"
}
]
}
]
}
```
### Exercise: **Search** for specific data inside objects
# Distributing a BigID Connector
` graph TD`
` Cloud[BigID Cloud Environment]`
` OnPrem[BigID On-Premise Environment]`
` Connector[Connector]`
` Scanner[Scanner]`
` Target[Target Data Source]`
` `
` subgraph BigID Environment`
` Cloud --- |Outbound Access| Scanner`
` OnPrem --- |Outbound Access| Scanner`
` end`
` `
` Scanner -->|Inbound Access| Connector`
` Connector -->|Outbound Access| Target`
BigID connectors are distributed as Docker images. This allows them to
be run within the BigID app server Kubernetes cluster or on the
Kubernetes clusters and Docker compose servers running an organization's
scanners. As long as your scanner can access your connector and your
connector can access your data source there are no other deployment
requirements.
\n\n---\n\n## Pre-Flight Checklist\n\nBefore creating a connector for a given data source you'll need to collect the following information:\n\n- What is the type of data returned from the API?\n- Where is the API documentation? Do you have access to it?\n- What authentication modes does this API support?\n- Does your account have any kind of usage limits? (X requests per day, per hour, per minute?)\n- Is there a programmatic representation of all API endpoints? (OpenAPI, Swagger)\n- Is this a structured data source or an unstructured data source?\n- What are the credentials for a test environment of this data source?\n\nAfter you have obtained the above information, determine what data models from the data source you wish to include in your connector. There may be hundreds of data models, but only a few may contain PI. For each of these data models, you need to know the following information:\n\n- What are the fields for this data model? What are the types of those fields? (ex: name=string, age=number)\n- What endpoint gives the records of this data model? (ex: /animals/)\n- What endpoint allows you to lookup a single record of this data model given an id? (ex: /animals/1)\n- What endpoint allows you to search for records in this data model matching criteria? (ex: animals/search?type=cat)\n\nYou now have all the information required to build a connector.
--------------------------------------------------------------------------------
# Getting Started
import { Vimeo } from '@astro-community/astro-embed-vimeo';
import { Card, CardGrid, Aside } from '@astrojs/starlight/components';
Welcome to the BigID Developer Portal! With the BigID data intelligence platform, you can bring our data intelligence anywhere.
BigID has **four main integration options**: the REST API, BigID Apps, BigID Connectors, and Model Context Protocol (MCP) Servers. Each of these integration options is designed for a different use case.
## Integration Options
The BigID API allows you to do anything you can do through the BigID UI programmatically. That could be adding data sources, running DSAR requests from an external privacy portal, or even extracting insights to a data science tool like Tableau or R Studio.
The most common use case for the BigID API is to automate repetitive tasks.
[Go to API Docs →](/api/bigid-api/)
BigID Applications allow you to add your own business logic and UI to a BigID system. This means that you can add dashboards, synchronize BigID with an external system, or even add entire data governance applications.
[Learn about Apps →](/apps/building-a-bigid-app/)
Out of the box, BigID ships with 55+ connectors, but if you want insights using a non-standard or custom system, you have the option to create your own connector. Connectors are created with your programming language of choice as a REST API.
[Build a Connector →](/connectors/what-is-a-bigid-connector/)
Interact with BigID using the Model Context Protocol (MCP) and Large Language Models. MCP allows AI agents to securely query the BigID catalog and perform data intelligence actions autonomously.
[Explore MCP & LLMs →](/llms/llms/)
---
## Exploring the Options
### BigID Apps
BigID Applications are written in your programming language of choice as a web application. You also can use our partner [Retool](https://retool.com) to create low-code BigID apps.
There are two different types of BigID Apps: **Utility** and **Interactive**.
#### Utility Applications
Utility Applications allow you to run custom code at regular intervals or on-demand. Your custom code will be given a BigID API Token to access data from a BigID system.
#### Interactive Applications
Interactive Applications allow you to add additional screens to the BigID user interface. These applications get their authentication information using the [BigID UI SDK](https://www.npmjs.com/package/@bigid/app-fw-ui-sdk).
### REST API Resources
- Documentation for the BigID API is available on the BigID Docs site at [docs.bigid.com/bigid/reference/api-getting-started](https://www.docs.bigid.com/bigid/reference/api-getting-started).
- For a quick overview on how to create an API integration, follow our [BigID API Tutorial](/api/bigid-api-authentication-tutorial/).
### MCP Servers
The Model Context Protocol (MCP) provides a standardized way for Large Language Models to interact with the real world. By deploying the BigID MCP Server, you can give your AI agents and custom LLM applications the ability to autonomously query the BigID data catalog, investigate privacy findings, and execute intelligent workflows.
- The official BigID MCP Server repository and documentation are hosted on [GitHub](https://github.com/bigexchange/bigid-plugin-official).
- Learn how MCP architecture works and how to design Agentic workflows in our [LLMs & Agents Guide](/llms/llms/).
---
## Next Steps
Once you've decided on your integration path, check out our publishing guidelines!
- [Marketplace Publishing Guidelines](/guides/publish-marketplace-guidelines/)
--------------------------------------------------------------------------------
# BigID Developer Portal | Documentation & APIs
> Official developer documentation and wiki for the BigID platform. Learn how to build native and external Apps, integrate data with Connectors, use the BigID API, Privacy Portal API, and build LLM-driven agents.
import { Card, CardGrid } from "@astrojs/starlight/components";
import ClassificationDemo from "../../components/ClassificationDemo";
import DataAnimation from "../../components/DataAnimation";
import MCPAnnouncement from "../../components/MCPAnnouncement.astro";
#### What you can build
Manage BigID programmatically. Automate data source creation, trigger system scans, and retrieve catalog insights.
[View API Tutorials →](/api/bigid-api/)
Automate data subject rights (DSARs), verify user identities, and download secure personal data report bundles.
[Explore Privacy Tutorials →](/privacy-portal-api/authentication/)
Build custom logic and screens on top of the BigID platform using our Apps framework. Connect to external governance tools.
[Learn about Apps →](/apps/building-a-bigid-app/)
Write custom connectors to scan and catalog any un-supported data source in your ecosystem.
[Build a Connector →](/connectors/what-is-a-bigid-connector/)
Interact with BigID using the Model Context Protocol (MCP) and Large Language Models like Claude and ChatGPT.
[Explore LLMs →](/llms/llms/)
--------------------------------------------------------------------------------
# Apps Agent Instructions
# BigID Apps - Agent Instructions
This directory contains documentation for building BigID Applications. When generating code, answering questions, or assisting developers with BigID Apps, adhere to the following core concepts:
## Core Architecture
- BigID Apps are standalone web applications. They can be written in any programming language (Node.js/Express, Python/FastAPI, Java/Spring, etc.) as long as they can respond to HTTP requests.
- They do not run *inside* the BigID core codebase; they run alongside it and communicate via HTTP.
## App Types
1. **Utility Applications**: Run custom code at regular intervals or on-demand. They rely on the `actions` defined in the manifest.
2. **Interactive Applications**: Provide a user interface embedded within BigID. These require `is_interactive: true` in the manifest and typically serve HTML/JS at a `/ui` endpoint. They use the `@bigid/app-fw-ui-sdk` NPM package for client-side context.
## Mandatory Endpoints
Every BigID app MUST implement at least the following endpoints:
- `GET /manifest`: Returns a JSON object describing the app (`app_name`, `version`, `actions`, `permissions`, `global_params`).
- `POST /execute`: The main webhook endpoint. When a user triggers an app action in BigID, BigID sends a POST request here containing the `actionName`, `bigidToken`, and any parameters.
## Authentication & Security
- **Never hardcode credentials.**
- When BigID calls `/execute`, it provides a `bigidToken` in the JSON payload. The app must extract this token and use it as a `Bearer` token in the `Authorization` header to make subsequent calls back to the BigID API.
- For interactive apps, the UI SDK automatically handles token retrieval from the parent BigID window.
--------------------------------------------------------------------------------
# Connectors Agent Instructions
# BigID Connectors - Agent Instructions
This directory contains documentation for building BigID Connectors. When generating code, answering questions, or assisting developers with BigID Connectors, adhere to the following core concepts:
## Core Architecture
- Connectors allow BigID to scan and catalog data from custom or unsupported data sources.
- They are typically distributed as Docker containers and run alongside the BigID Scanners.
## Connector Types
1. **Internal Connectors (Java)**: Built directly into the scanner using the BigID Java Connector SDK. Highly performant but requires Java expertise.
2. **External Connectors (REST API)**: Standalone web services written in any language. The BigID scanner communicates with them over HTTP to stream data.
## REST Connector Structure
An external REST connector must implement specific endpoints depending on the data type:
- **Structured Data**: Needs endpoints to list objects (`/objects`), list fields within objects, and read tabular records (`/objects/{objectName}/records`).
- **Unstructured Data**: Needs endpoints to list containers (`/containers`), list objects/files within containers, and a content-stream endpoint to stream raw binary data back to BigID for classification.
## Pagination & Implementation Rules
- **Pagination is mandatory.** All endpoints that return lists of objects or records MUST support `limit` and `offset` query parameters to prevent memory exhaustion and timeout errors in the BigID scanner.
- **Connection Testing**: Every connector must implement a `/test` endpoint that validates the user-provided credentials against the target data source without running a full scan.
- **Security**: Connectors receive data source credentials over HTTP. Therefore, they should always be secured behind HTTPS/TLS in production.
--------------------------------------------------------------------------------
# About LLMs
import { Aside } from '@astrojs/starlight/components';
## LLM Fundamentals
Large Language Models (LLMs) are a type of Artificial Intelligence known
as Predictive Models. They are trained on vast amounts of text data,
allowing them to understand and generate human-like language by
predicting the most probable next word (or "token") in a sequence. A key
characteristic of a standard LLM is that its knowledge is "frozen" at
the time of its training. This means its knowledge is limited to the
data it was trained on and doesn't include any information or events
that occurred after that point.
```mermaid
graph TD
A[Training Data] --> B{Model};
C[Question] --> B;
B --> D[Token];
```
**Example Interaction:**
```text
User: To be, or not to be, that is the...
LLM: question.
```
### Retrieval Augmented Generation (RAG)
Retrieval Augmented Generation (RAG) is a technique designed to overcome
the "frozen knowledge" limitation of LLMs. It allows a model to access
current, external data that was not part of its original training set.
This is achieved by first searching an external knowledge base (like a
company's internal documents or a real-time database) for information
relevant to the user's query. This retrieved information is then
provided to the LLM as additional context along with the original
prompt, enabling it to generate a more informed, accurate, and
up-to-date answer.
```mermaid
graph TD
A[User's Question] --> B{RAG Process};
B --> C[(Search External Data)];
C --> D[Relevant Information];
A --> E{LLM};
D --> E;
E --> F[Generated Answer];
```
**The RAG process intercepts a user's question, searches for relevant
information, and provides that information to the LLM as context to
generate a better answer.**
**Example of RAG in action:**
```text
User's original question
User: What was our company's Q4 revenue?
Step 1: RAG system searches internal documents and finds the following text in "budget.xlsx":
"Q4 2025 revenue reported at $1,000,000"
Step 2: The system combines the user's question with the found context
Augmented Prompt for LLM:
Context: "Q4 2025 revenue reported at $1,000,000"
Question: What was our company's Q4 revenue?
Step 3: LLM provides an answer based on the new context
LLM: Our company's Q4 revenue was $1,000,000.
```
### Tool Calling
Tool calling significantly expands an LLM's capabilities beyond simple
information retrieval and text generation. It gives an LLM the ability
to interact with and take action on external systems. When an LLM is
configured with tools, it receives a description of what each tool does
(e.g., a function or an API) and what inputs it requires. Based on the
user's request, the model can then intelligently decide which tool to
call and with what arguments to achieve a specific goal. This transforms
the LLM from a passive text generator into an active system that can
execute tasks.
```mermaid
graph TD
A[User's Question] --> B{LLM};
C[Available Tools] --> B;
B --> D[Decide Tool to Call];
D --> E[Execute Tool];
E --> F[Tool Result];
F --> B;
B --> G[Final Answer];
```
**The LLM is provided with a set of tools. When asked a question, it
determines which tool to call, executes it, and uses the result to
formulate the final answer.**
**Example of the Tool Calling process:**
```json
// 1. User asks a question that requires an action
{ "user_prompt": "Please order a pizza for me." }
// 2. The LLM is given a description of available tools
{
"available_tools": [
{
"name": "place_order",
"description": "Places an order for a food item.",
"parameters": {
"item": "string",
"quantity": "integer"
}
}
]
}
// 3. The LLM decides which tool to use
{
"thought": "The user wants to order a pizza. I should use the 'place_order' tool.",
"tool_to_call": "place_order",
"parameters": {
"item": "pizza",
"quantity": 1
}
}
// 4. The system executes the tool and gets a result
{ "tool_response": { "status": "success", "order_id": "12345" } }
// 5. The LLM uses the result to answer the user
{
"llm_response": "I have successfully placed an order for one pizza. Your order ID is 12345."
}
```
## LLMs vs. Agents
With the ability to use tools, LLMs evolve from being simple models into
the core of **agents**. An LLM acts as the "brain" of an agent. The
agent framework provides the LLM with memory (to recall past
interactions) and access to a suite of tools. This combination enables
the agent to reason about a task, break it down into a sequence of
steps, and execute those steps by calling the appropriate tools. This
ability to autonomously plan and act on the real world is the key
differentiator between a basic LLM and an agent.
Agents are more than just predictive models; they can:
Act on their own
Remember their past interactions
Take action in the real world
## The Role of an MCP Server
A **Model Context Protocol (MCP) server** is a standardized bundle of
tools that an agent can connect to and use. Think of it as a universal
API gateway or a service directory for LLM agents. It exposes a
collection of tools in a consistent format, so that any compatible agent
can connect to it, understand the available capabilities, and start
using them without needing custom integration for each individual tool.
While the MCP standard is still evolving, it aims to create an
interoperable ecosystem of tools for AI agents.
Common installation methods for servers providing these tools include
npm, http, and Docker.
```mermaid
graph TD
subgraph MCPServer
direction LR
T1[Tool 1]
T2[Tool 2]
T3[Tool 3]
end
A1[Agent 1] --> MCPServer;
A2[Agent 2] --> MCPServer;
A3[Agent 3] --> MCPServer;
```
BigID provides a hosted MCP server that exposes the full BigID platform — data discovery, classification, access governance, privacy, and more — as a ready-to-use tool bundle for any compatible AI agent. Continue to the next page to learn how to connect to it.
--------------------------------------------------------------------------------
# BigID Cloud MCP Server Docs
import { LinkCard, Aside } from '@astrojs/starlight/components';
The BigID Cloud MCP Server repository and documentation have moved to GitHub.
To access the latest installation instructions, prerequisites, setup guides, and troubleshooting resources, please visit our official repository:
--------------------------------------------------------------------------------
# Authentication
import { Aside, Steps, TabItem, Tabs } from '@astrojs/starlight/components';
Every API request to the Privacy Portal Admin API must be authenticated. To authorize external scripts, developer portals, or orchestration tools, you must generate a secure API key and include it in your HTTP headers.
In this tutorial, you will learn how to obtain your API key via the BigID product integration and construct the necessary authentication headers.
---
## 1. Locating the Privacy Portal Integration
When the Privacy Portal is integrated into BigID, it is accessed as a custom application.
1. **Find the Requests Menu**
By default, the Privacy Portal is accessed via the BigID integration at the following URL pattern:
```text
https:///#/customApp/69a802316d9bfbd8e1fzzb0/request-manager
```
The left-hand sidebar displays the main navigation menu with the **Requests** item selected:
2. **Transition to the Users Settings Page**
API Key settings are located in the User Settings panel. Replace `/request-manager` at the end of the URL with `/settings/users` to jump directly to this screen:
```text
https:///#/customApp/69a802316d9bfbd8e1fzzb0/settings/users
```
---
## 2. Generating Your API Key
1. **Select Your User Profile**
On the **Users Settings** screen, select the user account for which you want to generate an API key. Scroll to the bottom of their profile to find the **API Keys** section.
2. **Launch the Generation Modal**
Click the **Generate** button in the top-right corner of the **API Keys** grid.
3. **Configure Expiration and Name**
In the configuration dialog:
- **API Key Name**: Enter a descriptive name (e.g., `Orchestration-Automation-Key`).
- **API Key expires after (days)**: Set the expiration duration. The maximum limit is **`3650` days** (10 years).
Click **Generate** to proceed.
4. **Copy the Key Value Immediately**
The next dialog displays your newly generated token value.
Click the copy icon (clipboard) to copy the key immediately.
---
## 3. Authenticating Requests
To authenticate requests to the Admin API, pass your copied key in the `X-API-Key` HTTP header.
### Request Headers
```http
X-API-Key: YOUR_GENERATED_API_KEY
Content-Type: application/json
```
### Code Examples
Select your preferred language to see how to authenticate your API calls:
```python
import requests
url = "https://bigidprivacy.cloud/api/prm/my-tenant/user-profiles"
headers = {
"X-API-Key": "YOUR_API_KEY",
"Content-Type": "application/json"
}
response = requests.get(url, headers=headers)
print(response.json())
```
```javascript
const url = 'https://bigidprivacy.cloud/api/prm/my-tenant/user-profiles';
const headers = {
'X-API-Key': 'YOUR_API_KEY',
'Content-Type': 'application/json'
};
async function getUserProfiles() {
try {
const response = await fetch(url, { headers });
const data = await response.json();
console.log(data);
} catch (error) {
console.error('Error fetching user profiles:', error);
}
}
getUserProfiles();
```
--------------------------------------------------------------------------------
# Retrieve and Download Privacy Reports
import { Aside, Steps, Tabs, TabItem } from '@astrojs/starlight/components';
Once data collection, curation, and approval processes are complete, the Privacy Portal compiles all discovered personal data records into a secure report file. For Access requests, privacy professionals need to retrieve these reports programmatically to securely distribute them to customers or archive them for auditing.
In this tutorial, you will learn how to programmatically check if a report is ready and download the completed privacy report using the Admin API.
---
## 1. Verifying Request Completion
You must verify that a request's `processingStage` is **`COMPLETE`** or **`APPROVED`** before attempting to download the report file. If you query the report file endpoint for an active or open request that is still in the verification or collection phases, the server will return an error.
To check request status, use the [Retrieve and Filter Privacy Requests](/privacy-portal-api/get-requests/) endpoint to inspect the `processingStage` field:
```json
{
"id": "req_841203",
"status": "APPROVED",
"processingStage": "COMPLETE"
}
```
---
## 2. Retrieving the Report File
To download the compiled personal data report, execute a `GET` request against the report file endpoint.
### HTTP Endpoint
```http
GET /api/prm/{tenant}/requests/{requestId}/report/file
```
### Path Parameters
| Parameter | Type | Required | Description |
| :--- | :--- | :--- | :--- |
| **`tenant`** | String | Yes | Your organization's tenant slug. |
| **`requestId`** | String | Yes | The ID of the completed request (e.g., `req_841203`). |
### Request Headers
Include your programmatically generated key in the `X-API-Key` header (refer to the [Authentication Guide](/privacy-portal-api/authentication/) on how to obtain this key):
```http
X-API-Key:
Accept: application/octet-stream
```
---
## 3. Code Examples
Select your preferred language to see how to download and stream compiled report zip files programmatically:
```python
import requests
url = "https://bigidprivacy.cloud/api/prm/my-tenant/requests/req_841203/report/file"
headers = {
"X-API-Key": "YOUR_API_KEY",
"Accept": "application/octet-stream"
}
print("Retrieving report for request req_841203...")
response = requests.get(url, headers=headers, stream=True)
if response.status_code == 200:
with open("user_results_bundle.zip", "wb") as f:
for chunk in response.iter_content(chunk_size=8192):
f.write(chunk)
print("Report downloaded successfully and saved as user_results_bundle.zip")
elif response.status_code == 403:
print("Error: Request is not in a completed stage. Report is not ready.")
else:
print(f"Failed to download report. HTTP Status: {response.status_code}")
```
```javascript
const fs = require('fs');
const { Readable } = require('stream');
const url = 'https://bigidprivacy.cloud/api/prm/my-tenant/requests/req_841203/report/file';
const headers = {
'X-API-Key': 'YOUR_API_KEY',
'Accept': 'application/octet-stream'
};
async function downloadPrivacyReport(outputPath) {
try {
console.log('Retrieving report for request req_841203...');
const response = await fetch(url, { headers });
if (!response.ok) {
if (response.status === 403) {
console.error('Error: Request is not in a completed stage. Report is not ready.');
} else {
console.error(`Failed to download report. HTTP Status: ${response.status}`);
}
return;
}
const fileStream = fs.createWriteStream(outputPath);
const nodeStream = Readable.fromWeb(response.body);
nodeStream.pipe(fileStream);
fileStream.on('finish', () => {
console.log(`Report downloaded successfully and saved to: ${outputPath}`);
});
} catch (error) {
console.error('Failed to download report:', error);
}
}
downloadPrivacyReport('user_results_bundle.zip');
```
---
## Handling Common Errors
If you attempt to retrieve the report of a request that has not been approved or is still active, the server will block the download.
**Response (`403 Forbidden`):**
```json
{
"message": "The privacy report for request req_841203 is not compiled yet.",
"status": 403
}
```
**Response (`404 Not Found`):**
If no files or reports were compiled for this request:
```json
{
"message": "Report file not found for request req_841203",
"status": 404
}
```
--------------------------------------------------------------------------------
# Retrieve and Filter Privacy Requests
import { Aside, Steps, Tabs, TabItem } from '@astrojs/starlight/components';
To automate privacy operations, privacy engineers and DPOs often need to continuously poll for new data subject rights requests (DSARs, Deletion, or Opt-Outs). This allows external orchestration engines to trigger scans or notify downstream databases.
In this tutorial, you will learn how to programmatically search, filter, and retrieve incoming privacy requests using the Privacy Portal Admin API.
---
## 1. Navigating the UI for Context
Before writing search scripts, you can locate the request ID, status, and processing stage in the custom application interface within BigID. Under the **Requests** sidebar menu, you will see a live grid of all requests and their current processing status (e.g., `VERIFY`, `COLLECT`, `APPROVE`, `COMPLETE`).
---
## 2. Searching Requests via API
To retrieve user requests programmatically, perform a `POST` request to the search endpoint. Filtering options are passed in the request body, allowing you to build complex search queries.
### HTTP Endpoint
```http
POST /api/prm/{tenant}/requests/search
```
### Request Headers
Ensure you include your admin API key in the `X-API-Key` header (refer to the [Authentication Guide](/privacy-portal-api/authentication/) on how to obtain this key):
```http
X-API-Key:
Content-Type: application/json
```
### Request Body Parameters
The search body accepts a `FindRequestsOptionsDto` JSON object:
* **`filters`** *(array)*: A list of search filter criteria objects.
* **`name`** *(string)*: The field to filter on (e.g., `status`, `type`, `processingStage`).
* **`values`** *(array of strings)*: Values to match against the filtered field.
* **`limit`** *(query integer)*: Maximum number of records to return (defaults to `10`).
* **`skip`** *(query integer)*: Number of records to skip for pagination (defaults to `0`).
* **`showAttributes`** *(boolean)*: Set to `true` to include consumer attribute fields in the returned dataset.
---
## 3. Code Examples
Select your preferred language to see how to search and filter requests via the Admin API:
```python
import requests
url = "https://bigidprivacy.cloud/api/prm/my-tenant/requests/search?limit=5"
headers = {
"X-API-Key": "YOUR_API_KEY",
"Content-Type": "application/json"
}
payload = {
"filters": [
{
"name": "status",
"values": ["SUBMITTED"]
}
],
"showAttributes": True
}
response = requests.post(url, headers=headers, json=payload)
print(response.json())
```
```javascript
const url = 'https://bigidprivacy.cloud/api/prm/my-tenant/requests/search?limit=5';
const headers = {
'X-API-Key': 'YOUR_API_KEY',
'Content-Type': 'application/json'
};
const payload = {
filters: [
{
name: 'status',
values: ['SUBMITTED']
}
],
showAttributes: true
};
async function searchRequests() {
try {
const response = await fetch(url, {
method: 'POST',
headers: headers,
body: JSON.stringify(payload)
});
const data = await response.json();
console.log(data);
} catch (error) {
console.error('Error searching requests:', error);
}
}
searchRequests();
```
---
## 4. Understanding the Response
The API returns a `PagingResponseDtoUserRequestDto` object containing a list of matching requests.
**Response (`200 OK`):**
```json
{
"data": [
{
"id": "req_841203",
"originalRequestId": "ext_9831a28d",
"type": "ACCESS",
"requestKey": "alex.bulis@gmail.com",
"requestKeyType": "EMAIL",
"userType": "CUSTOMER",
"dueDays": 29,
"dueDate": "2026-09-11T14:32:00.000Z",
"status": "SUBMITTED",
"processingStage": "VERIFY",
"regulation": "CCPA",
"closed": false,
"processingStartDate": "2026-08-12T10:00:00.000Z",
"issueDate": "2026-08-12T10:00:00.000Z"
}
]
}
```
### Key Response Fields to Parse
| Field Name | Type | Description |
| :--- | :--- | :--- |
| **`id`** | String | The unique identifier of the request in the Privacy Portal. |
| **`type`** | String | The request action type (`ACCESS`, `DELETE`, `OPT_OUT`, etc.). |
| **`requestKey`** | String | The primary identity lookup key used by the data subject (e.g., email or phone). |
| **`processingStage`** | String | The active workflow step (`VERIFY`, `COLLECT`, `REVIEW`, `CONFIRM`, `APPROVE`, `COMPLETE`). |
| **`dueDate`** | String | ISO 8601 date indicating when compliance must be achieved under the specified regulation. |
---
## Error Handling
If your API key is invalid or your session has expired, the API will respond with:
**Response (`401 Unauthorized`):**
```json
{
"message": "Neither valid API Key nor Authentication cookie is present",
"status": 401
}
```
--------------------------------------------------------------------------------
# Programmatically Validate and Verify Requests
import { Aside, Steps, Tabs, TabItem } from '@astrojs/starlight/components';
When a data subject submits a privacy request (such as an Access or Deletion request), regulations require organizations to verify the requestor's identity before retrieving or deleting personal data. This initial screening stage is referred to as the **Verification Stage** (`VERIFY`).
In this tutorial, you will learn how to programmatically validate a consumer's identity and transition a request from the verification stage to the data collection stage (`COLLECT`) using the Admin API.
---
## 1. The Verification Lifecycle
By default, newly submitted requests start in the **`VERIFY`** processing stage. Until the identity of the requestor is verified:
1. Data collection scanning is blocked to prevent accidental exposure of personal data.
2. Compliance timers (`dueDays`) continue to count down.
Once you have verified the identity out-of-band or via an external IDP, you invoke the `verify` action API to transition the request's `processingStage` to **`COLLECT`**.
---
## 2. Triggering Programmatic Verification
To verify a request, issue a `POST` request to the verification action endpoint.
### HTTP Endpoint
```http
POST /api/prm/{tenant}/requests/{requestId}/stages/verify/actions/verify
```
### Path Parameters
| Parameter | Type | Required | Description |
| :--- | :--- | :--- | :--- |
| **`tenant`** | String | Yes | Your organization's tenant slug. |
| **`requestId`** | String | Yes | The ID of the request to be verified (e.g., `req_841203`). |
### Request Headers
Pass your administrative API key in the `X-API-Key` header (refer to the [Authentication Guide](/privacy-portal-api/authentication/) on how to generate this key):
```http
X-API-Key:
Content-Type: application/json
```
### Request Body
The API does not require a complex payload for verification. You pass an empty JSON object:
```json
{}
```
---
## 3. Code Examples
Select your preferred language to see how to programmatically verify a request via the Admin API:
```python
import requests
url = "https://bigidprivacy.cloud/api/prm/my-tenant/requests/req_841203/stages/verify/actions/verify"
headers = {
"X-API-Key": "YOUR_API_KEY",
"Content-Type": "application/json"
}
response = requests.post(url, headers=headers, json={})
print(response.json())
```
```javascript
const url = 'https://bigidprivacy.cloud/api/prm/my-tenant/requests/req_841203/stages/verify/actions/verify';
const headers = {
'X-API-Key': 'YOUR_API_KEY',
'Content-Type': 'application/json'
};
async function verifyRequest() {
try {
const response = await fetch(url, {
method: 'POST',
headers: headers,
body: JSON.stringify({})
});
const data = await response.json();
console.log(data);
} catch (error) {
console.error('Error verifying request:', error);
}
}
verifyRequest();
```
**Response (`200 OK`):**
The API responds with a successful transition message, reflecting that the request has now entered the next stage.
```json
{
"requestId": "req_841203",
"action": "verify",
"status": "SUCCESS",
"newProcessingStage": "COLLECT",
"timestamp": "2026-08-12T14:48:00.000Z"
}
```
---
## 4. Verifying via an External Agent (Alternate)
If verification is performed by a dedicated validation script acting as an agent, you can also log the agent's meta-information by targeting the `verify-agent` endpoint:
```http
POST /api/prm/{tenant}/requests/{requestId}/stages/verify/actions/verify-agent
```
**Request Payload:**
```json
{
"agentName": "OktaIDV-Automation",
"verificationScore": 98,
"transactionId": "tx_abc123789"
}
```
---
## Handling Common Errors
If you attempt to verify a request that has already been verified or is not in the `VERIFY` stage, the server will block the transition.
**Response (`403 Forbidden`):**
```json
{
"message": "User has insufficient permissions or request is not in VERIFY stage",
"status": 403
}
```
**Response (`404 Not Found`):**
If the `requestId` does not exist or the `tenant` is misspelled:
```json
{
"message": "Request req_841203 not found",
"status": 404
}
```

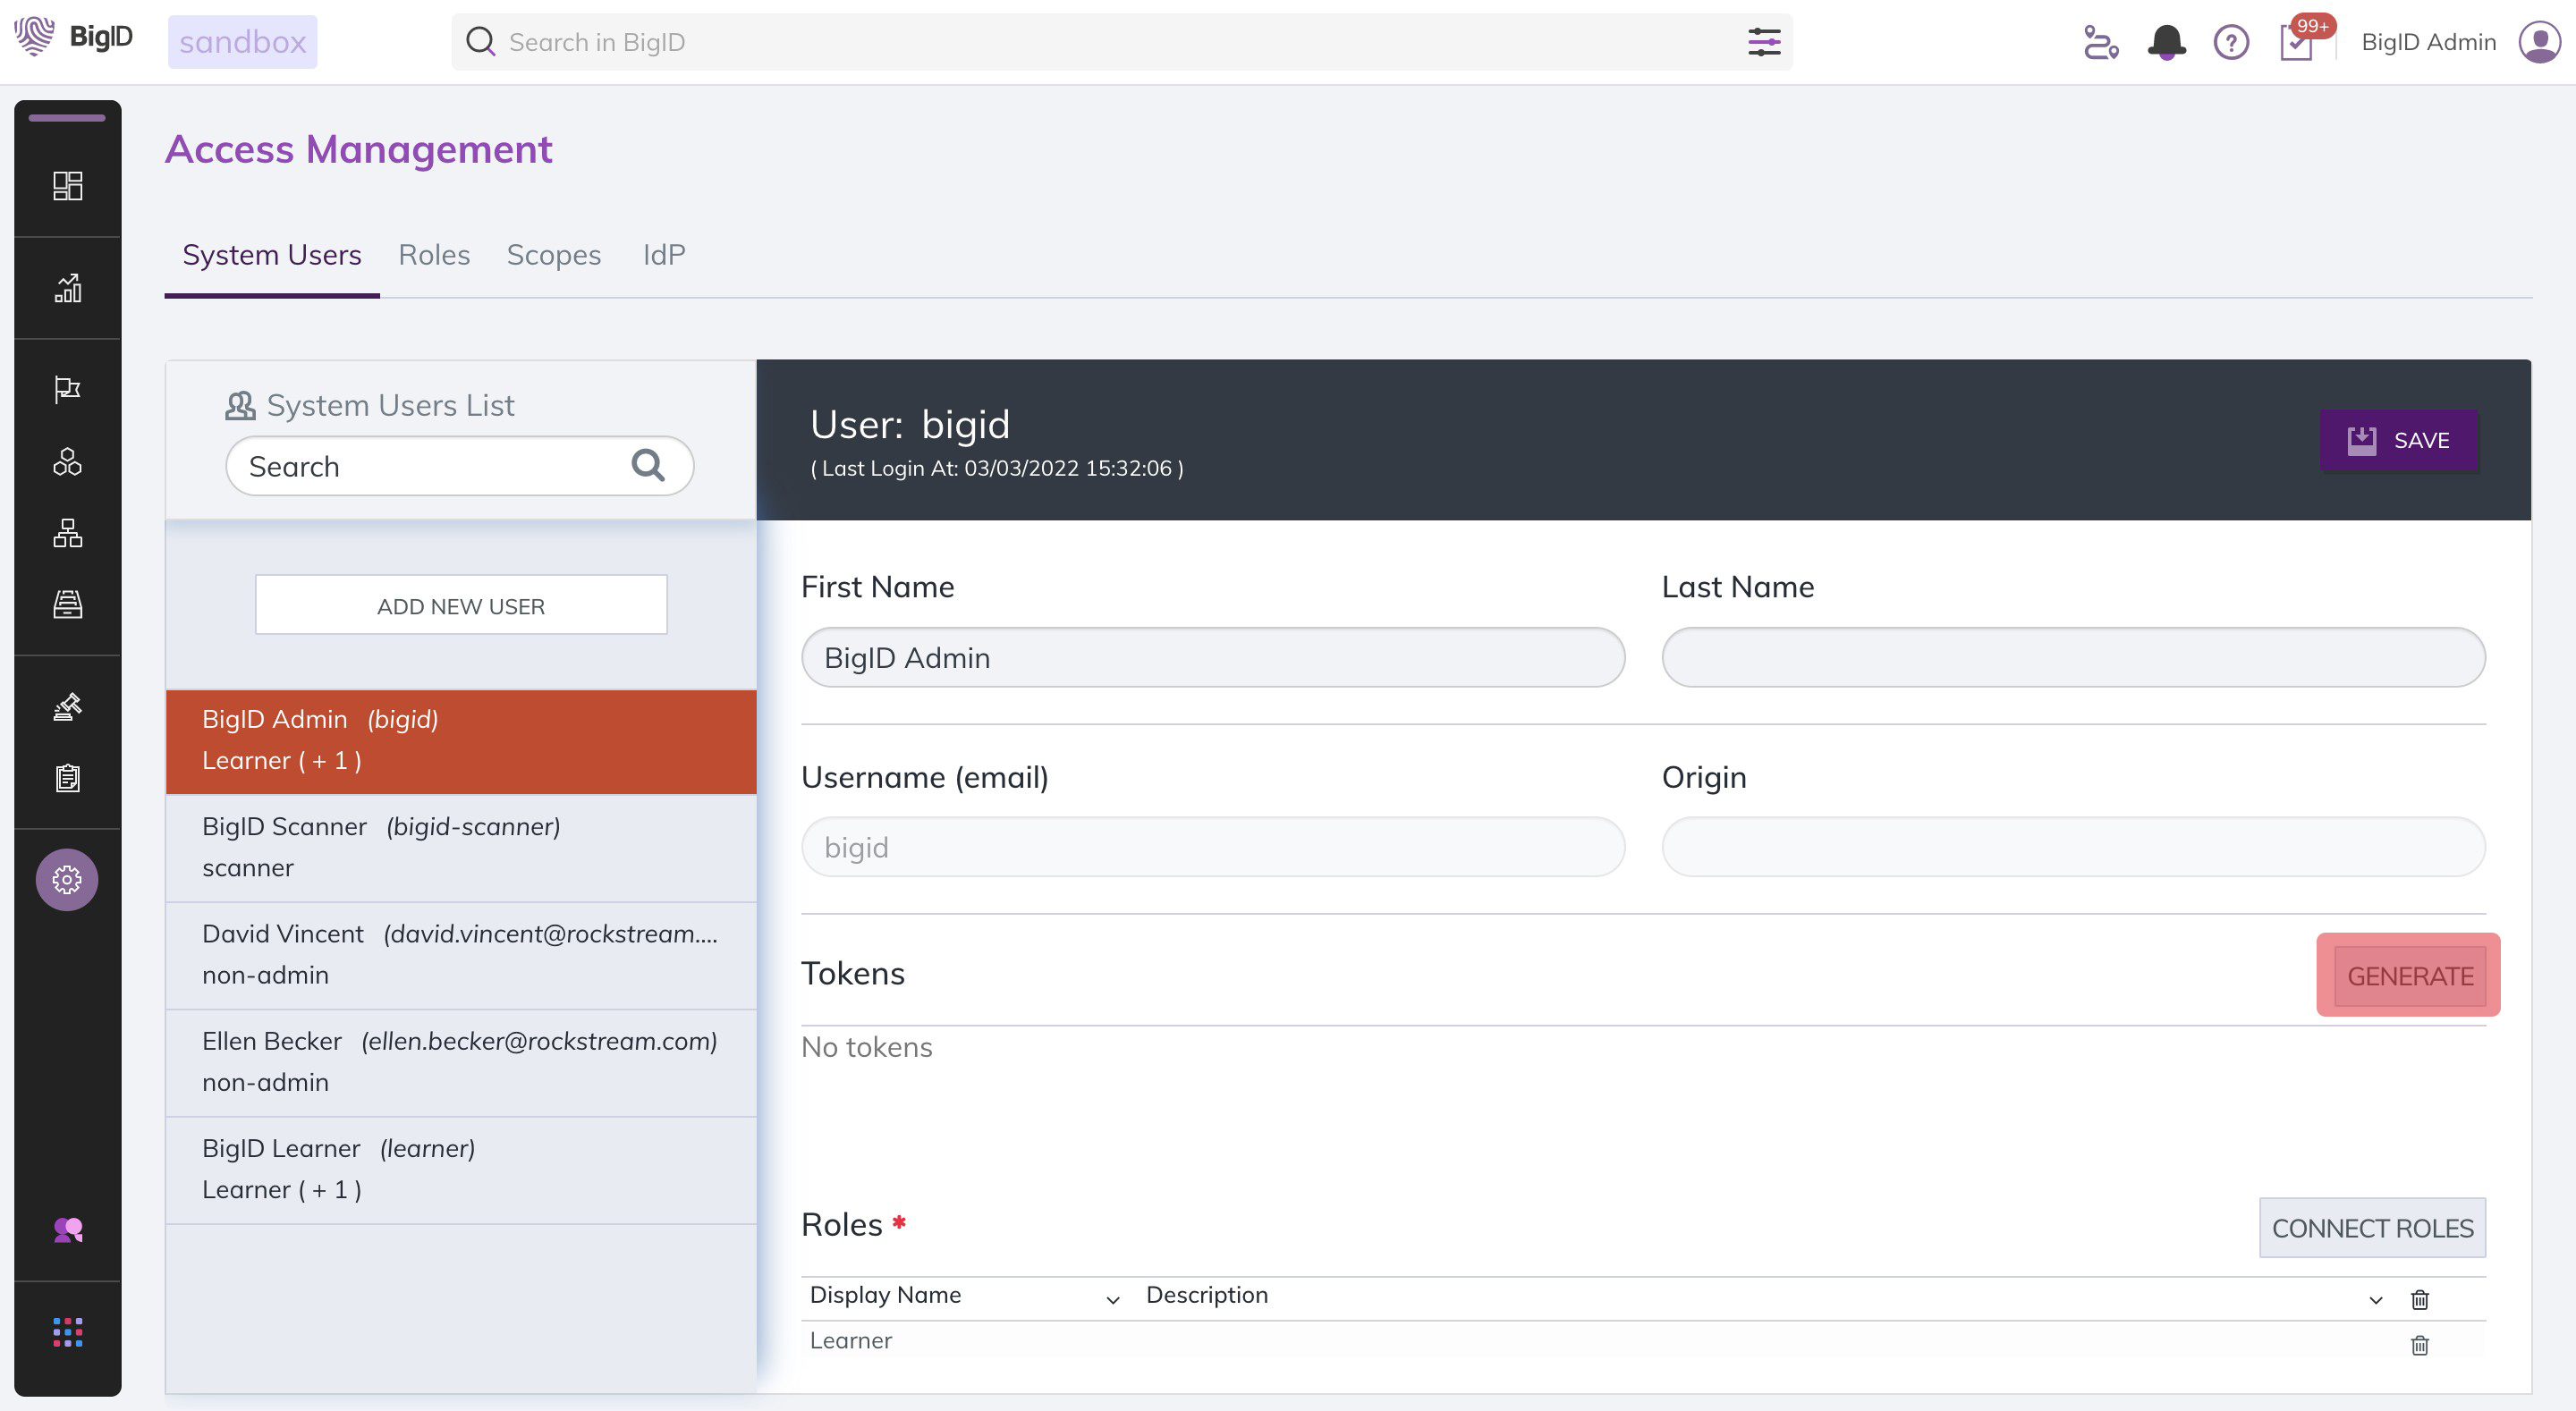 Tokens can only be valid for up to 999 days. Since we're just using this
token for testing, let's set it to 30 days and then click
Generate like in the screenshot below.
Tokens can only be valid for up to 999 days. Since we're just using this
token for testing, let's set it to 30 days and then click
Generate like in the screenshot below.
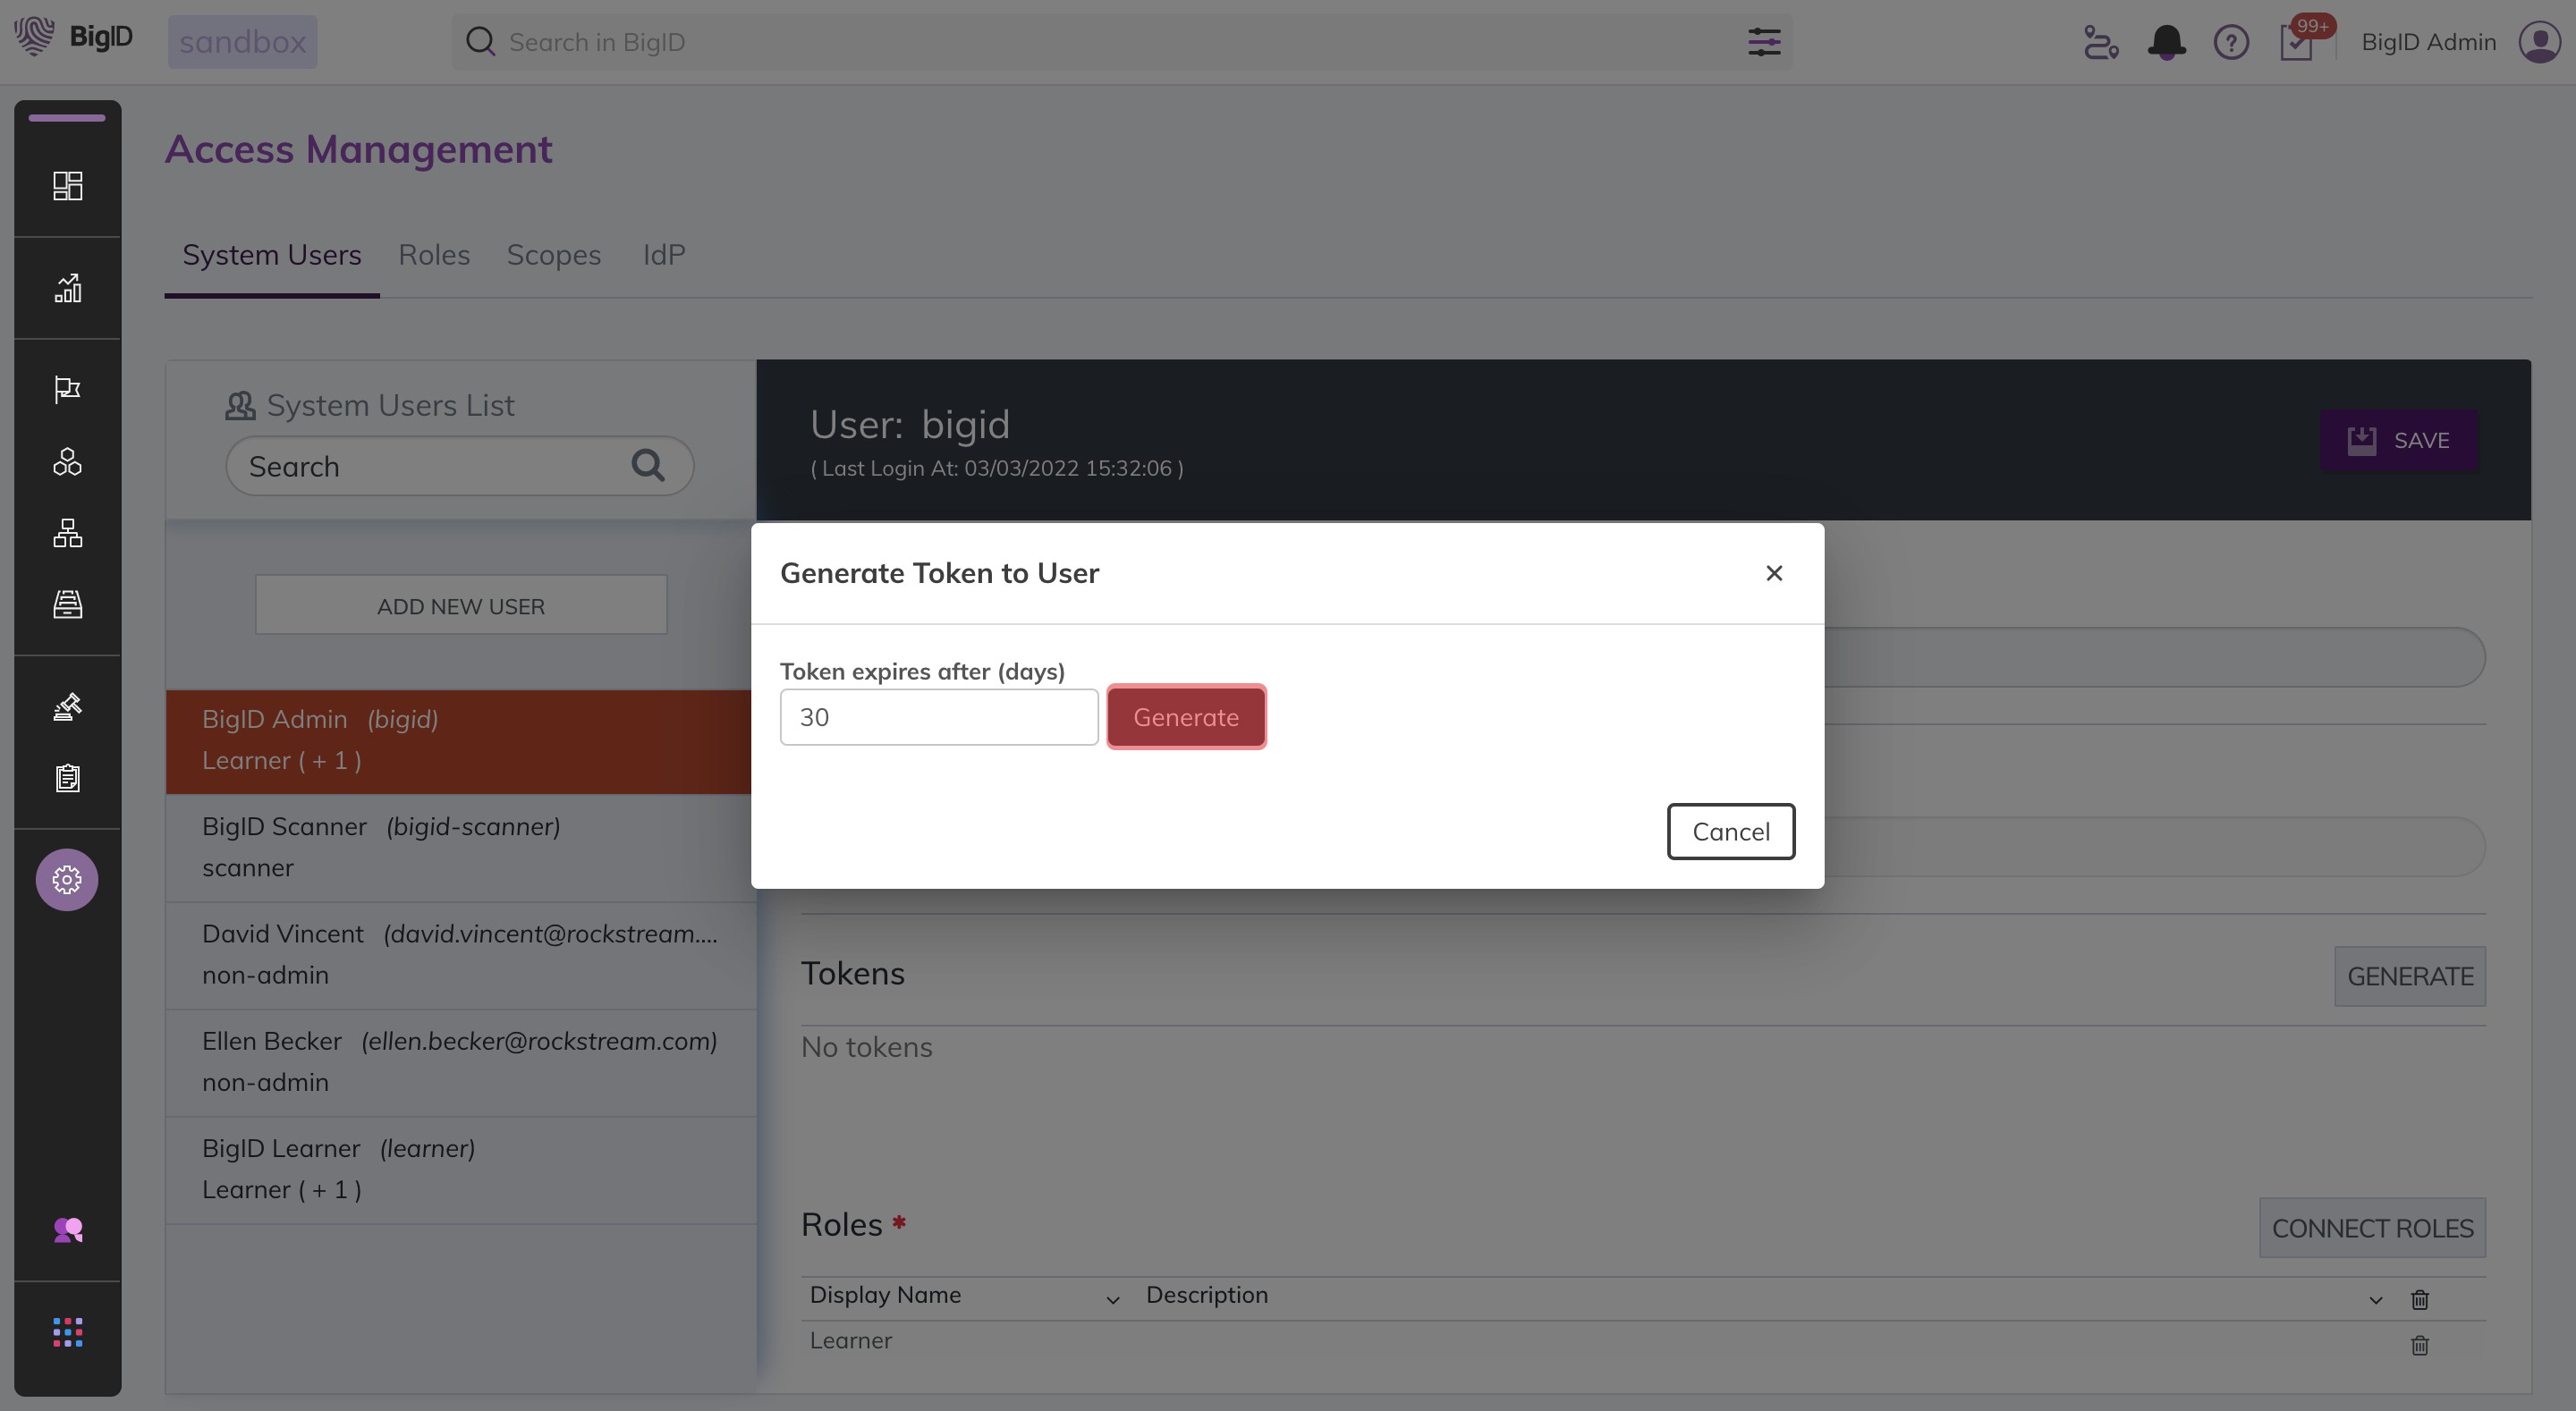 On the next screen you'll see a name for the token as well as the token
value. Copy the token value by clicking the icon to the right of it then
close the dialog. You can't see the token value again so be sure you
have saved it someplace safe.
On the next screen you'll see a name for the token as well as the token
value. Copy the token value by clicking the icon to the right of it then
close the dialog. You can't see the token value again so be sure you
have saved it someplace safe.
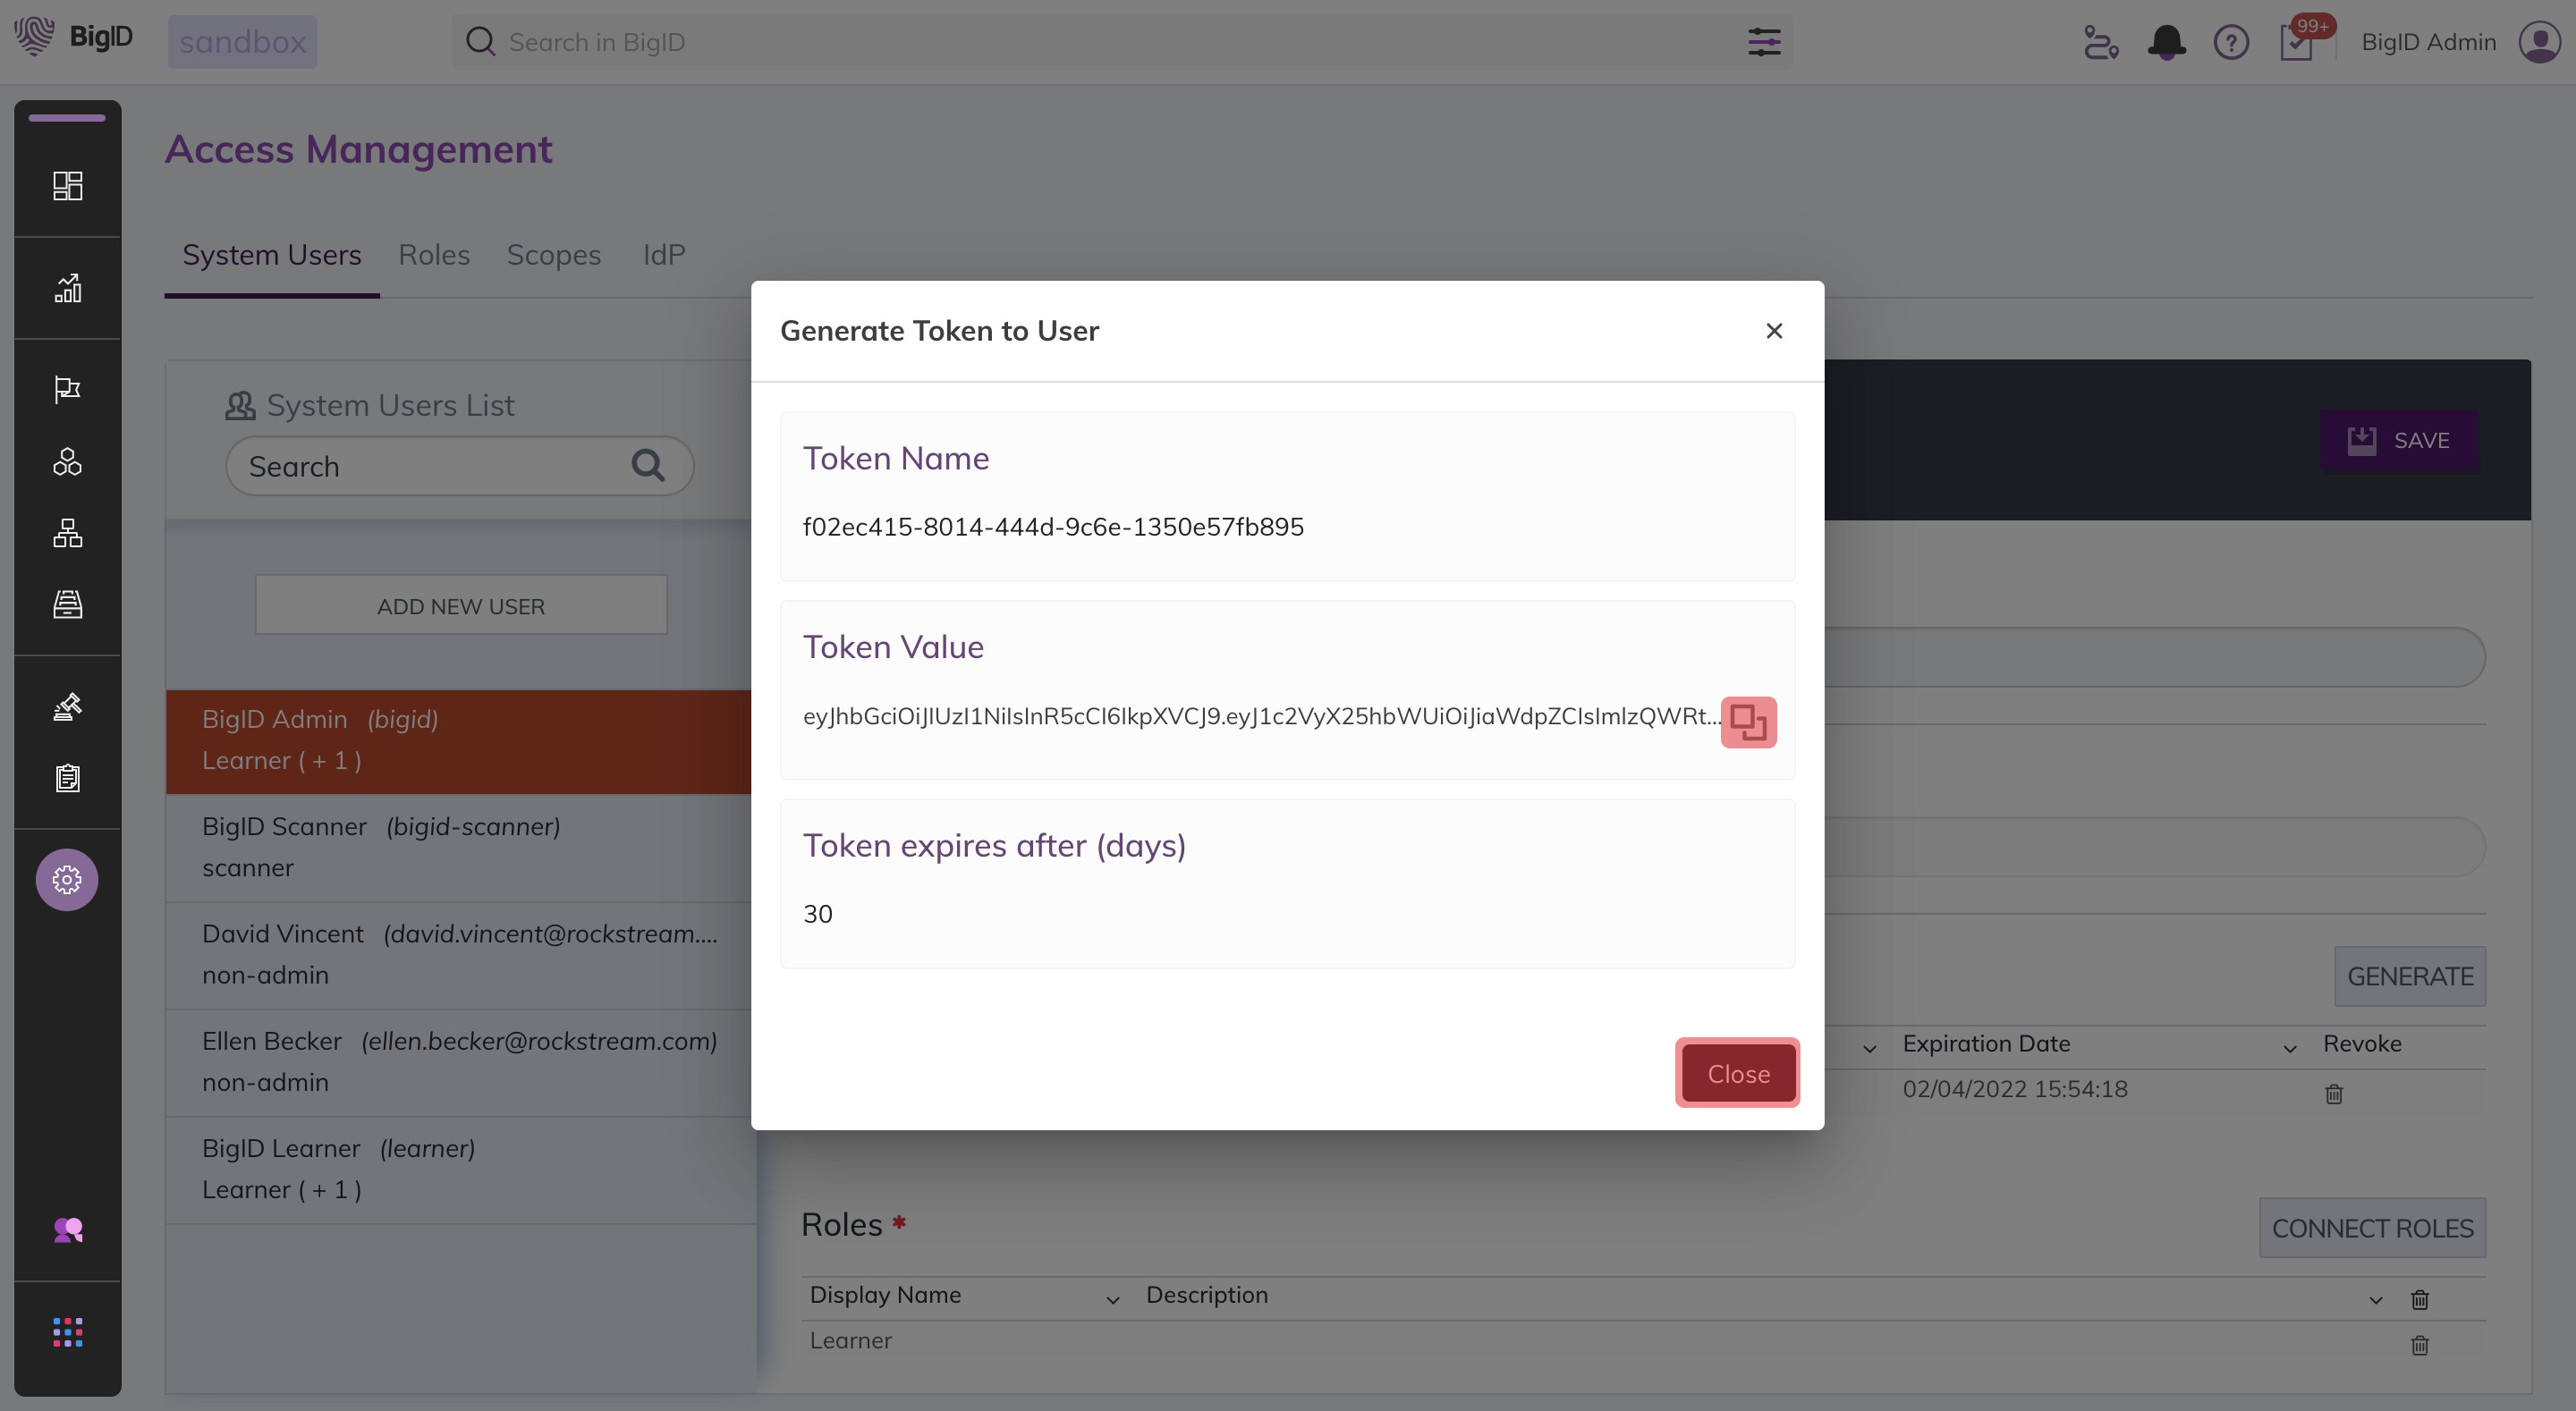 Finally, save the user so the token can take effect.
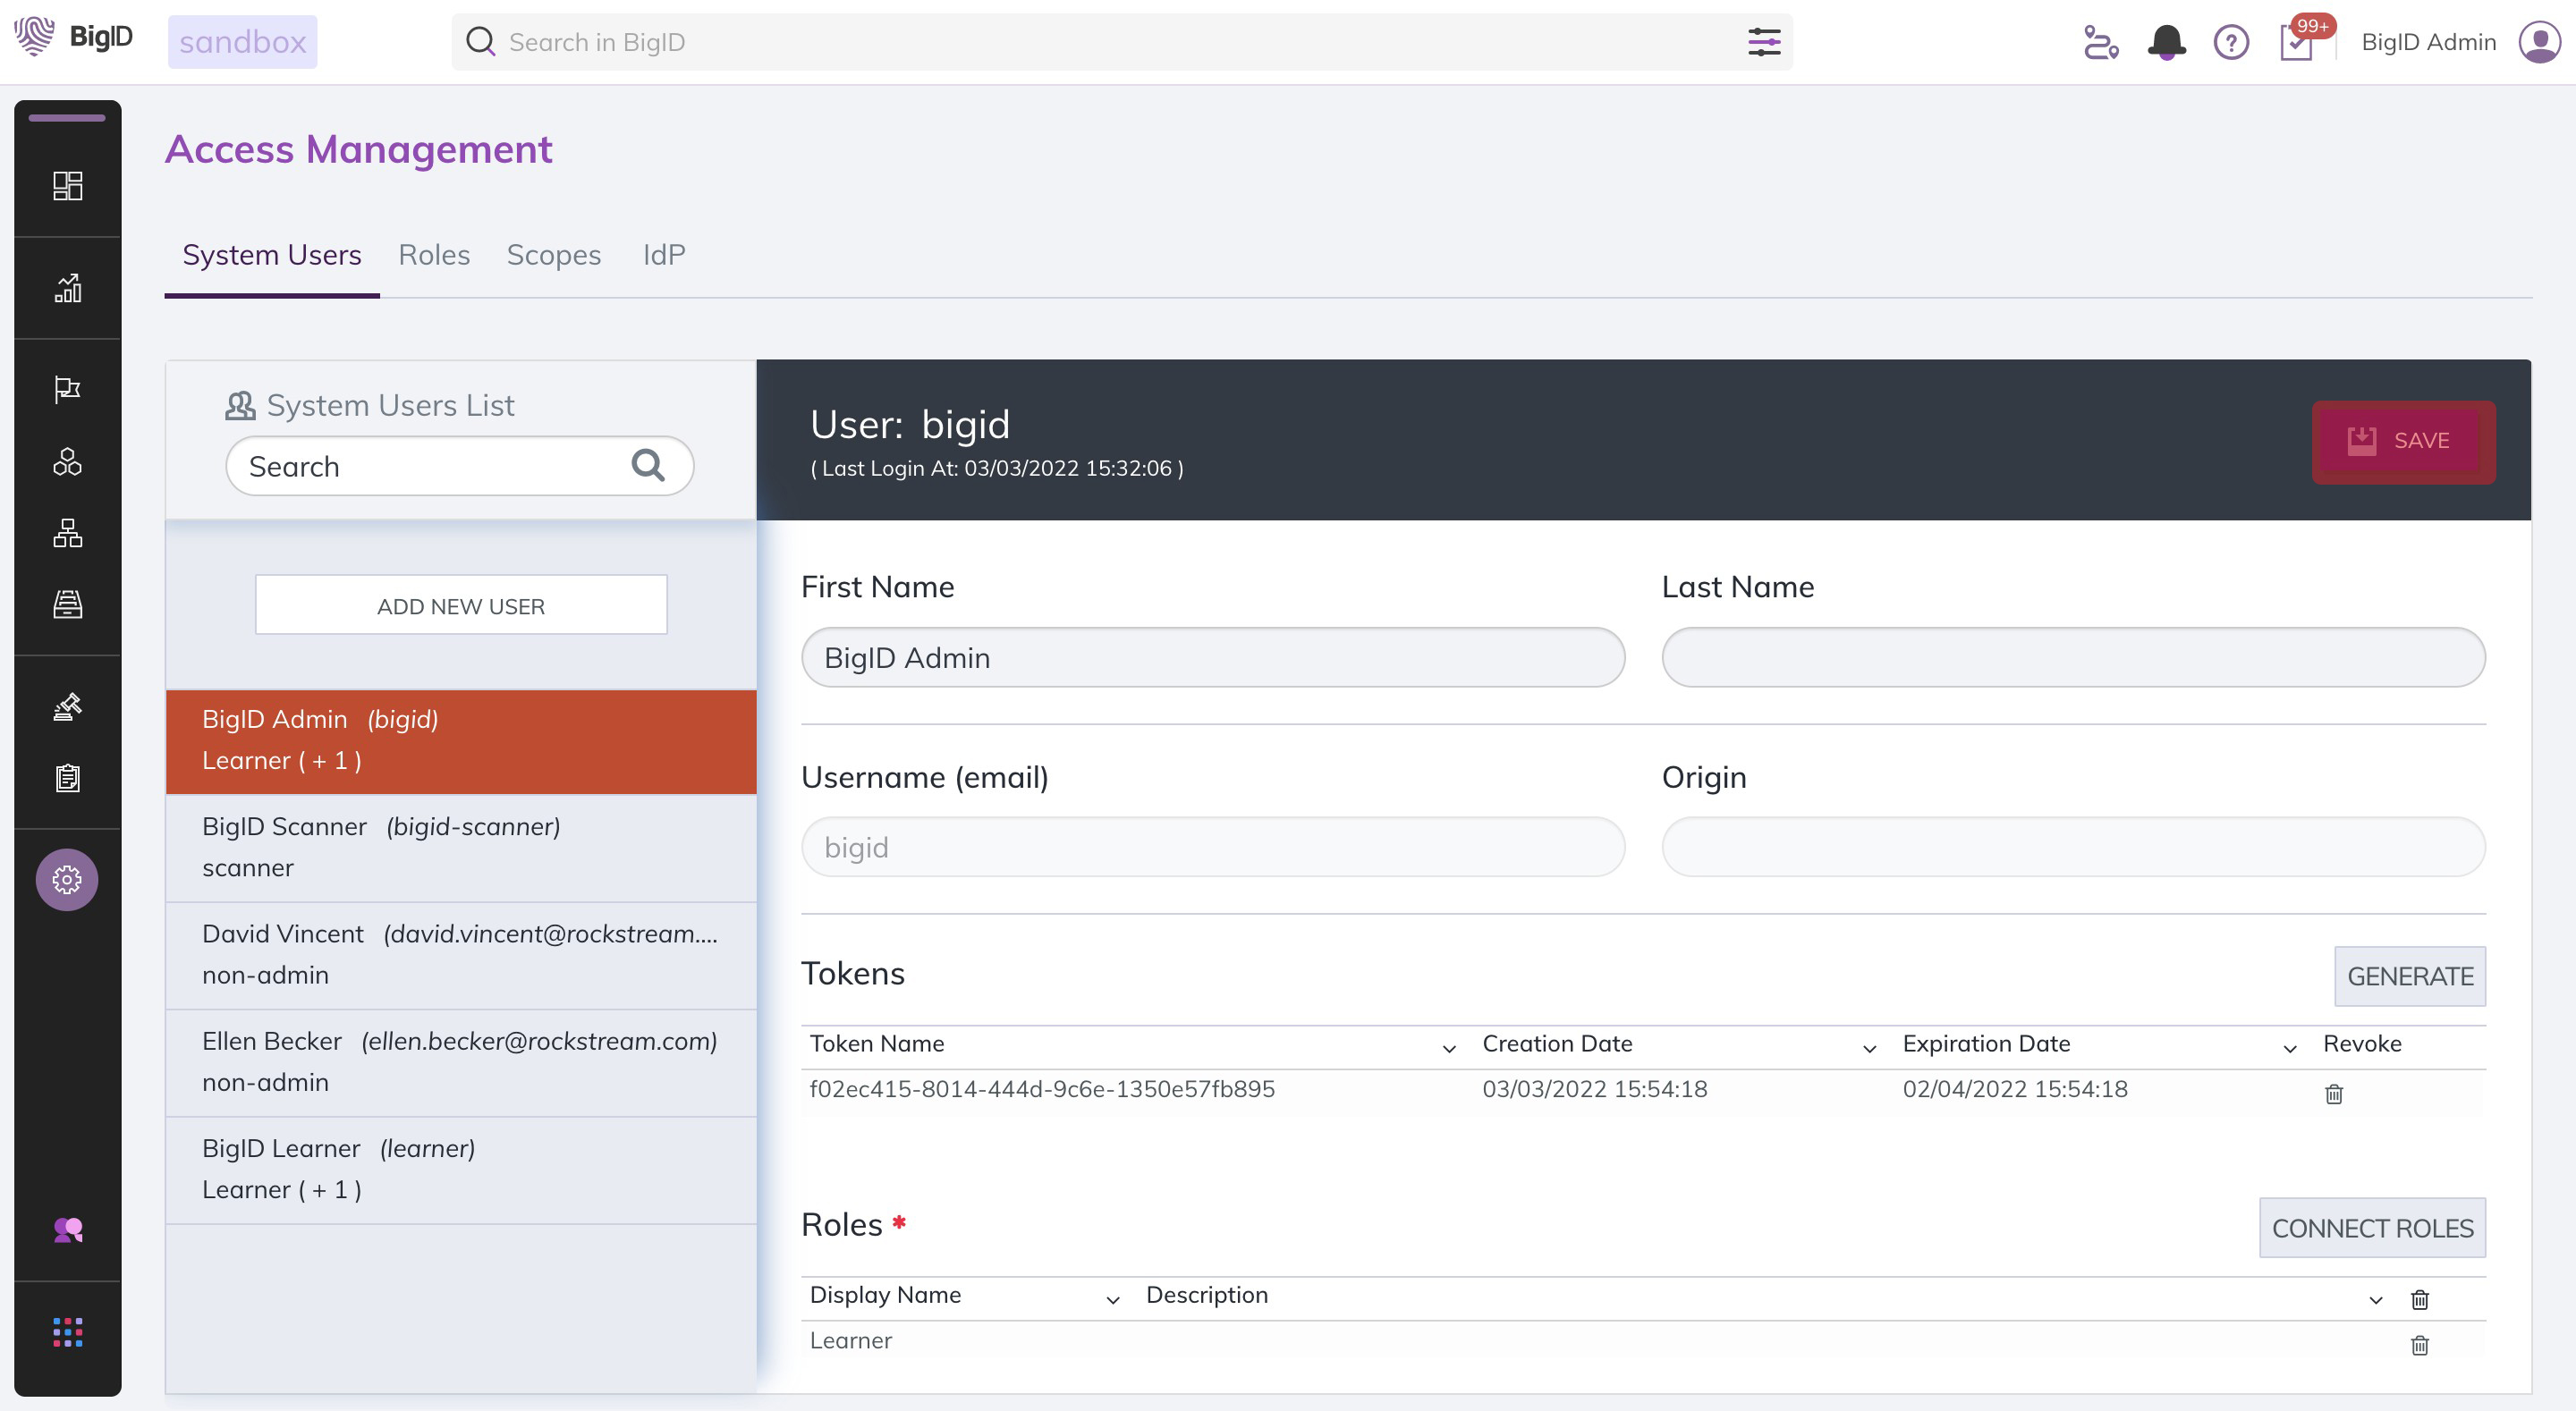 import SandboxAction from "../../../components/SandboxAction";
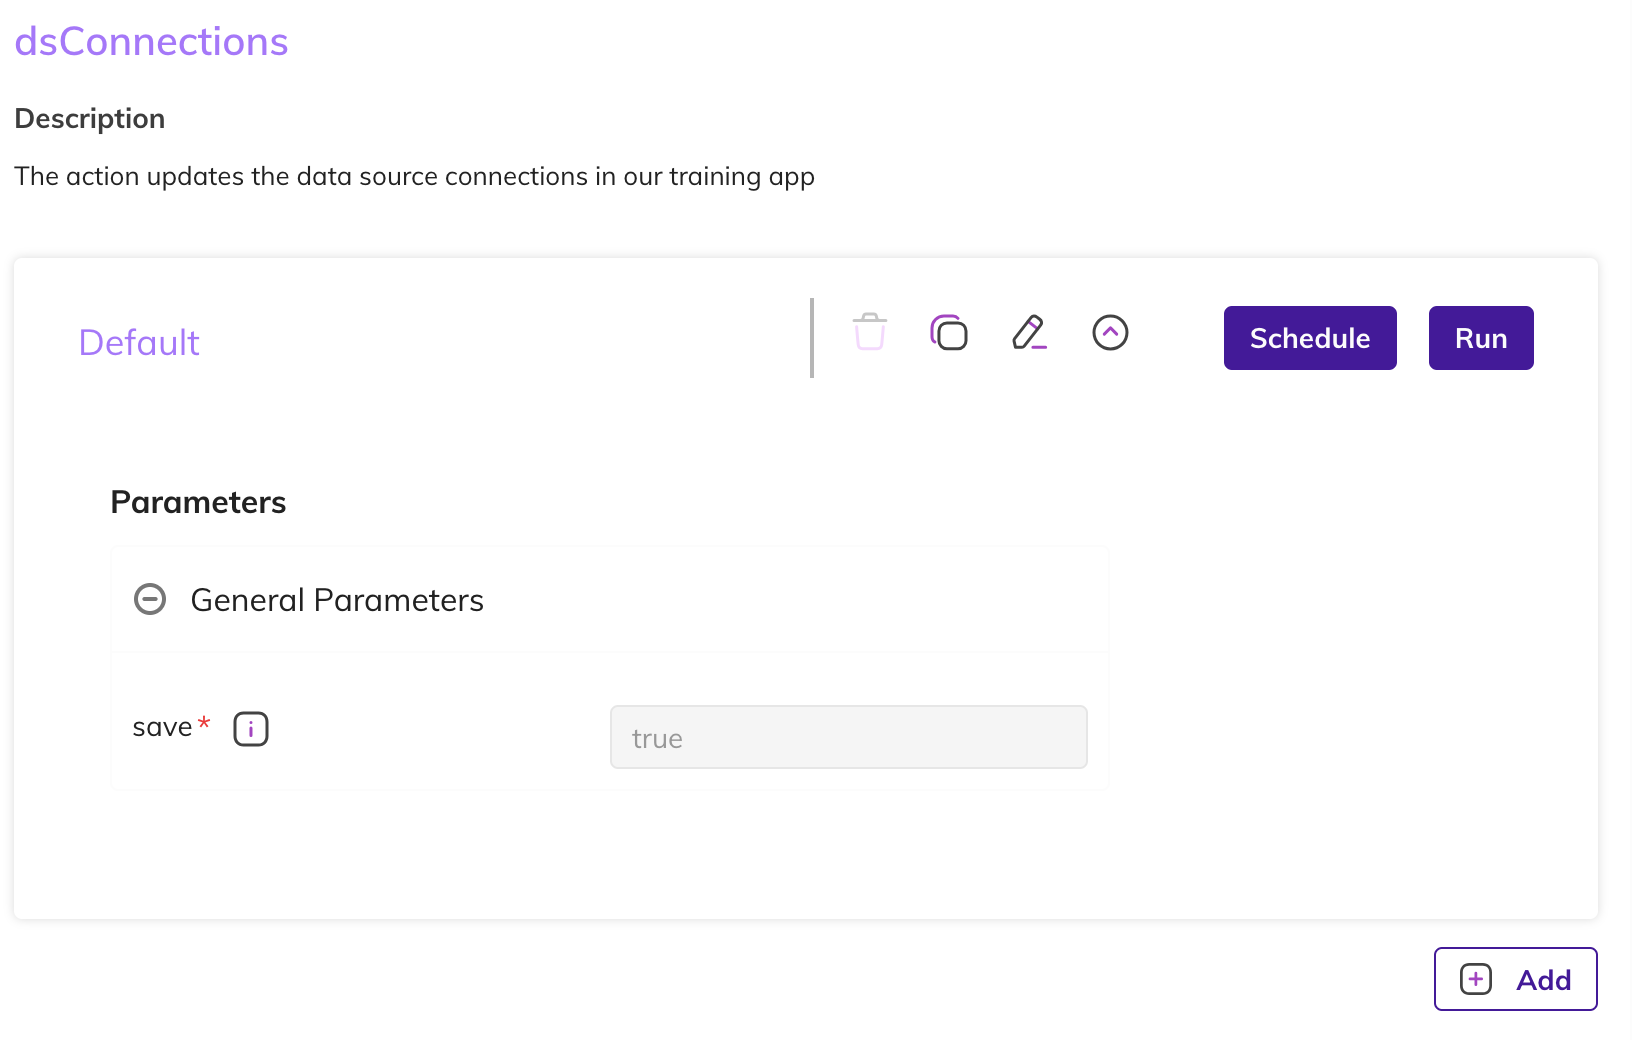 Actions can have multiple configurations and schedules. For instance,
someone can run your action once a week with settings to modify all data
sources and once a day to modify a specific data source.
## Exercise: Defining App Actions
Actions can have multiple configurations and schedules. For instance,
someone can run your action once a week with settings to modify all data
sources and once a day to modify a specific data source.
## Exercise: Defining App Actions
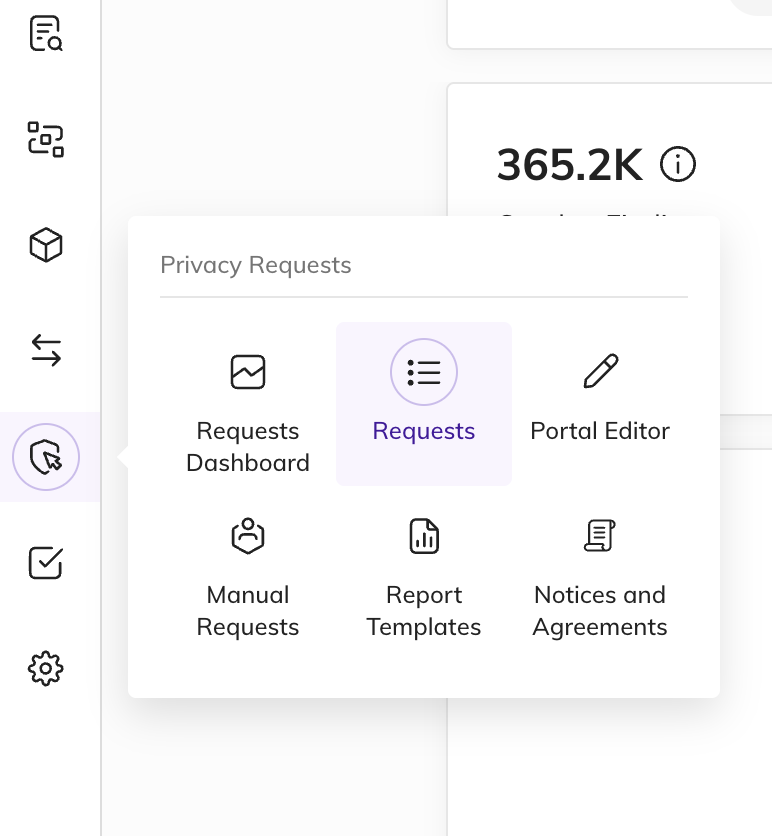 2. **Transition to the Users Settings Page**
API Key settings are located in the User Settings panel. Replace `/request-manager` at the end of the URL with `/settings/users` to jump directly to this screen:
```text
https://
2. **Transition to the Users Settings Page**
API Key settings are located in the User Settings panel. Replace `/request-manager` at the end of the URL with `/settings/users` to jump directly to this screen:
```text
https://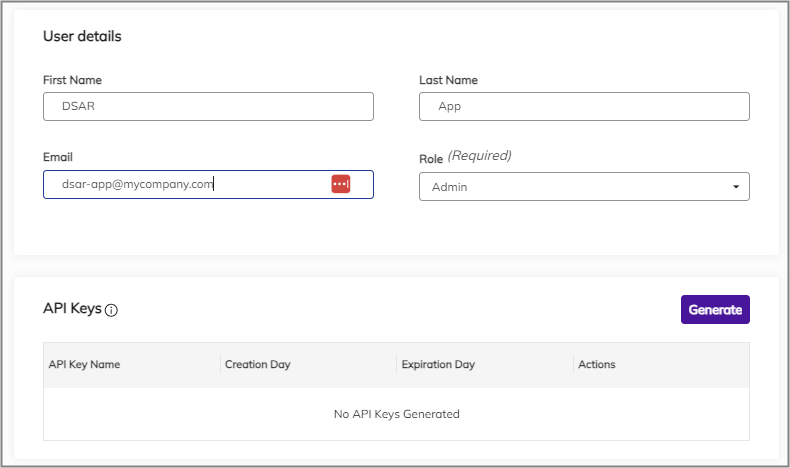 2. **Launch the Generation Modal**
Click the **Generate** button in the top-right corner of the **API Keys** grid.
2. **Launch the Generation Modal**
Click the **Generate** button in the top-right corner of the **API Keys** grid.
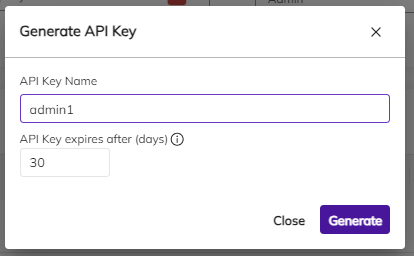 3. **Configure Expiration and Name**
In the configuration dialog:
- **API Key Name**: Enter a descriptive name (e.g., `Orchestration-Automation-Key`).
- **API Key expires after (days)**: Set the expiration duration. The maximum limit is **`3650` days** (10 years).
Click **Generate** to proceed.
4. **Copy the Key Value Immediately**
The next dialog displays your newly generated token value.
3. **Configure Expiration and Name**
In the configuration dialog:
- **API Key Name**: Enter a descriptive name (e.g., `Orchestration-Automation-Key`).
- **API Key expires after (days)**: Set the expiration duration. The maximum limit is **`3650` days** (10 years).
Click **Generate** to proceed.
4. **Copy the Key Value Immediately**
The next dialog displays your newly generated token value.
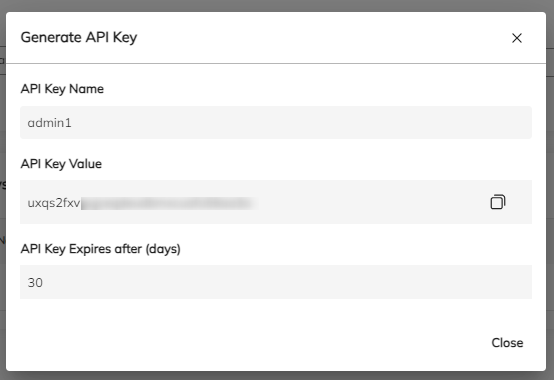 Click the copy icon (clipboard) to copy the key immediately.